How to set up LM Studio: GPU offload, developer mode and your first local model
Turn a gaming GPU into a working local AI model with LM Studio - free, no billing, no API key. In today's guide, we install it, point it at the GPU, download a first model, and then go through the settings: GPU offload, context length, Flash Attention, temperature and top-k, and the Developer mode that unlocks them.
If you have got a half-decent gaming GPU sitting in your PC, you are one download away from running your own AI model on it - no subscription, no API key, no data leaving your machine. LM Studio was my introduction to running local models, first on an RTX 3090 and then on a six-GPU server I called Hopper, and it is still the guide I hand to anyone dipping a toe in for the first time. It is free, it runs on Windows, Mac and Linux, and it walks you from an empty screen to a model answering questions in under half an hour.
My favourite thing about it, and the reason I still point people at it, is that the model search recommends models it knows will fit in your VRAM, so you can download something, try it, tune it a little, play with the context window, and start learning what top-k is and what temperature Qwen wants without ever having to build a harness of your own. I have since moved my own production work onto vLLM, because I felt ready for it, and I will show you that ladder at the end. LM Studio is the first rung, and for most people it is the only one they will need for a good while.
Quick Navigation
Why run a model on your own machine
What you need
Install LM Studio
Point it at your GPU
Download your first model
Load it into memory
Chat with it
The settings to learn first
Turn it into an API
Going bigger: more than one GPU
The next rungs
Why run a model on your own machine
A local model (one that runs entirely on your own hardware, with no calls out to a cloud API) buys you three things the subscription services cannot. Your prompts never leave the room, which matters the moment you are pasting in anything you would not email to a stranger. It keeps working when your internet does not. And it costs nothing per token, so you can throw a thousand messages at it in an afternoon and the bill is whatever your electricity meter says.
One caveat before you start: once a model is downloaded, the chat and the local server run fully offline, but the model search, the downloads themselves, and the runtime updates all need a connection (see the offline notes at lmstudio.ai/docs). So the initial setup is an online job, even though the model itself will run without a connection once it is downloaded.
What you need
The published floor from LM Studio's own docs is modest. On Windows it is a GPU with 4GB or more of dedicated VRAM (video memory soldered onto your graphics card - the hard ceiling on how big a model you can hold) and 16GB or more of system RAM, on an x64 chip with AVX2 or one of the ARM Snapdragon X Elite laptops. A Mac needs Apple Silicon and macOS 14 or newer - Intel Macs are not supported at all, which catches people out. Linux gets an AppImage or a .deb on Ubuntu 20.04 or newer, x64 or ARM64. A mid-range gaming card clears the Windows floor easily. You do not need a rig like mine to start, and mine is overkill for anything in this guide.
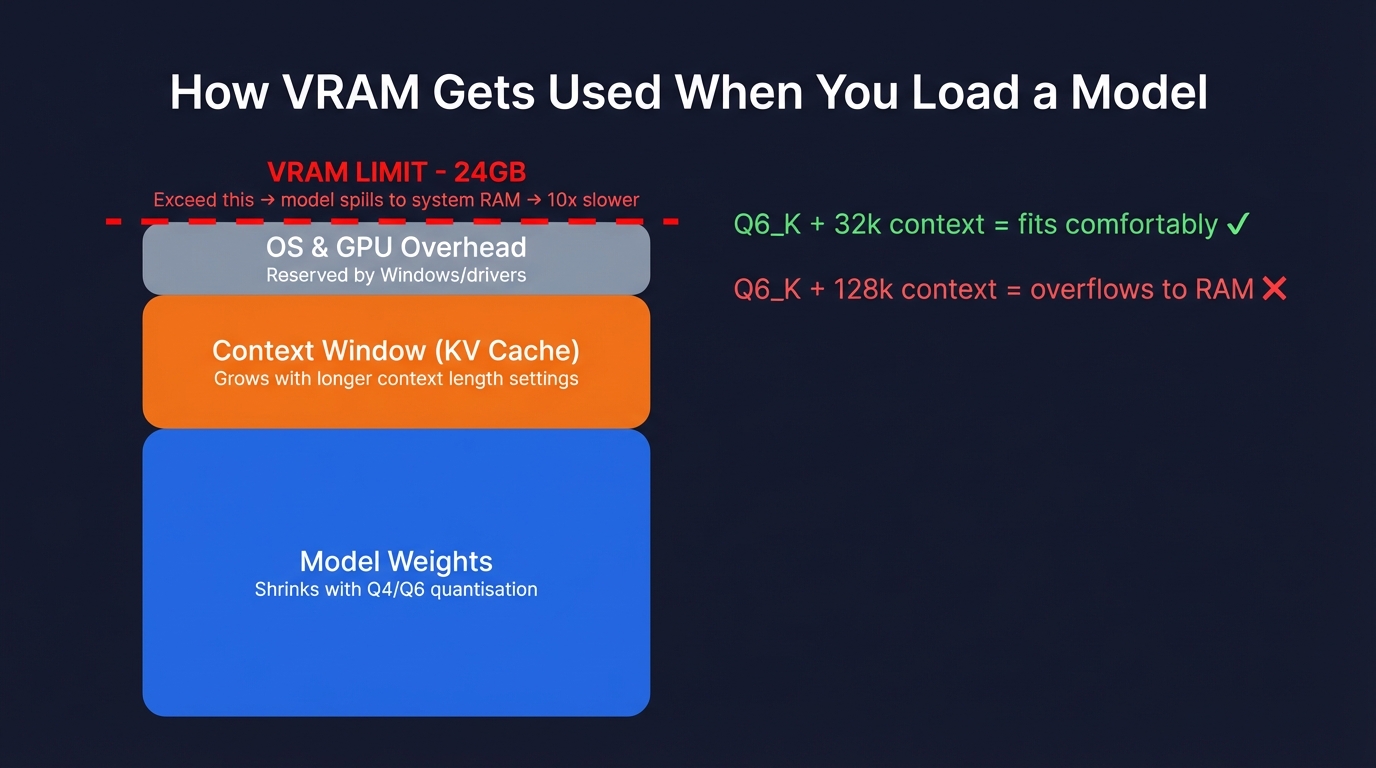
The one idea to hold onto is where your VRAM goes when a model loads. It is not just the model weights. The context window (how much text the model can keep in mind at once) also lives in VRAM and grows as you raise it, and the OS takes a slice off the top. Exceed the card and the model spills into system RAM, where it runs roughly ten times slower.
If you want to understand which card suits which models before you spend anything, I have written that up separately in the best GPUs for running local LLMs . For now, whatever you already own will do.
Install LM Studio
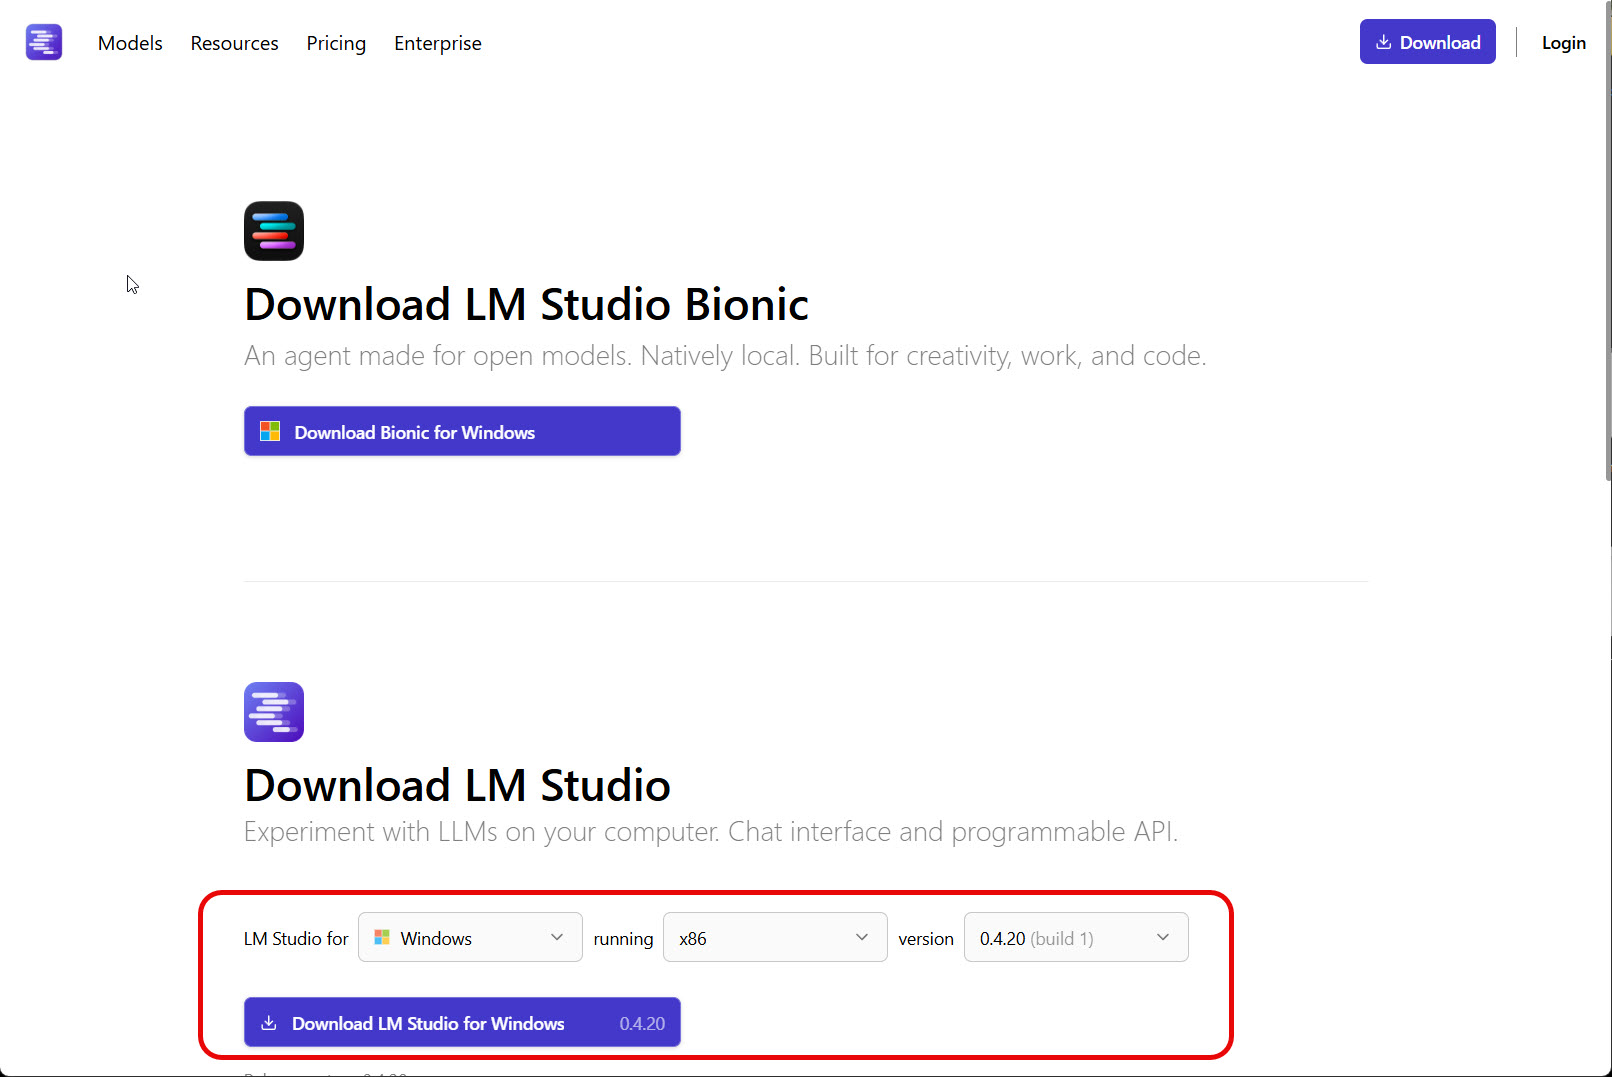
Go to lmstudio.ai/download and grab the build for your platform. The page auto-detects you - macOS ships an Apple Silicon build, Windows an x64 AVX2 build, Linux an AppImage or a .deb, x64 or ARM64. At time of writing that is version 0.4.23.
One thing to notice on that page: the top download is LM Studio Bionic, a separate agent app, and the one you want is the plain LM Studio further down. Grab the plain one. I will come back to Bionic at the end, because installing it by mistake is a rite of passage (I did exactly that) and on my machine the two would not run side by side.
Run the installer, open the app, and you land on an empty chat screen with no model loaded. That is expected. The next three steps fill it.
Point it at your GPU
This is the step most first-timers skip, and skipping it is why their model crawls. LM Studio ships with a set of inference engines (the code that runs the model), and it will happily fall back to the CPU-only engine if you never tell it otherwise. A model on the CPU generates text at a walking pace; the same model on the GPU sprints.
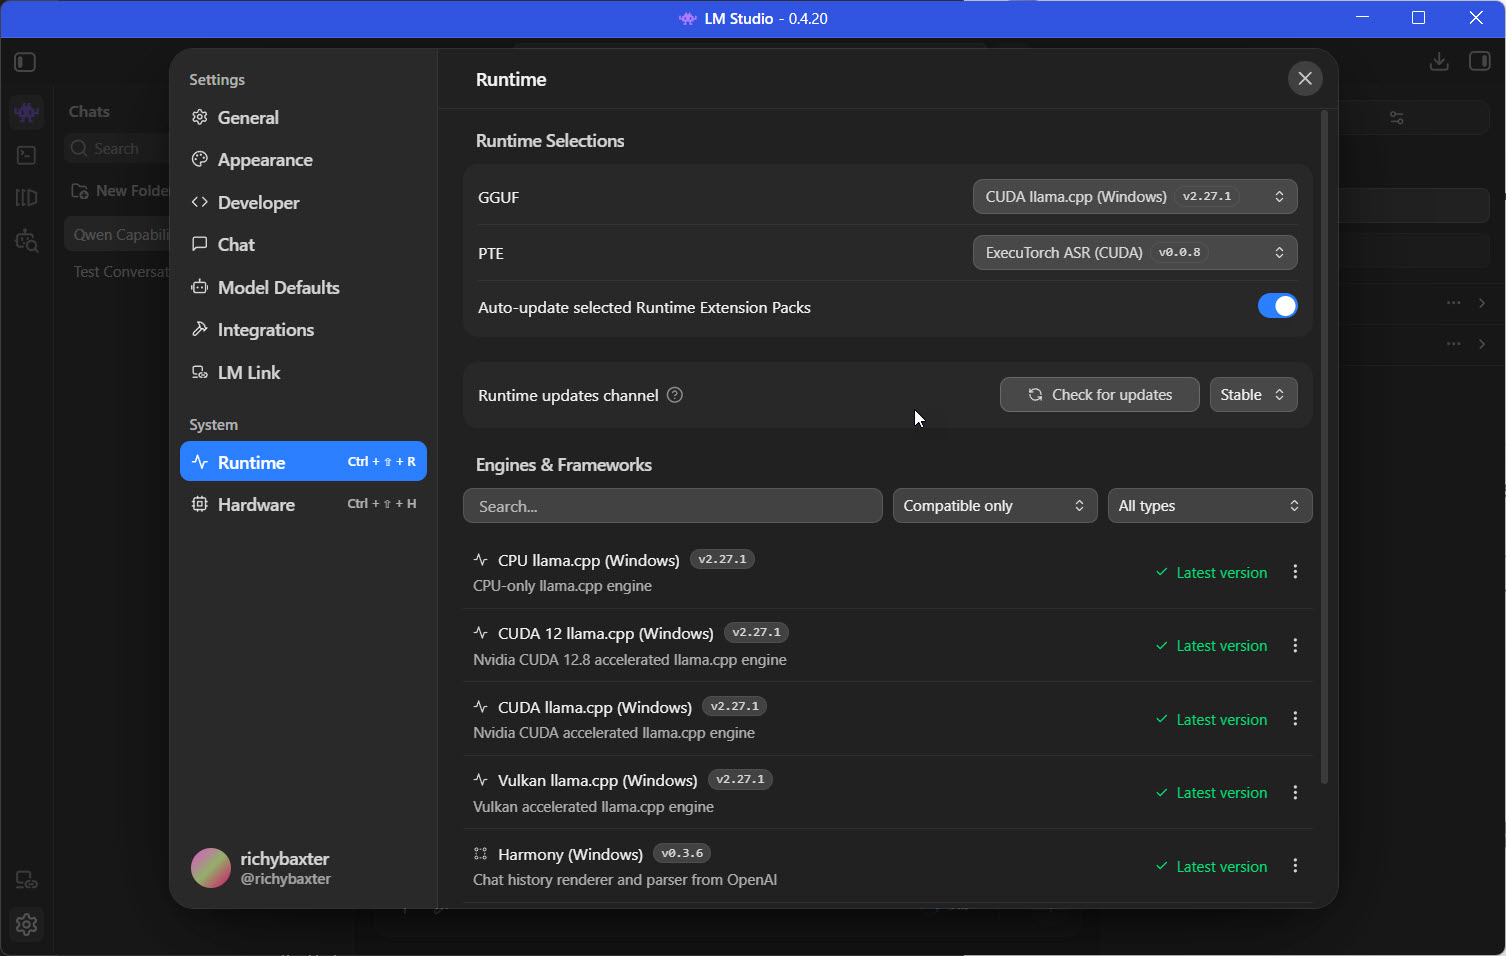
Open Runtime settings with Ctrl+Shift+R and pick the engine that matches your card. If you have an NVIDIA GPU, choose one of the CUDA engines (the screenshot shows "CUDA 12 llama.cpp" running on CUDA 12.8). You will see two CUDA entries, and the difference is simpler than it looks: "CUDA 12 llama.cpp" is the current one and wants a Windows driver of 551.61 or newer, while the plain "CUDA llama.cpp" is the older CUDA 11 build kept for machines that cannot update their driver. On the newest cards LM Studio picks CUDA 12 for you when the driver allows; on an older card, choose it yourself if your driver is recent enough - my 4090s run on it. AMD cards want the Vulkan engine. Apple Silicon uses MLX, Apple's own framework. Set it once and LM Studio remembers.
If your generation speed later feels like watching paint dry, this is the first setting to check. Nine times out of ten it is quietly stuck on CPU.
If LM Studio is not detecting or using your GPU
If LM Studio loads a model but your GPU sits idle, it is almost always one of two things. Either the GPU offload slider is at zero, so every layer runs on the CPU - drag it up (more on that slider below). Or LM Studio is on a CPU-only runtime and never loaded the GPU one: open Runtime settings with Ctrl+Shift+R and make sure the CUDA runtime (NVIDIA) or Vulkan or ROCm (AMD) is installed and selected. A stale GPU driver is the third suspect - update it and restart. One more thing to watch out for: integrated graphics. Since version 0.4.17 LM Studio can see an iGPU through the Vulkan engine, but it leaves it disabled by default, so a laptop's built-in graphics shows up switched off in the Hardware panel until you enable it - and sharing system memory with the CPU, it will not be quick.
Download your first model
Open the Discover tab with Ctrl+2. LM Studio has staff picks front and centre, and next to each model is a small fit indicator - a green rocket means the model will run on your GPU as configured. Trust the rocket. It is doing the "will this fit" maths for you against the card you have.
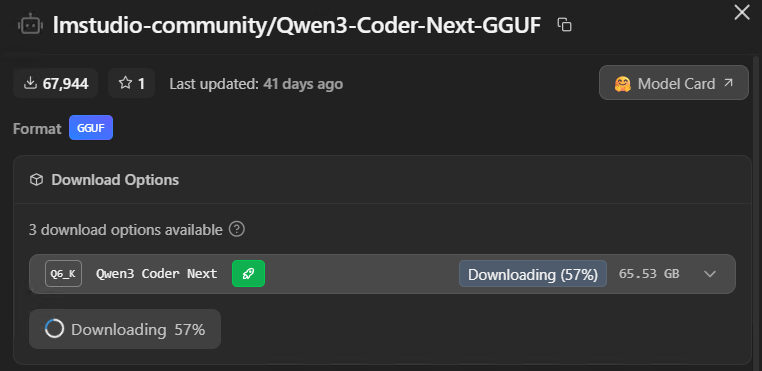
Good starting models in mid-2026 are Qwen3.6 (the 27B and its smaller siblings), Gemma 4 12B, and gpt-oss (openai/gpt-oss-20b). Pick one and you will be offered a row of quants. Quantisation shrinks the model's weights so it takes less memory and runs faster, at a small cost to answer quality; Q4KM, Q6K and Q80 are the same model getting slightly less precise as the number falls. Q4 or higher is the sensible floor. You will also see two file formats: GGUF (the cross-platform format the llama.cpp engine reads) works everywhere, while MLX is Apple Silicon only.
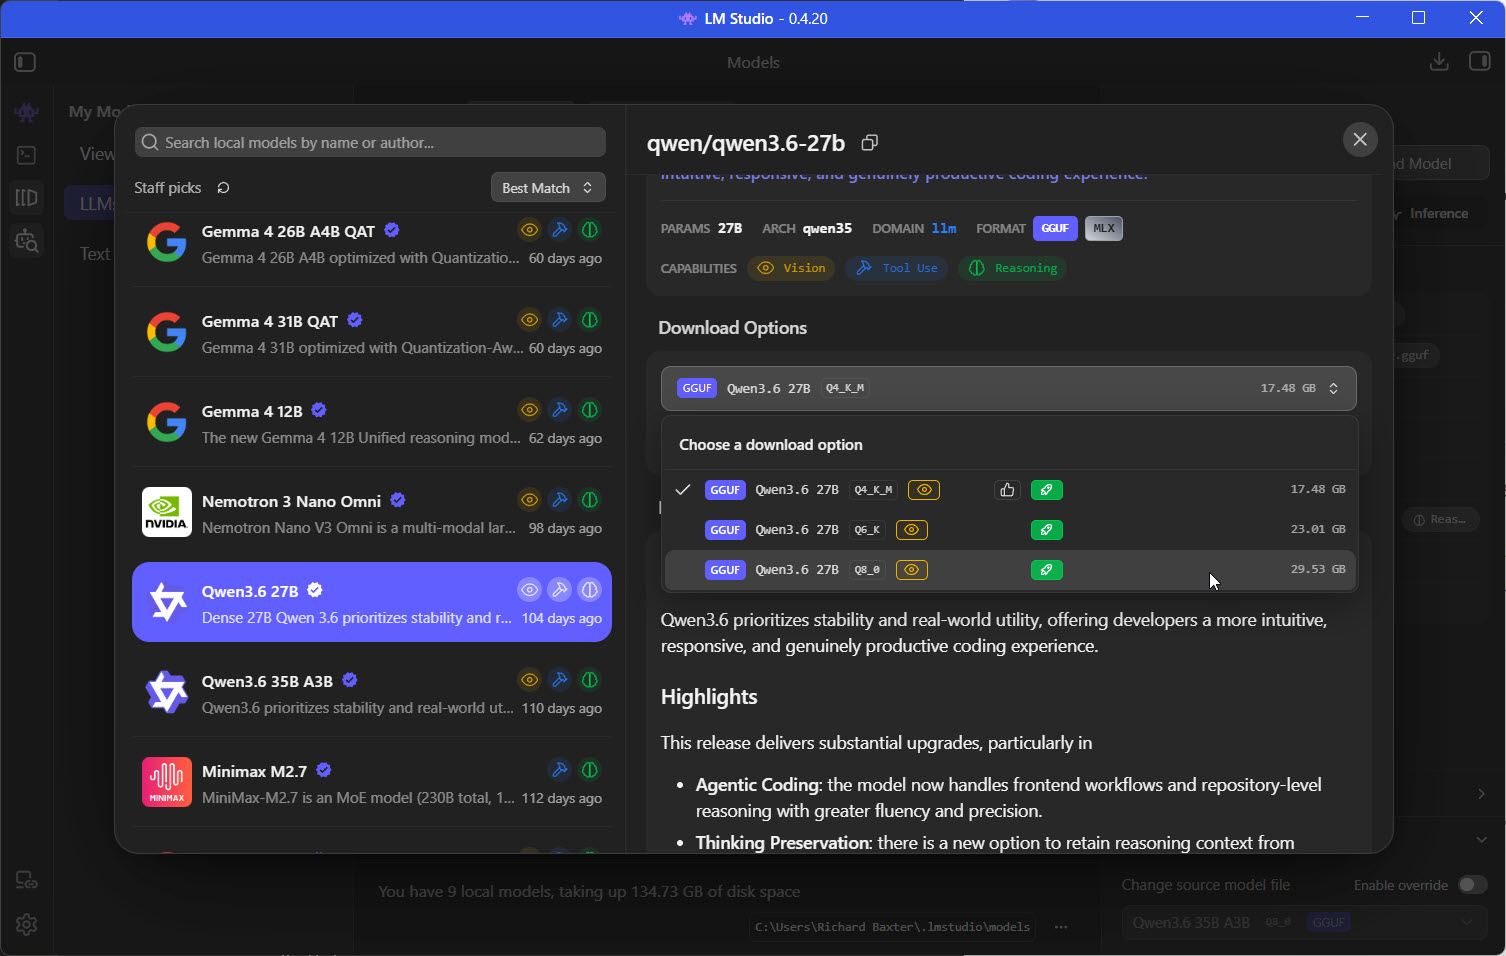
I will not quote you a "this model needs X gigabytes" table, because the answer depends on your quant and your context setting, and LM Studio's fit estimator already computes it live for your exact card. Watch the rocket, not a number I made up.
Load it into memory
Downloading a model does not run it. Back on the Chat tab, click the model loader at the top and you get a short dialog before it loads: an estimated memory usage figure, a context length slider, and a GPU offload control.
Two settings decide whether this goes smoothly. Leave GPU offload at its maximum so the whole model sits on the card. And resist the urge to drag the context-length slider to the top. That slider is the single most common way beginners run out of memory - a long context window eats VRAM fast, and on a smaller card maxing it will tip you into system RAM and kill your speed. Leave it at the default unless you are deliberately feeding the model long documents.
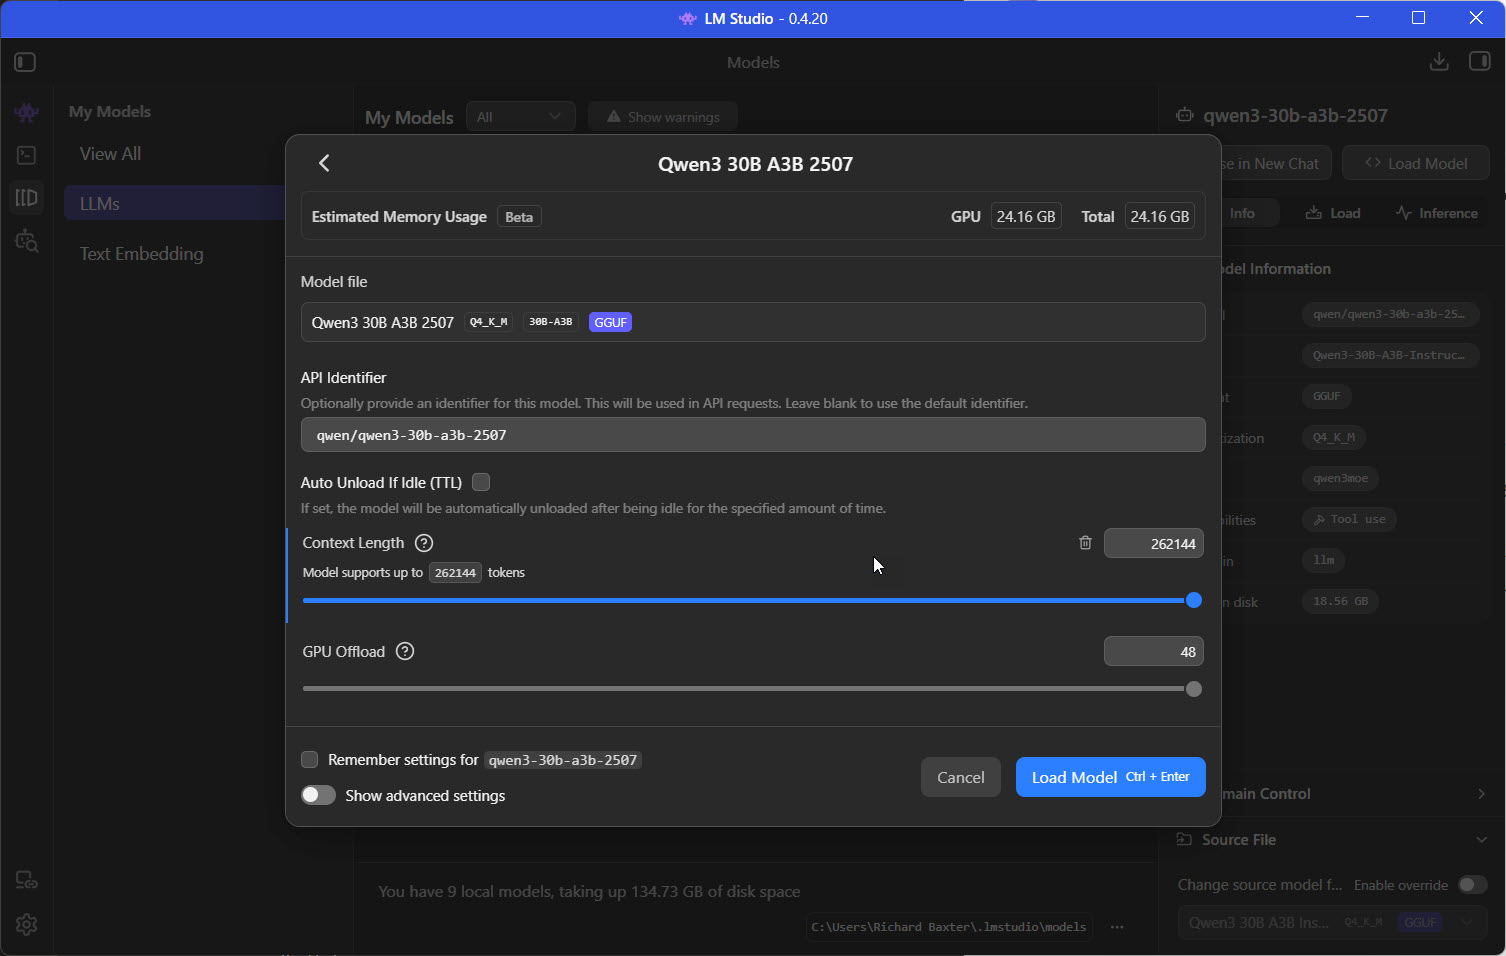
Watch the estimated-memory figure as you change these. If it goes red against your VRAM, back the context length off until it is comfortable, then load.
Chat with it
Type a message and press enter. The model answers, and it is running on metal a foot from your keyboard with nothing going out over the wire. Ask it who it is and where it is running - the first time a model tells you it is running locally on your own machine, the penny drops about what you have just built.
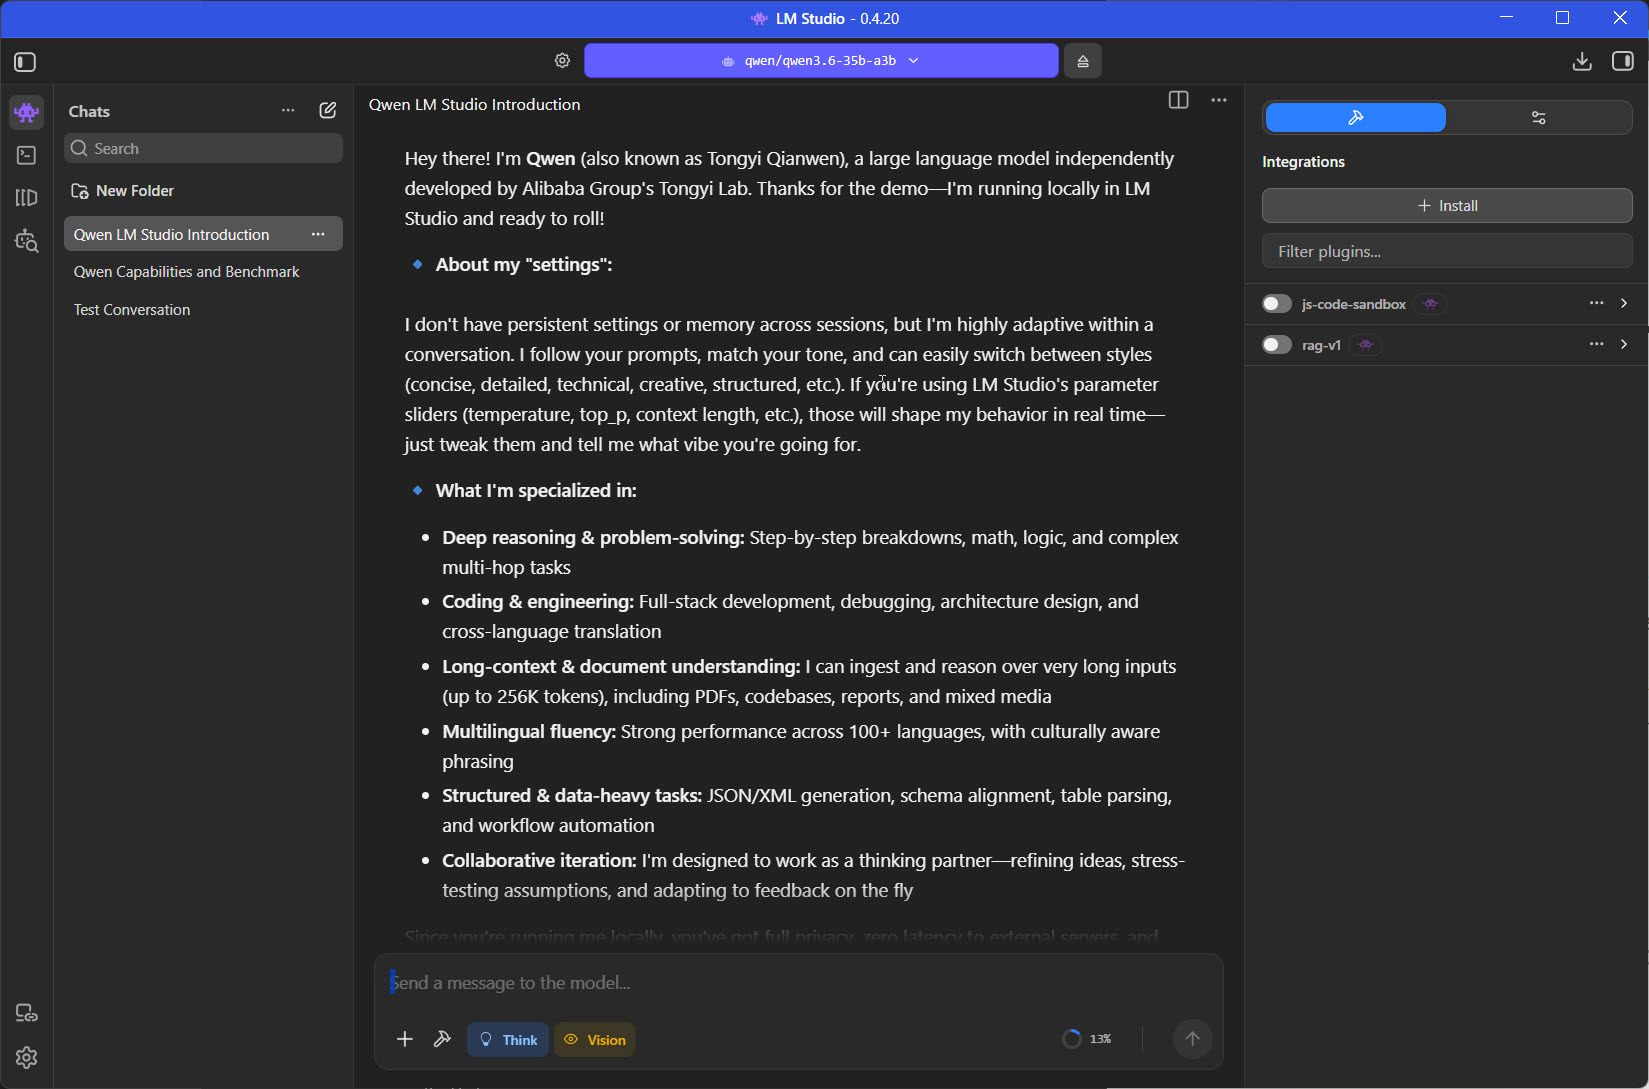
That is the whole beginner loop: install, point at the GPU, download, load, chat. Everything below is optional depth, and I would start with the settings, because that panel is where you learn what all the knobs do.
The settings to learn first
Fresh out of the box LM Studio runs in User mode, which shows you the chat window and quietly configures everything else for you. That is the right default for day one, and it is also why so many people go looking for the GPU offload setting and cannot find it: the sliders only appear once you switch to Developer mode, under Settings > Developer (the old Power User mode was folded into it). Flip it on. Nothing breaks, you just get a settings panel on the right-hand side of the chat, and everything below lives either in that panel or in the load dialog.
GPU offload is the one to understand first. A model is a stack of layers, and the slider decides how many of them sit on the graphics card rather than in system RAM. All of them is the answer whenever the model fits, which is why I said leave it at maximum - every layer you push back to the CPU costs you speed. The estimated memory figure next to it is your budget: if it goes red, the fix is a smaller quant or a shorter context, and only then the slider.
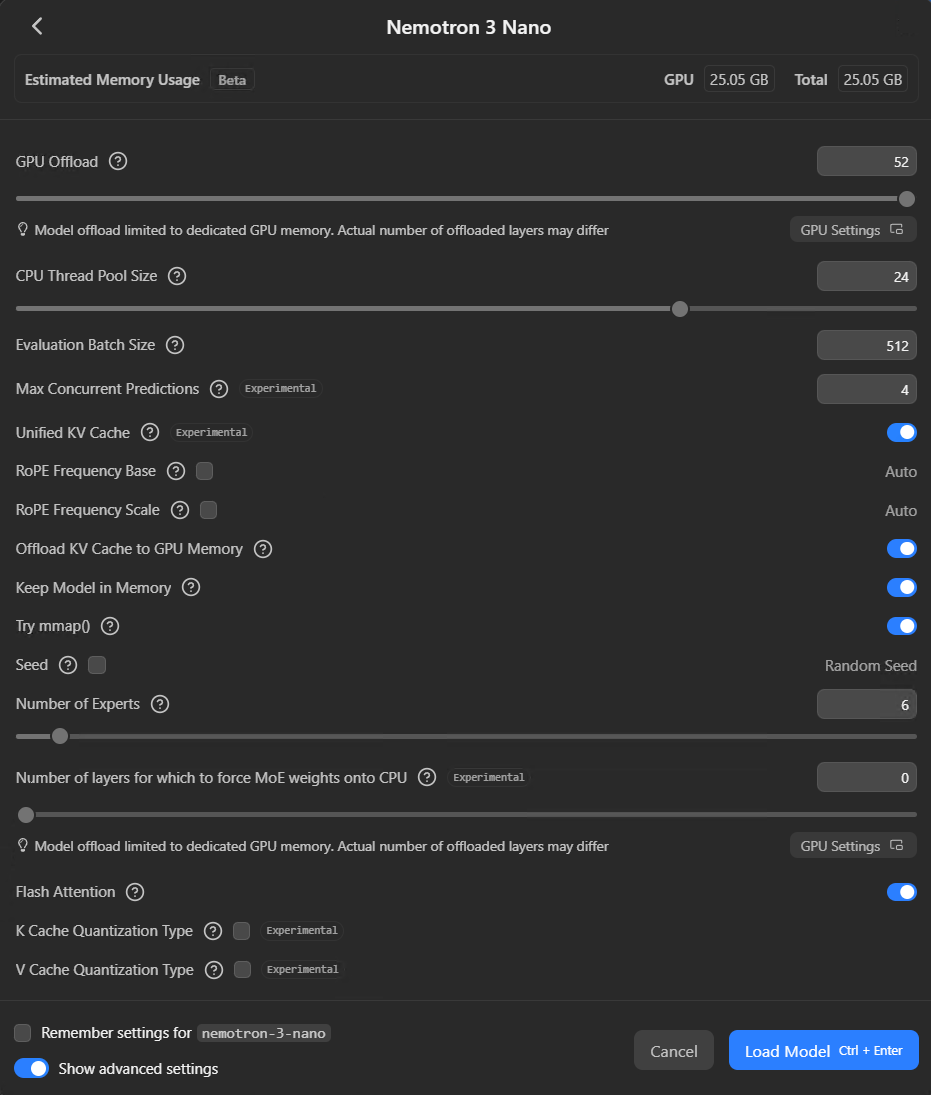
Context length is the working memory - how much of the conversation, and any documents you attach, the model can hold at once - and every token of it costs VRAM on top of the weights. Beginners max the slider because bigger sounds better, run out of memory, and blame the model. Leave it at the default until you have a reason, then raise it in steps and watch the estimate. If you do need a long context on a small card, two switches in the load dialog buy you room: Flash Attention, which cuts the memory the context takes and has been on by default for CUDA since 0.3.31, and the K and V cache quantisation options, which shrink the context's memory the same way a Q4 quant shrinks the weights, at a small cost to quality. Both are labelled experimental in the dialog, so try them on a chat you can afford to lose.
Then the knobs that change how the model talks, in the right-hand panel: temperature, top-k and top-p. Temperature is how adventurous the next word is allowed to be; top-k and top-p are two ways of trimming the list it picks from. I am not going to give you numbers, because the right ones depend on the model (the model cards usually say, and Qwen's differ from Gemma's) and because the whole point of LM Studio, for me, is that you can change one, ask the same question again, and see what happened. That is how I learned what they do, and it beats any explanation I could write. When you find a combination you like, save it as a Preset - the system prompt and the parameters together - so it is one click next time.
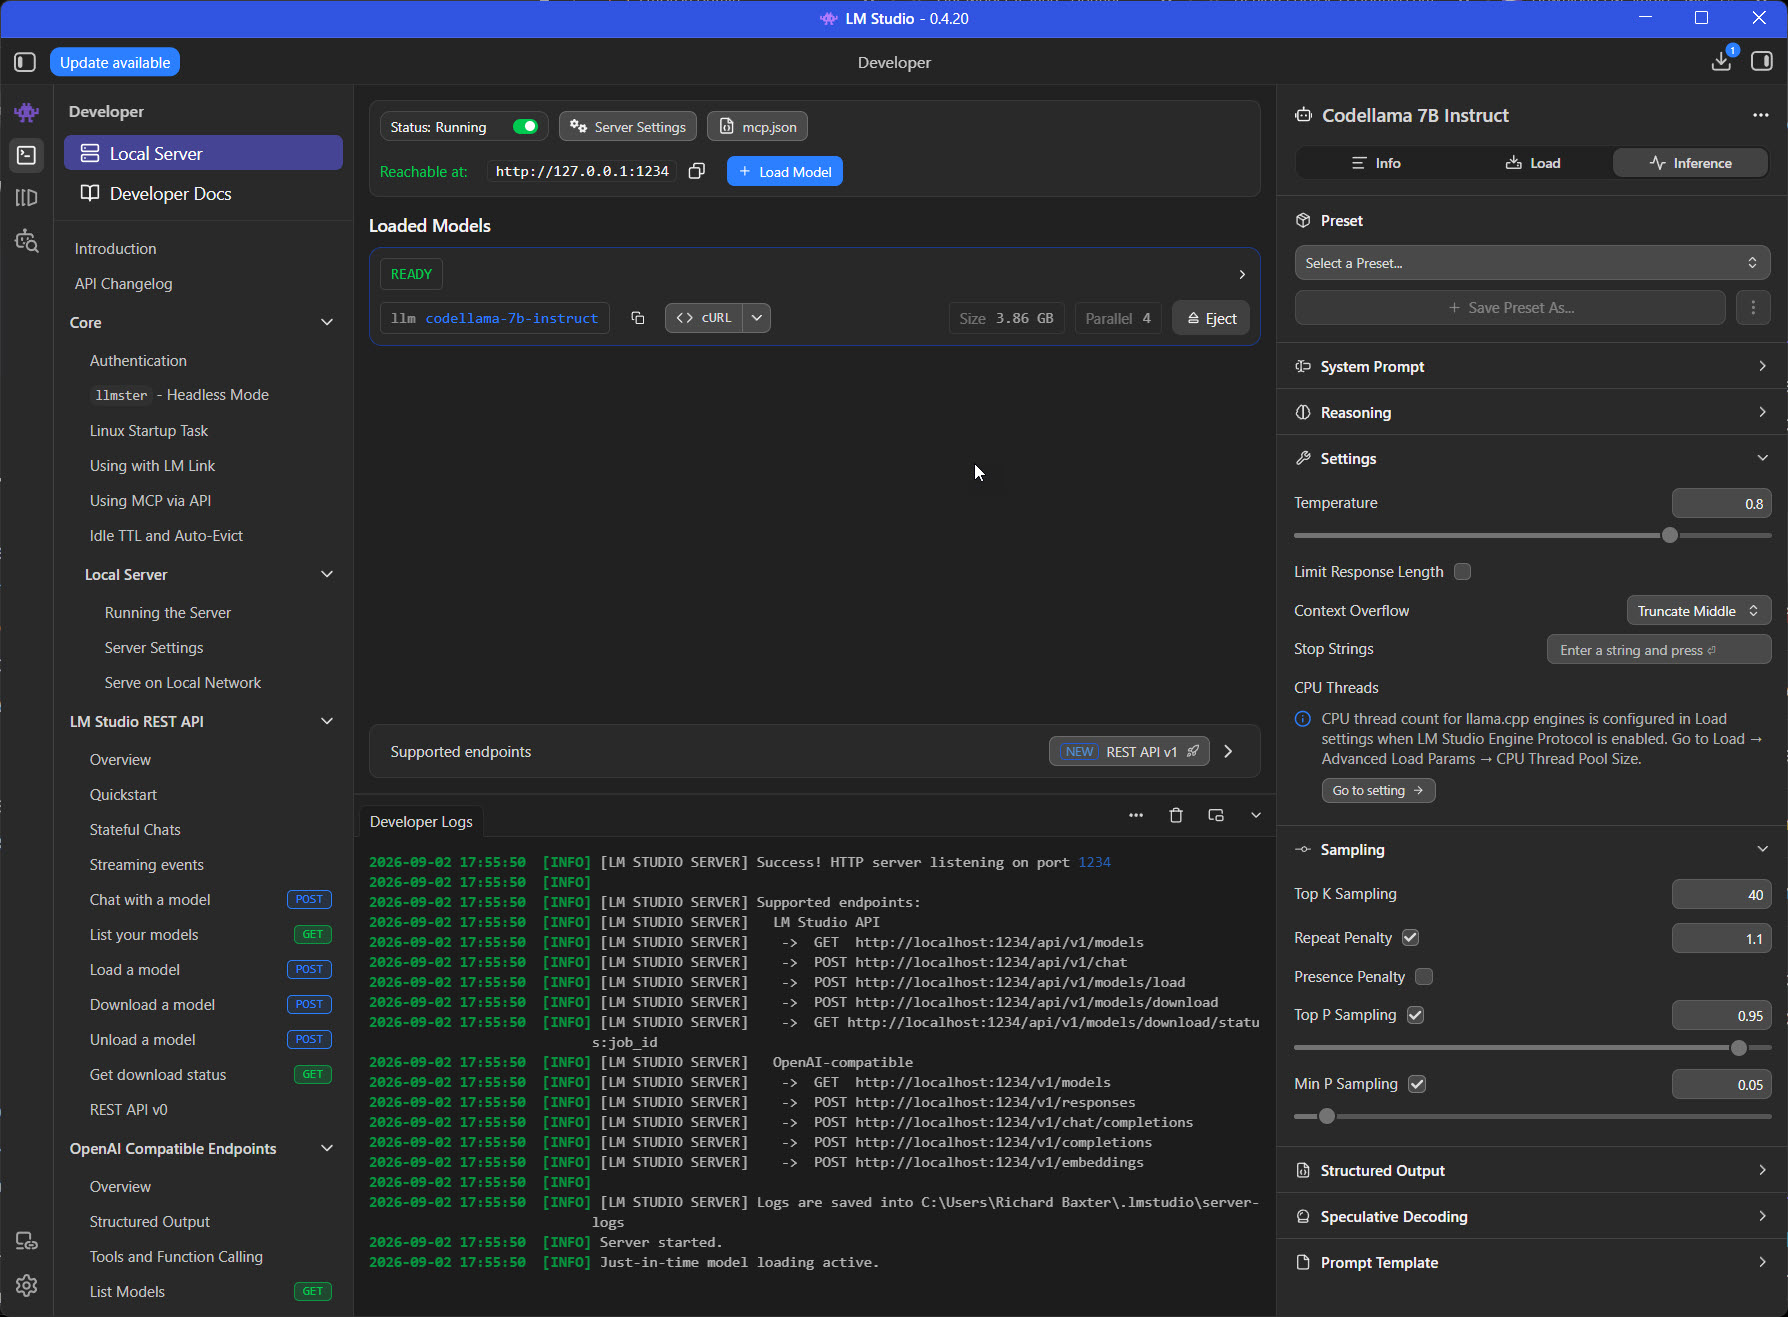
There are two more settings for when you are comfortable, and both are about speed rather than fit. Speculative decoding pairs your model with a much smaller draft model that guesses the next few tokens for the big one to verify; the docs pair a 7B with a 1B draft and a 32B with a 7B, and the speed-up depends on the prompt - predictable answers fly, creative writing barely moves, and a bad pairing can slow you down. And if you are running a mixture-of-experts model like the Qwen3.6 35B-A3B (35 billion parameters, about 3 billion active per token), the load dialog can park the expert weights on the CPU, which is how a model bigger than your card gets to run at all. Whatever you settle on, tick "Remember settings" for that model, or set its defaults under My Models, and the load dialog stops asking.
Turn it into an API
The moment you want to wire a local model into your own scripts, LM Studio can expose it as an API. Open the Developer tab, switch Developer Mode on, and start the local server. It serves an OpenAI-compatible (and Anthropic-compatible) endpoint at http://localhost:1234/v1, or you can start it from the command line with lms server start.
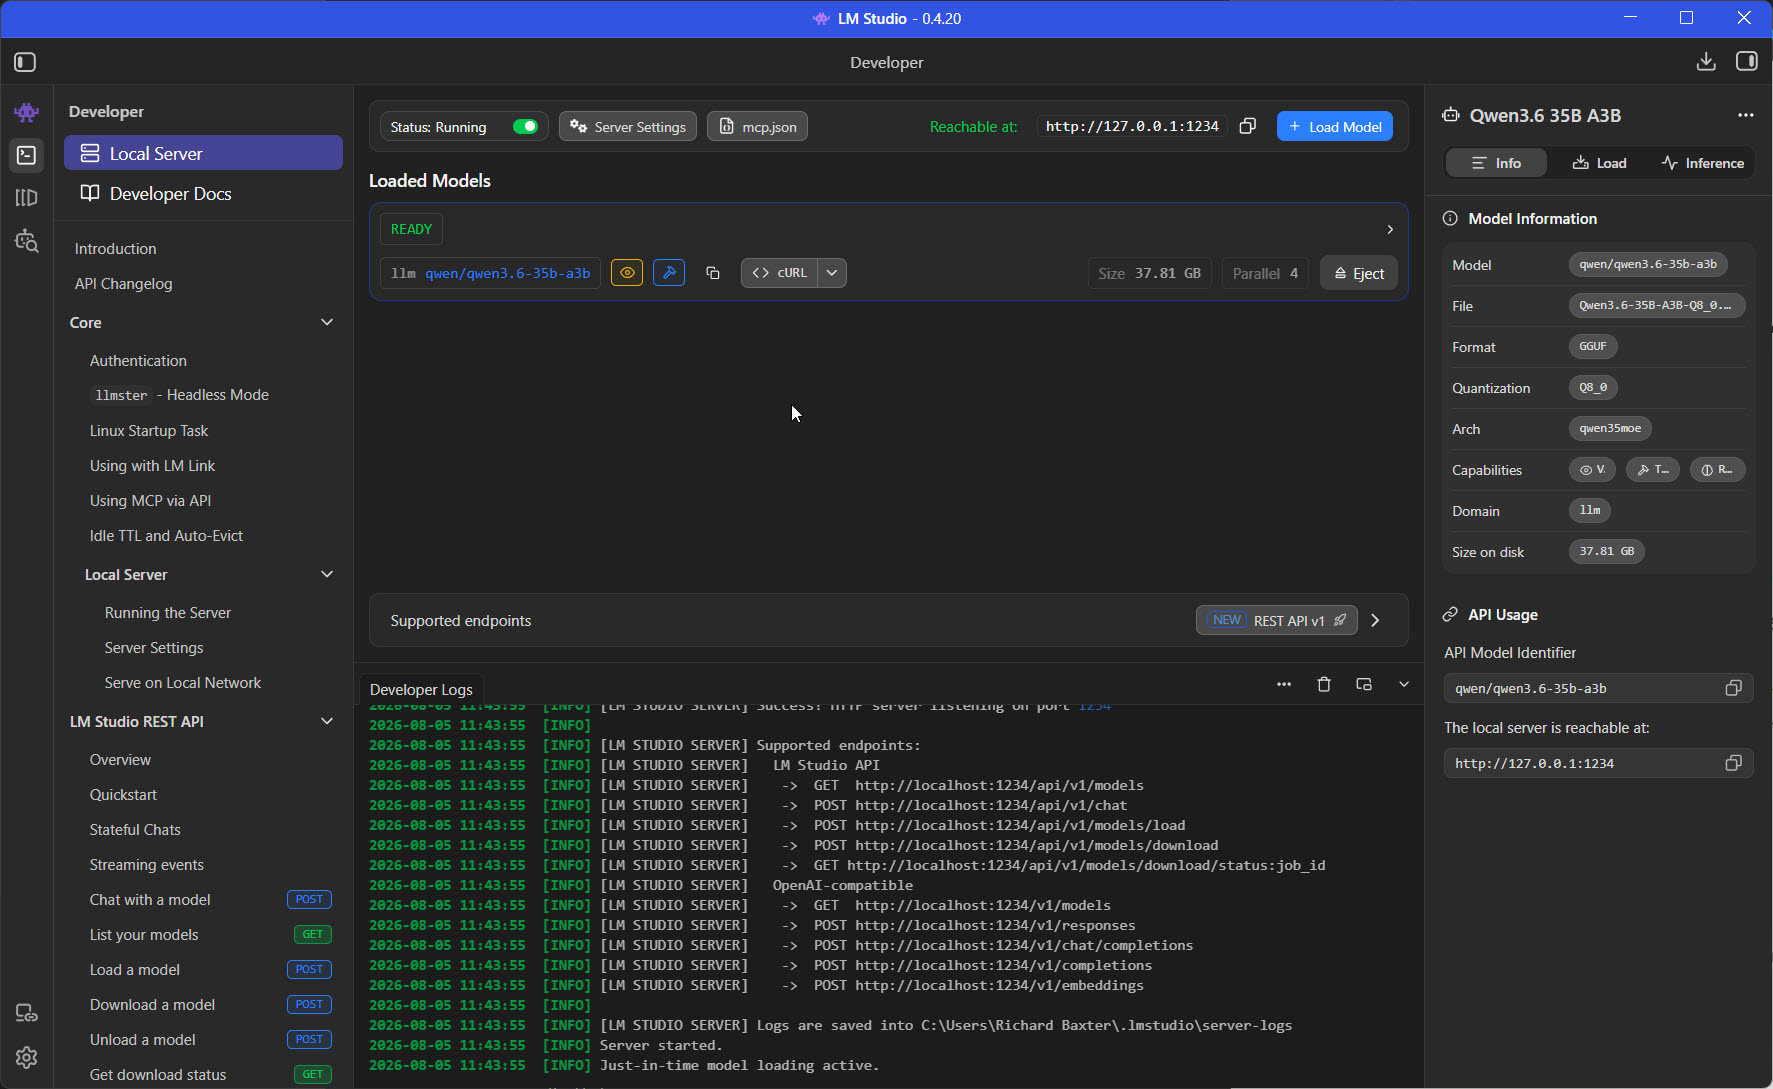
From Python, you point the standard OpenAI client at that address and it just works:
from openai import OpenAI

client = OpenAI(base_url="http://localhost:1234/v1", api_key="lm-studio")

response = client.chat.completions.create(
    model="qwen3.6-27b",
    messages=[{"role": "user", "content": "Say hello from my own GPU."}],
)
print(response.choices[0].message.content)
The api_key is a placeholder the server ignores; nothing is being billed. Any tool that speaks the OpenAI API - and most of them do - can now talk to a model on your desk. Full server docs are at lmstudio.ai/docs .
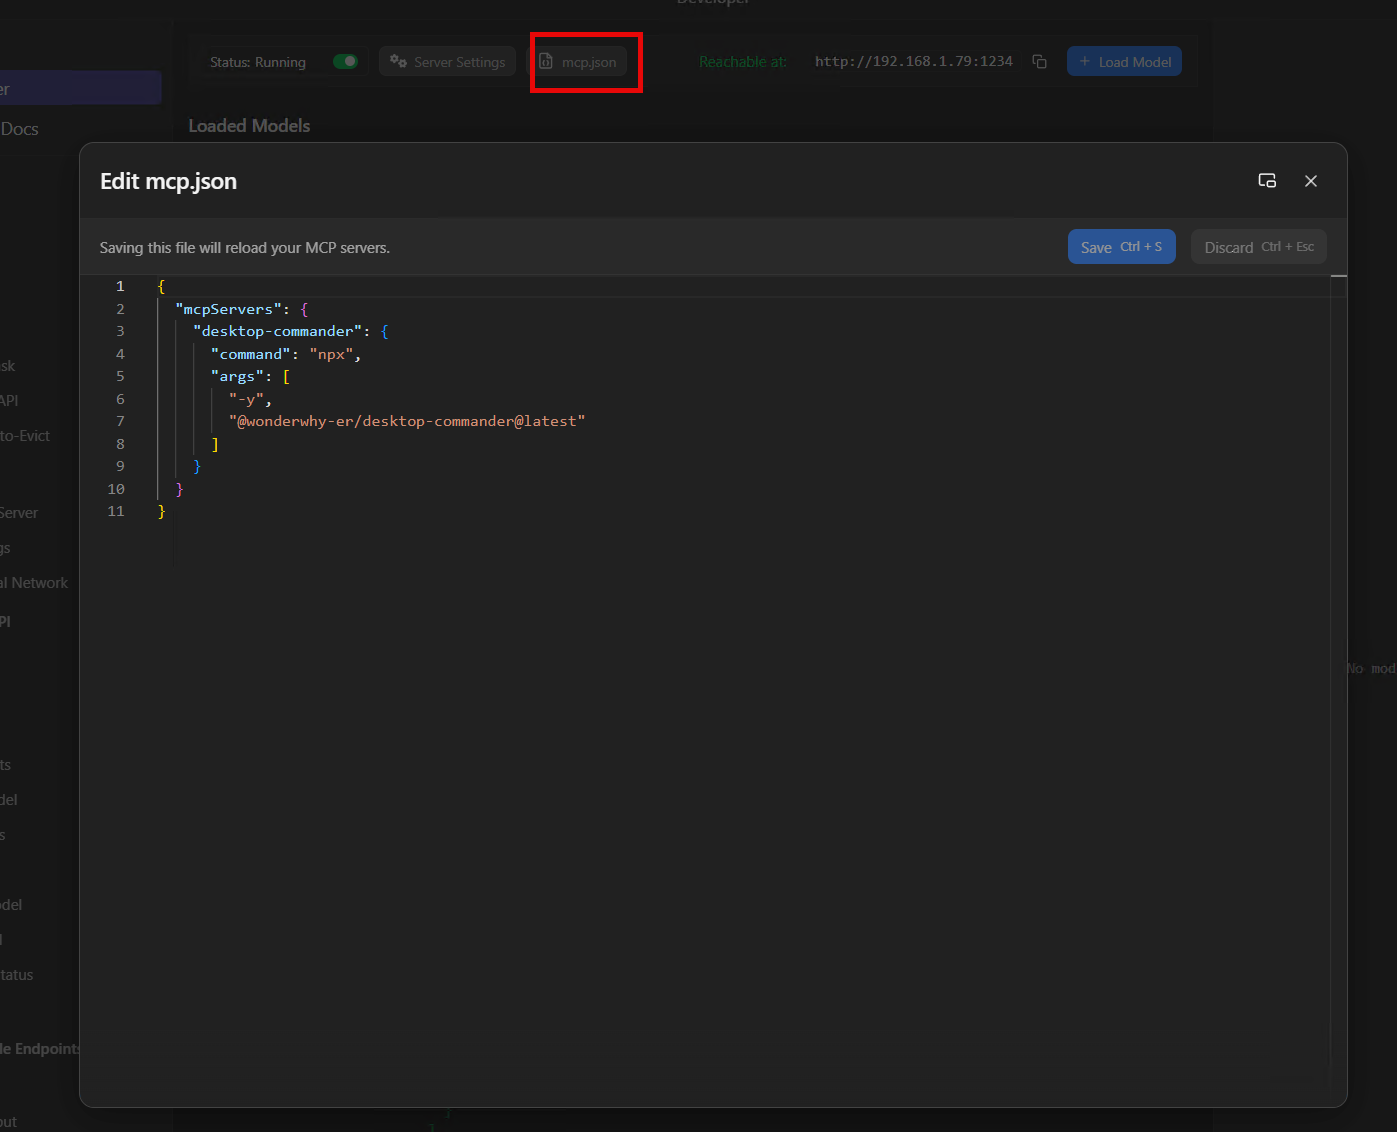
The other half of the developer story is MCP (the Model Context Protocol - the same plug standard Claude Desktop uses to reach tools), which LM Studio has hosted since 0.3.17. Any MCP server, including the ones I publish under @houtini , can be wired to a local model: open the Program tab in the right-hand panel, click Install > Edit mcp.json, and paste the server's block in the same notation Cursor uses. Some servers on the LM Studio Hub have an "Add to LM Studio" button that does the edit for you. One more thing to watch out for: an MCP designed for Claude or ChatGPT can be greedy with tokens, and a local model with a modest context will overflow and lose the thread, so start with one small server and keep an eye on the context meter.
That is the engineer-and-user split in one app: a chat window for you, an endpoint for your scripts, and the same tools plugged into both. It is also why I would tell a client that LM Studio is a test bench you did not have to build. When a specialist model turns up - a classifier, an embedding model, something like the DeBERTa-based detector for AI-written copy we lean on at work - LM Studio is where I would try it first: download it, load it, and see what it does in a chat window, without writing the harness you would need to run it any other way. The one condition is that somebody has published it in a format LM Studio loads (GGUF, or MLX on a Mac); a classifier that only exists as PyTorch weights still needs the harness.
Going bigger: more than one GPU
You do not need this to start. I am including it because it is the natural question once the first model is running: what if one card is not enough?
My own machine has two RTX 4090s (modded 48GB versions, so about 96GB of VRAM between them) alongside a Core i7 and 128GB of system RAM. With more than one card, LM Studio's Hardware panel gives you a split strategy. I run tensor parallelism, which slices each layer of the model across both cards so they compute in parallel, rather than filling one card and spilling onto the second. For a model large enough to span both cards, that is the faster arrangement.
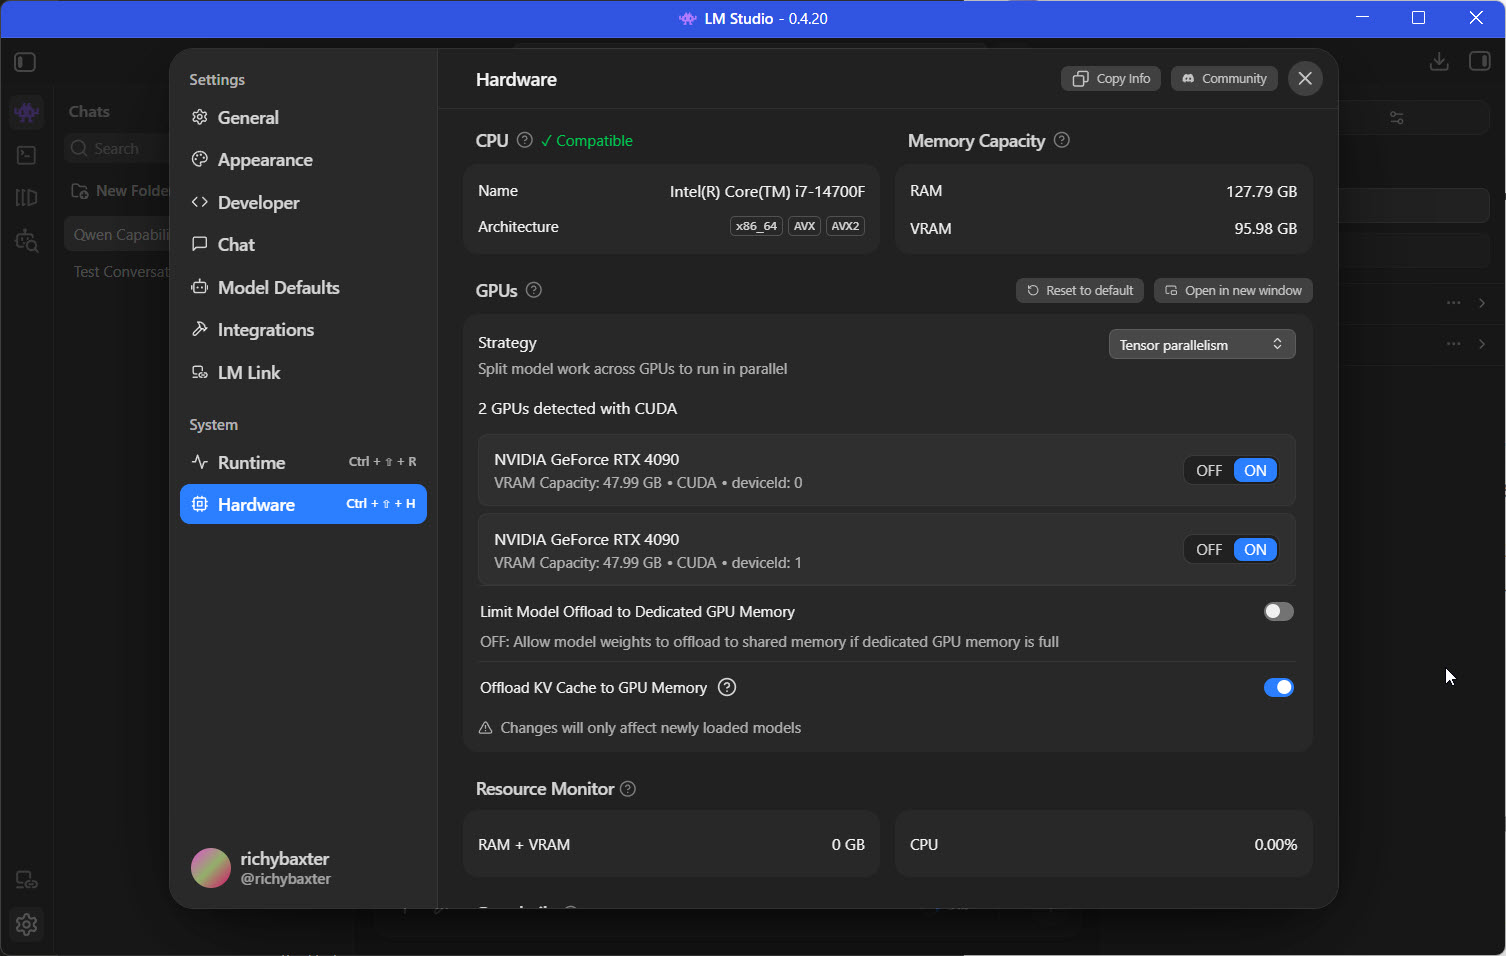
How far a single card takes you before you would want a second one depends entirely on the models you settle on and the work you throw at them. I cannot hand you a clean cutoff, and anyone who quotes you one is guessing. Start with what you have, notice where it strains, and buy hardware to fix a problem you have hit rather than one you have read about.
The next rungs
LM Studio is the first rung. Three places to go from here, roughly in order of how far they take you.
Bionic, the agent app
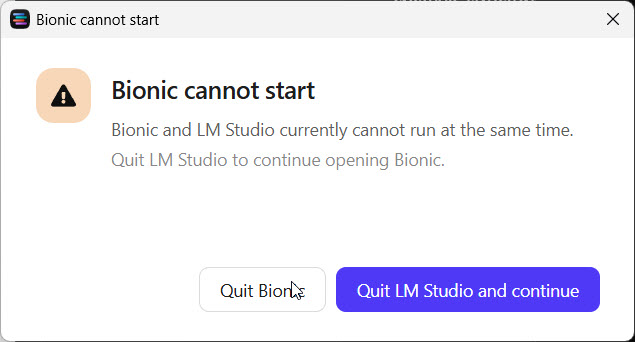
Bionic is LM Studio's separate agent app - the "next generation designed for agentic work", with projects, sessions, skills, and tools that read a codebase or run a shell, and since August a review step for the shell commands it wants to run. It reaches models in three places: local (on your device), remote (a model on another machine of yours, over LM Link), and LM Studio's own cloud, which is the only part that costs money; local and remote are free. It runs on Windows, Mac and now Linux, and it has a local API of its own (Settings > Local Model API, on port 1234 like the classic app). The two will not run at the same time, and it is a rule rather than a quirk: open Bionic with LM Studio running and you get a dialog that says "Bionic and LM Studio currently cannot run at the same time", with a button to quit LM Studio and continue. Each runs perfectly well on its own, so you close one to open the other. On my install the cloud list offers DeepSeek V4, GLM 5.3 and Kimi K3 alongside whatever is on the disk. Treat it as a different tool for a different day, not an upgrade.
LM Link, your rig from the sofa
LM Link solves a nicer problem: running a big model on your GPU rig and using it from a laptop or phone as though it were local. It is rebuilt on Tailscale (an encrypted device-to-device network), so the connection between your machines is private. If you build a serious rig, this is how you get the benefit of it from the sofa.
The top rung: vLLM and houtini-lm
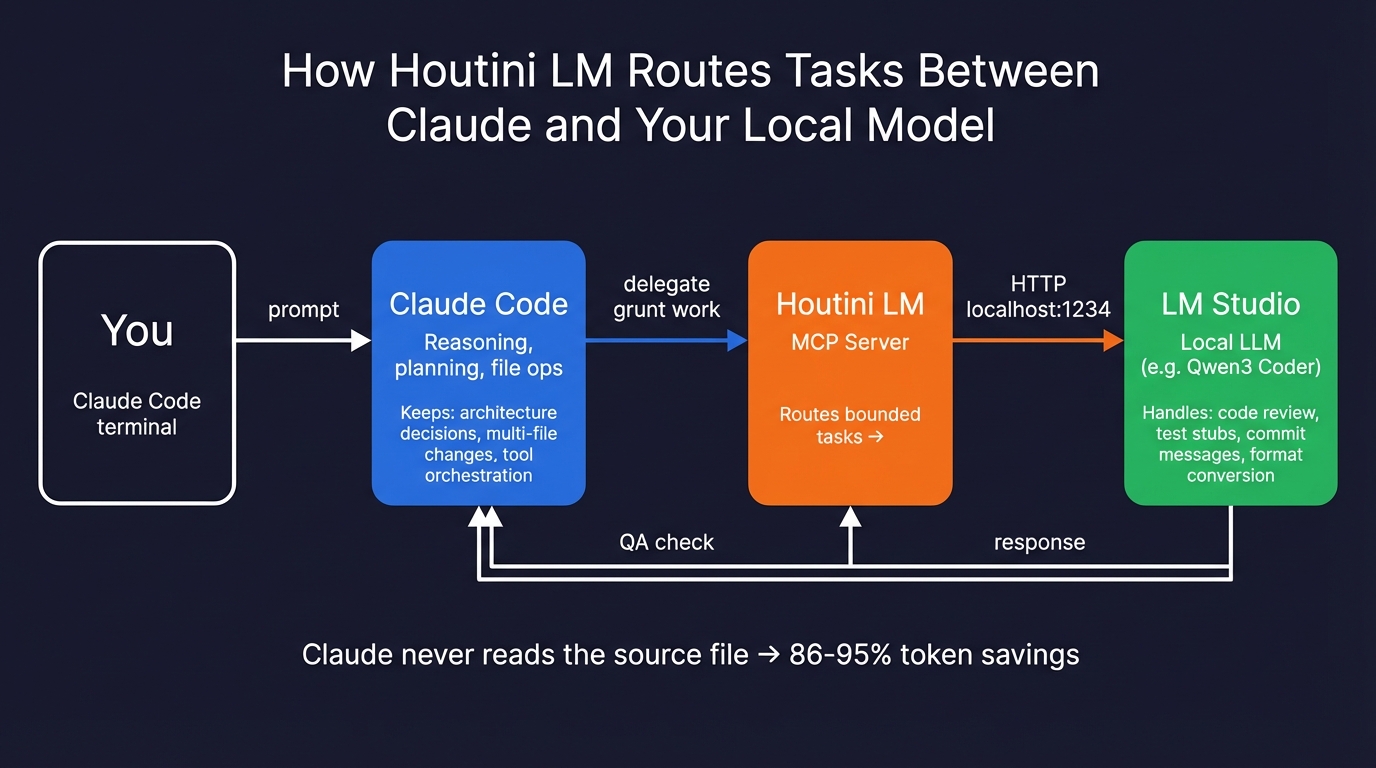
The top of the ladder is a server, and LM Studio's own answer there is llmster, a headless build of the same engine for a GPU box with no screen; for a home rig it may be all you need. I no longer run my production serving on LM Studio. Once local inference became part of how the business works - routing the cheap, repetitive coding tasks to local models so they do not burn frontier-API budget - I moved to vLLM in Docker on those same two 4090s, orchestrated by our own houtini-lm tool so Claude can hand work down to the local rig. That is a bigger setup with sharper edges, and it is written up in how to set up vLLM , the houtini-lm vLLM backend , and the houtini-lm tool page if you want to see where this road ends up.
If that sounds familiar, it should: it is the same bet as Bionic, from the other end. Bionic hands the steering wheel to the local model and lets it drive; houtini-lm keeps Claude in the driver's seat and passes the local rig the bounded, repetitive jobs, so the expensive model spends its budget on judgement rather than typing. Two independent takes on the same move - wrapping a local open-weight model in a harness that gets jobs done rather than chatting - which is really the local-model-as-worker idea reaching the mainstream.
But that is the road, not the start. LM Studio is a powerful on-device app and not really an LLM server - that is what our own testing kept showing, and it is why I moved on. I was very happy with it while I used it, I think it is a great bit of software, and I hope they keep growing it. The start is a green rocket, a downloaded model, and a chat window running on the GPU you already own. Go press enter.
Continue reading.
- How-to GuidesHow to Stop MCP Servers Eating Your PC: One Docker Gateway for Every Claude Client15 Aug 2026
- How-to GuidesHow to Use the Gemini API (and Why I Run It Next to Claude)15 Aug 2026
- AI ToolsHow to Do a Technical SEO Audit with Claude20 Jul 2026
- ExplainerWhat is a Marketing Engineer (and do you need one)?31 Aug 2026
- AI WorkflowsDynamically updating infographics and content (so you don't have to)28 Aug 2026
- Case StudiesThe parts Shopify Plus B2B doesn't do (and how we built them)28 Aug 2026