How to Build a Competitor Price Monitoring Pipeline with n8n
I built an n8n workflow that normalises 375 products from three public Shopify stores and flags any price that has changed since the last run, modelled on the product scraper I run every day. On the way, all three stores refused my server with a 429, and workflow static data never saved from the editor. So I finished the build on responses fetched from my desk, with the last run kept in a file.
 Richard Baxter AI Ops & Marketing Engineer
 On this page
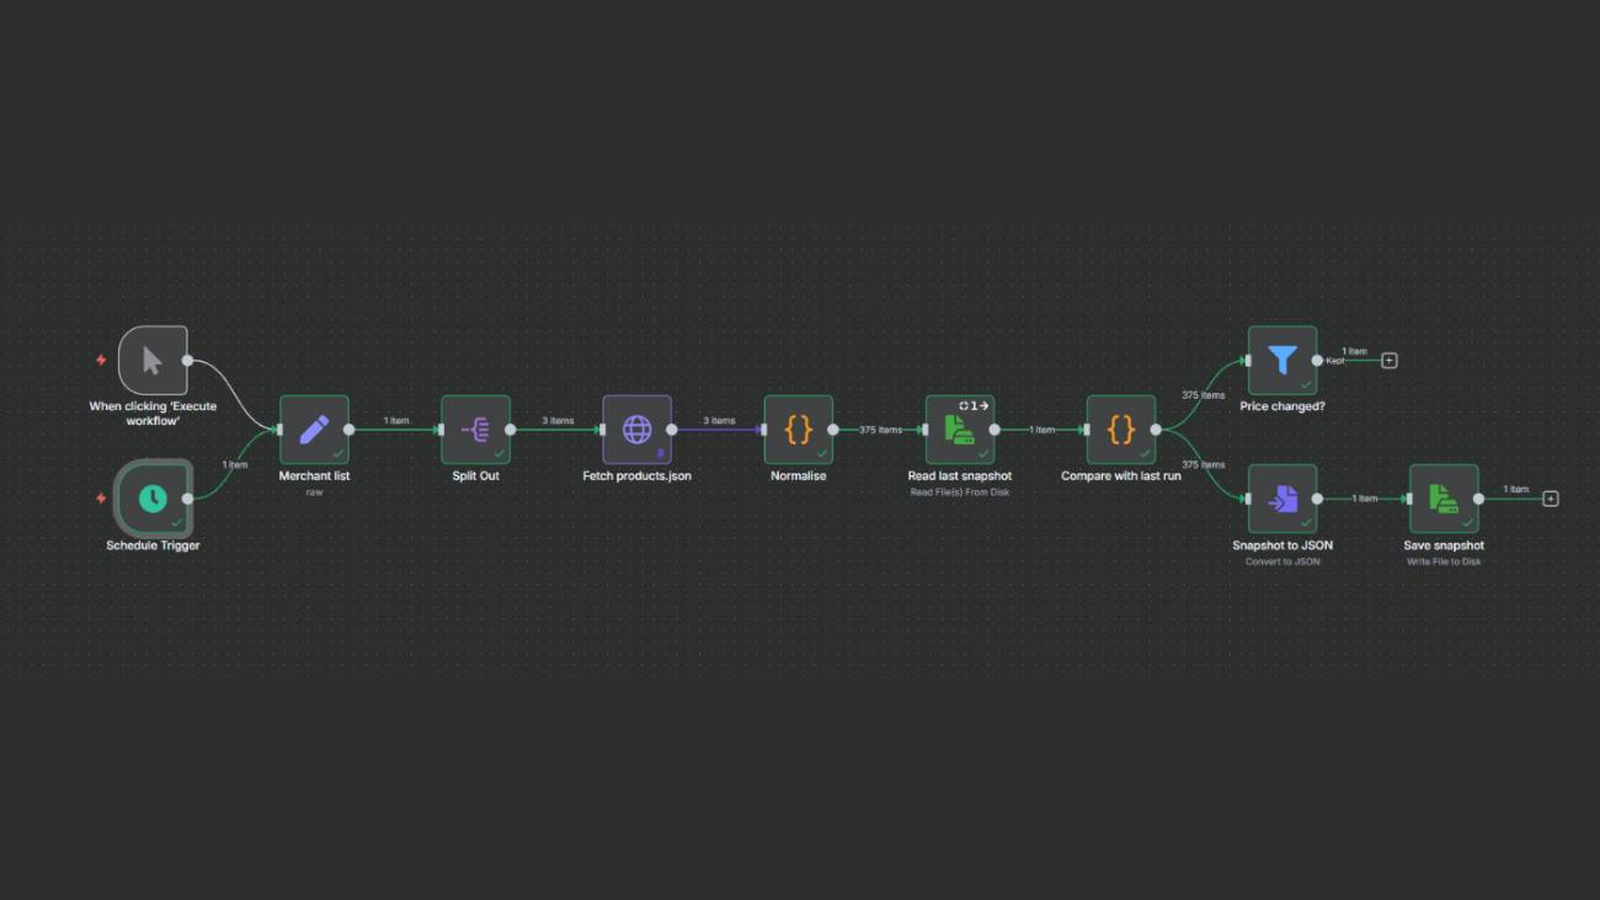
My production scraper reads 13 Shopify stores, and every one of them publishes its whole catalogue at /products.json. That's a public JSON feed with every product, variant and price in it, and you don't need a key to open it. So if the competitors you watch sell on Shopify, n8n can read their prices on a schedule, compare each one with the last run and pick out the ones that moved. I built a small version of that production scraper against three public stores with 375 products between them, and it took me about 55 minutes, detours included. n8n's community edition is free to self-host, so you pay for the server it runs on, plus a proxy if that server sits in a datacentre.
When my n8n server asked the three stores for their products, all three refused it with a 429, HTTP's "too many requests" status. So the build carried on from the responses I fetched from my desk that evening and pinned to the Fetch node, which means n8n keeps them inside the workflow as that node's output and uses them instead of calling the stores. Every node after the fetch ran for real. Between my first two runs no price moved at all, so the "changed" result further down is a test: one price in the pinned data, edited by hand from 375.00 to 350.00.
Quick Navigation
Is it worth it? |
What you need |
The design |
Step 1: the store list |
Step 2: fetch |
Step 3: normalise |
Step 4: compare |
Verify it works |
Gotchas |
Where next
Is it worth it for you?
This works best when you're watching a handful of named competitors and they sell on Shopify. You already know which stores and which products matter, and the feed gives you exact prices, so there's no product matching to solve.
If your competitors sit behind heavier bot protection than Shopify's, Akamai for example, or behind a login, stop here: that's a different job, and so is matching their products to yours without a barcode. Our competitor price monitoring build tracks five retailers running Akamai-protected, SAP-level ecommerce installs: about 41,800 competitor listings, with 97% of a 1,250-product catalogue matched to at least one competitor. We tried the polite routes there first, and the only approach that worked reliably on all five was stealth crawling through Firecrawl, a scraping API. AI models then grade the candidate product pairs.
If the stores you watch run WooCommerce rather than Shopify, the design carries over to the WooCommerce Store API, /wp-json/wc/store/v1/products, with its own fetch code. My own WooCommerce flow reads its four stores that way, 100 products a page.
What you need before you start
- A self-hosted n8n. I built this on 1.107.3. If you're on 1.113 or later, n8n's Data Tables could hold the last run instead of a file.
- A server the stores will answer. My Hetzner VPS got a 429 from all three, so a live run from it would need a proxy; Step 2 has the detail.
- Two or three Shopify store domains you want to watch.
- File access for the Read/Write Files from Disk node. On 1.107.3 anything inside the
.n8nfolder is blocked by default. From n8n 2.0 the node can only reach~/.n8n-filesunless you setN8N_RESTRICT_FILE_ACCESS_TO.
The design this copies
The demo copies the shape of Master - Shopify, the workflow that feeds my product database every day. It reads a config array of 13 merchants, splits it into one item per store, and fetches each store's /products.json in a single Code node, up to 40 pages of 250 products. The rows go through a validation step and into Postgres as an upsert on merchant_domain and sku. An upsert inserts the row, or updates it if a row with the same key is already there. Then a status report closes the run. The 2 October run started at 04:00 UTC and finished in 3 minutes 53 seconds; the table below shows where the time went.
In July this one workflow replaced about 20 Firecrawl flows, one for each store. Now there's one workflow per platform, and adding a store means adding a line to the config.
| Master - Shopify node, 2 Oct 2026 04:00 UTC run | Items out | Time |
|---|---|---|
| Split Merchants Array | 13 | 1 ms |
| Fetch Shopify Products | 2,920 | 26.1 s |
| Pre-Database Validation | 2,889 | 2.5 s |
| Save to PostgreSQL | 2,889 | 34.6 s |
| Get Processing Stats | 2,889 | 168.9 s |
The data is there to serve pricing to affiliate sites like simracingcockpit.gg, where it's embedded as a shortcode. There's more on the wider system in retail product data collection.
Our production systems that serve jobs and prices run on Cloudflare. In the seven days to 1 October 2026, yubhub.co, our jobs platform, handled about 690,000 requests a day, and simracingcockpit.gg about 275,000. The price scrapers and the price database behind simracingcockpit.gg don't sit on Cloudflare; they run on n8n on a VPS.
The demo follows Master - Shopify's design but swaps Postgres for a JSON file on disk, so you can build it without a database.
Step 1: the triggers and the store list
Add a manual trigger and a schedule
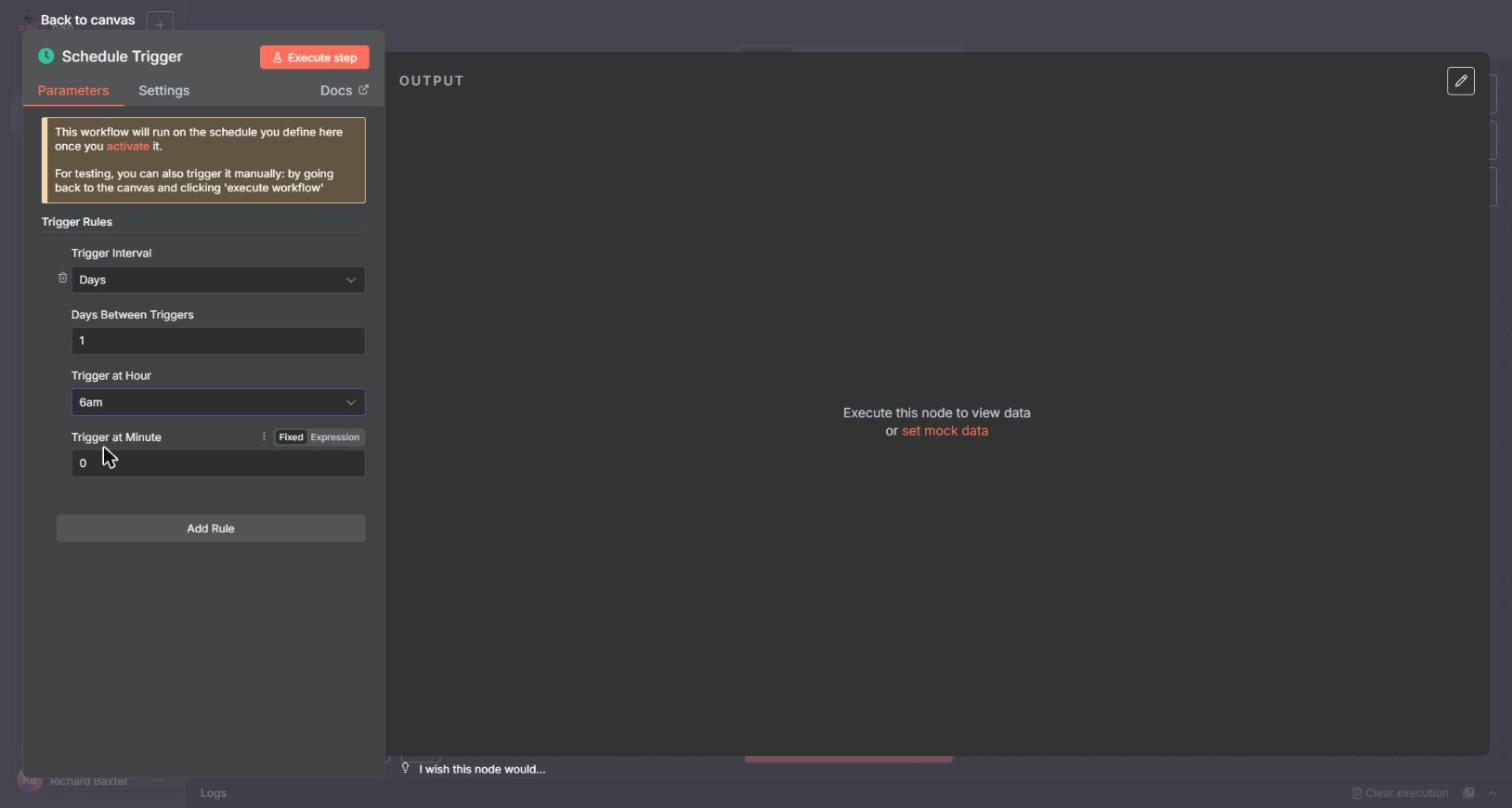
Create a new workflow and add the "Trigger manually" node. On the canvas it shows as "When clicking 'Execute workflow'", and it's what you'll use to run the flow while you build it. Then add a Schedule Trigger and set Trigger Interval to Days, Days Between Triggers to 1, Trigger at Hour to 6am and Trigger at Minute to 0. Wire both triggers into the store list node from the next step, so either one can start a run.
Look at the note in the Schedule Trigger panel: the workflow only runs on its schedule once you activate it. Every run below was started from the editor, not by the schedule.
List the stores in an Edit Fields node
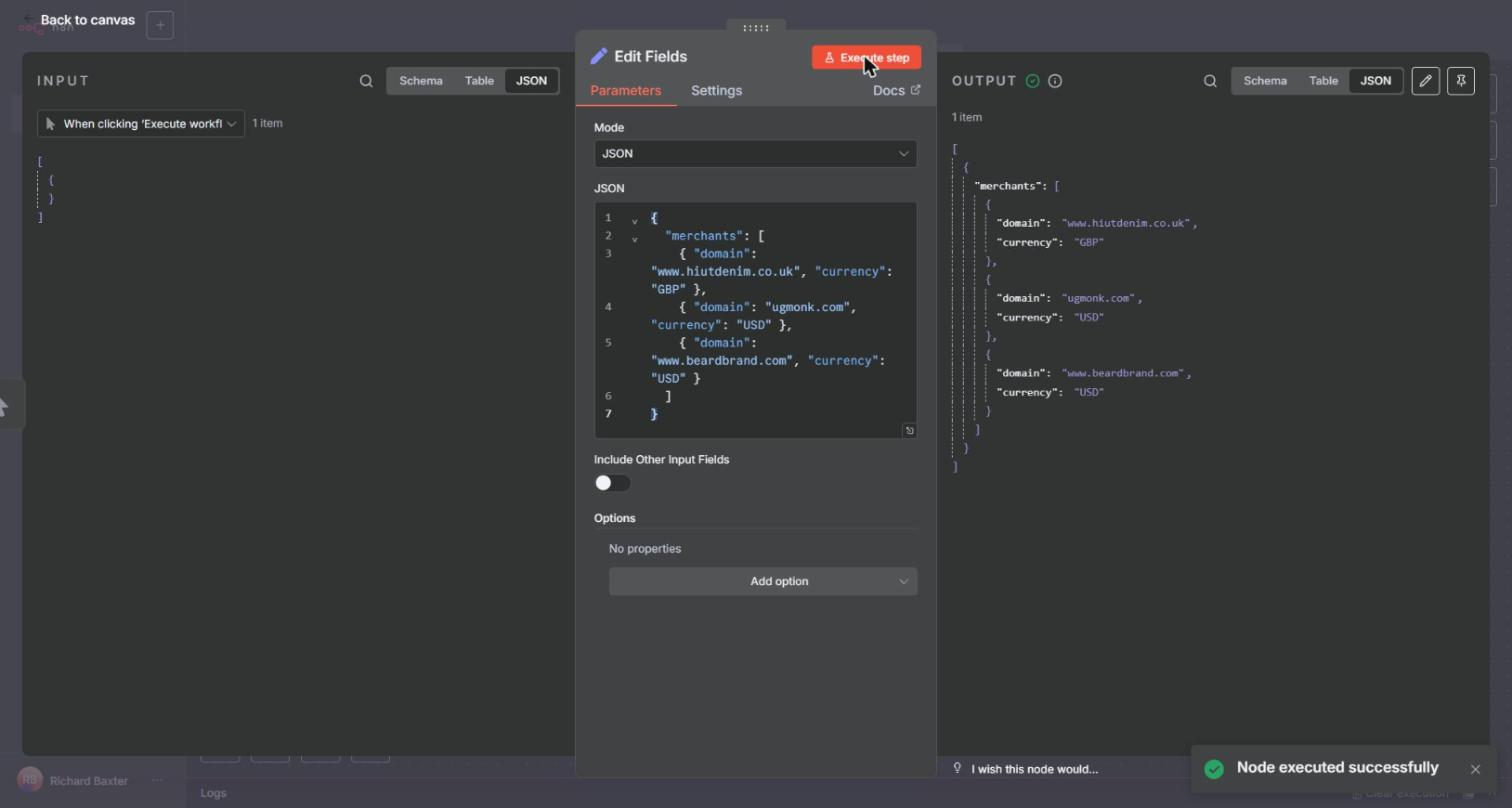
Add an Edit Fields (Set) node, switch Mode to JSON and paste the array below. It holds three small public Shopify stores: Hiut Denim, which prices in GBP, and Ugmonk and Beardbrand, both in USD. The currency sits in the config because /products.json doesn't carry one. Production takes each merchant's currency from its config line too.
Click Execute step and you should see one item, holding a merchants array of three. An item is one record in n8n. Each node takes a list of items in and passes a list of items on to the next. Rename this node "Merchant list".
{
  "merchants": [
    { "domain": "www.hiutdenim.co.uk", "currency": "GBP" },
    { "domain": "ugmonk.com", "currency": "USD" },
    { "domain": "www.beardbrand.com", "currency": "USD" }
  ]
}
Split the list into one item per store
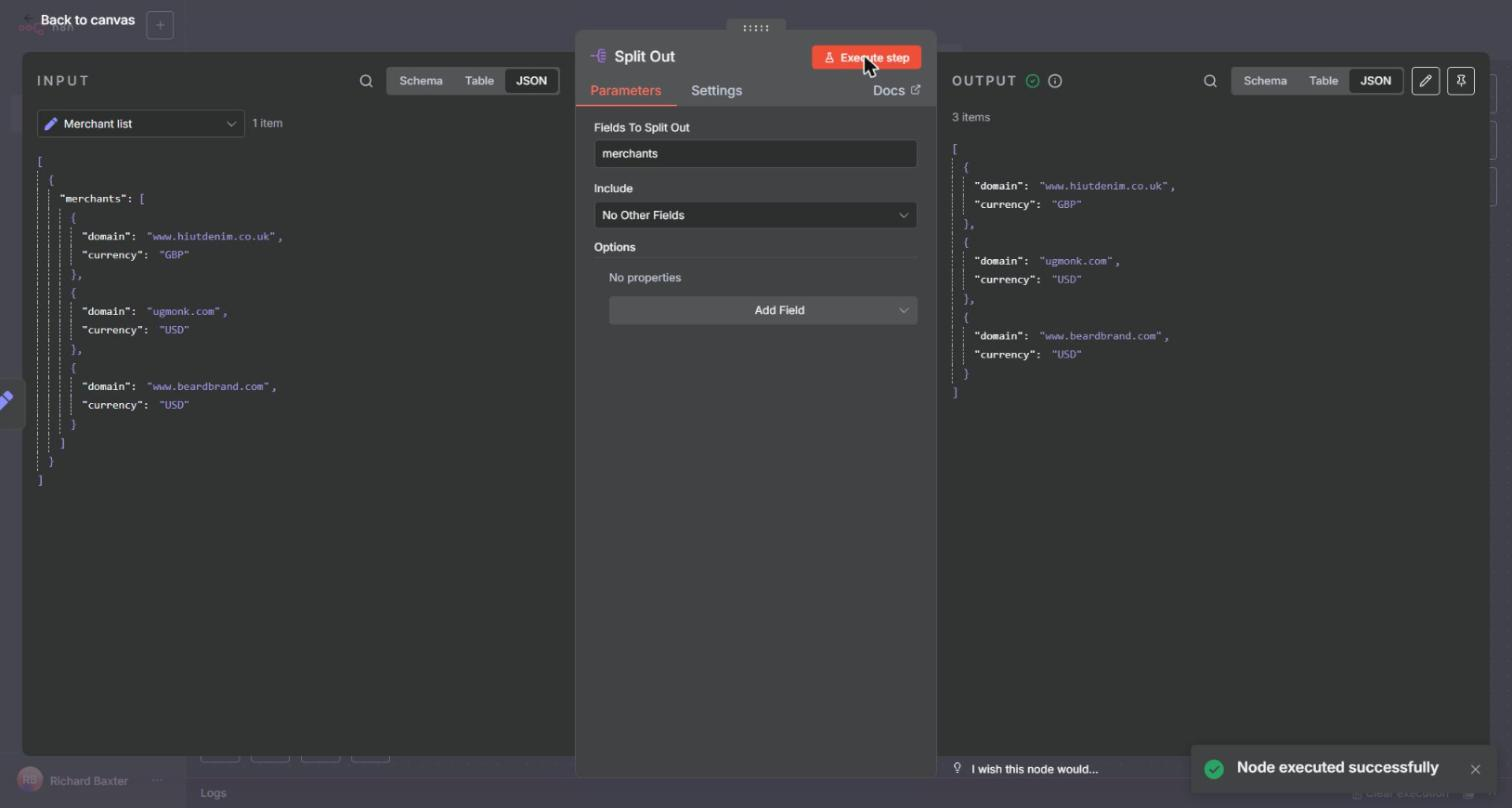
Add a Split Out node and set Fields To Split Out to merchants. Execute step turns the one item into three, each with a domain and a currency. The next node runs once for each item it receives, which means one fetch per store.
Step 2: fetch each store's products.json
Point an HTTP Request node at products.json
Add an HTTP Request node, set Method to GET, and put the expression below in the URL field. For the first item the preview should resolve to https://www.hiutdenim.co.uk/products.json?limit=250. Then turn on Send Headers and add a User-Agent of Houtini-PriceMonitor-Demo/1.0 (+https://houtini.com). That names the bot and links to the site behind it, which is how my WooCommerce flow identifies itself too.
The limit=250 is the page size production uses. These three stores fit in one page each, with 120, 190 and 65 products, so there's no paging here. A bigger catalogue needs it: production keeps asking for the next page until one comes back with fewer than 250 products.
https://{{ $json.domain }}/products.json?limit=250All three stores return a 429
Click Execute step. n8n says it will execute 3 times, once for each input item. Mine failed on item 0 with "The service is receiving too many requests from you" and error code 429. n8n's suggestion was to space the requests out using the batching settings under Options.
Spacing the requests out couldn't help, because it was the server's first request to that store. I tried no User-Agent at all, then that bot name, then a desktop Chrome string, and got a 429 every time. With the node set to carry on past errors, as in the next step, all three stores returned a 429. The same three URLs from my desk, on my home connection, returned 200 with 120, 190 and 65 products.
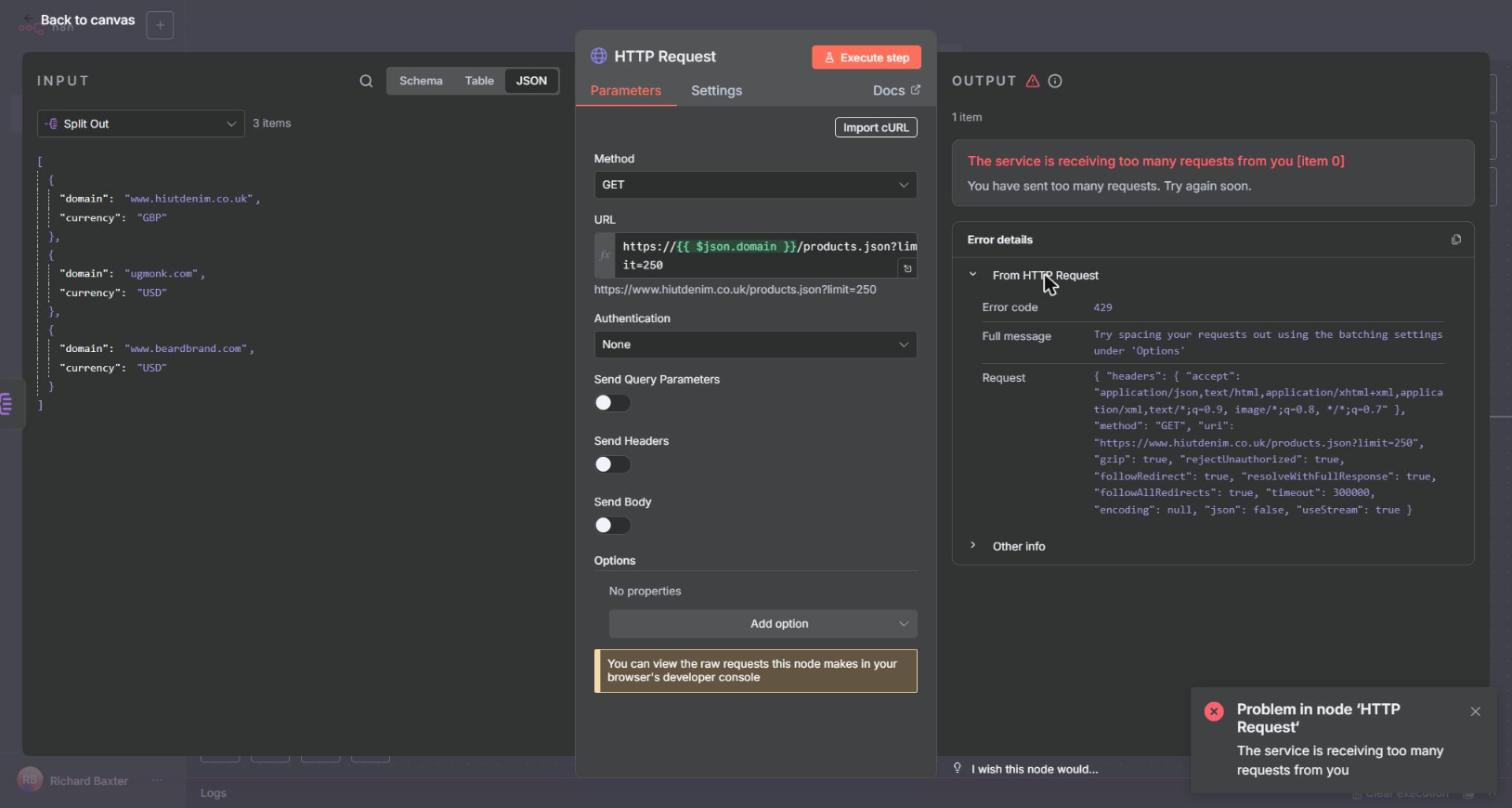
So the stores were refusing the server's IP, which is a datacentre address on a Hetzner VPS, and no batching setting changes that. Shopify's help centre says every request to a Shopify store passes through Cloudflare first, with a web application firewall and DDoS protection there to keep out most automated traffic. Shopify's developer docs cover a single-product .js endpoint, and I couldn't find any Shopify page that documents /products.json.
My production flow runs on the same server. Since 13 September it has fetched every /products.json page through Firecrawl's residential proxies, and the code comment says why: "residential proxies bypass the datacenter-IP block".
Let one blocked store fail without stopping the run
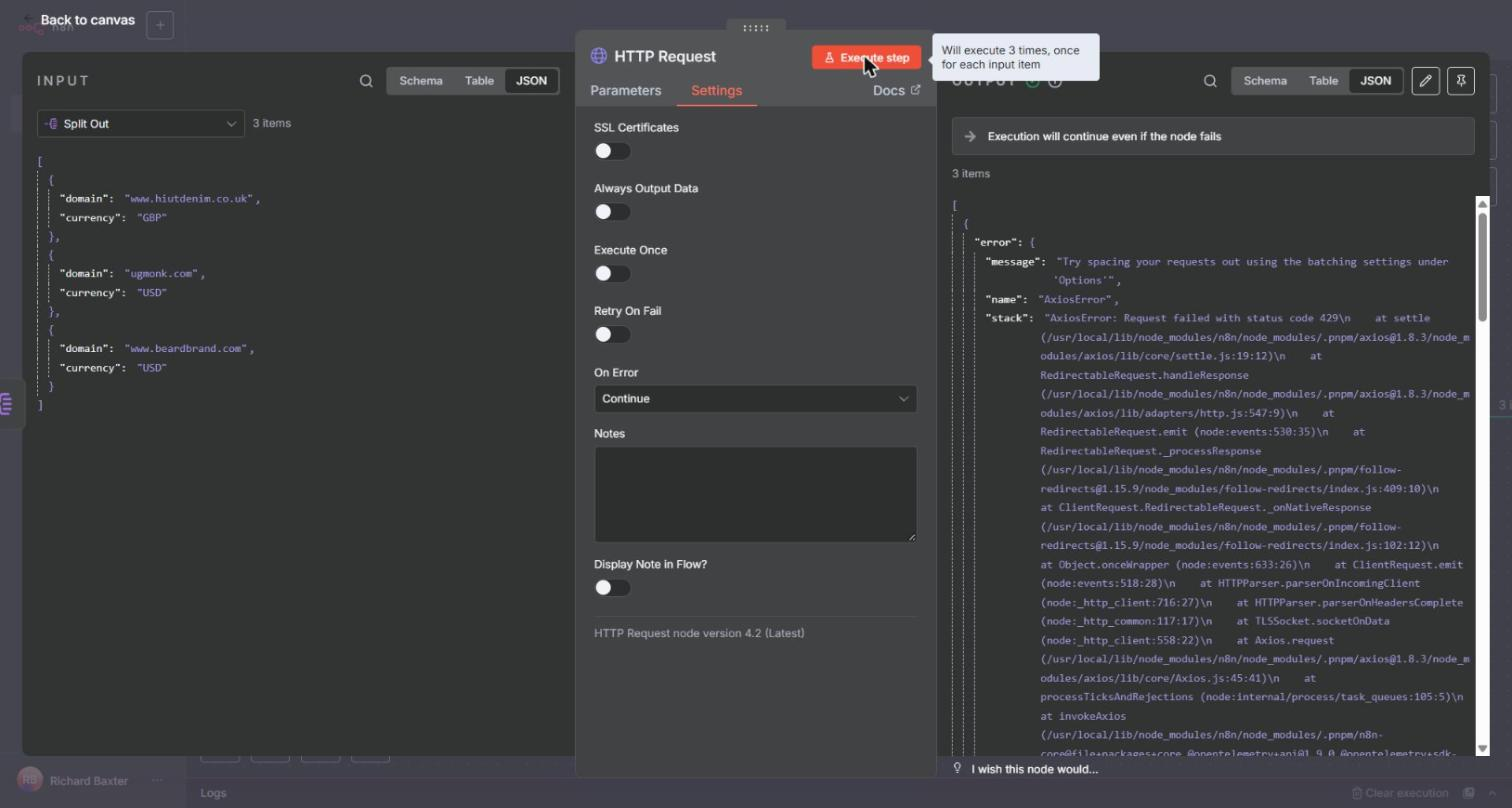
A blocked store shouldn't stop the others. Open the HTTP Request node's Settings and set On Error to Continue; the option reads "Pass error message as item in regular output". Run it again and you get three items instead of a stopped workflow. Each one is an error object: AxiosError, "Request failed with status code 429". The Normalise code in Step 3 checks for that error, logs the store and skips it.
Rename this node "Fetch products.json". In production the fetch Code node catches each store's failure and logs it, so one dead store doesn't stop the other twelve.
Pinned data from my desk
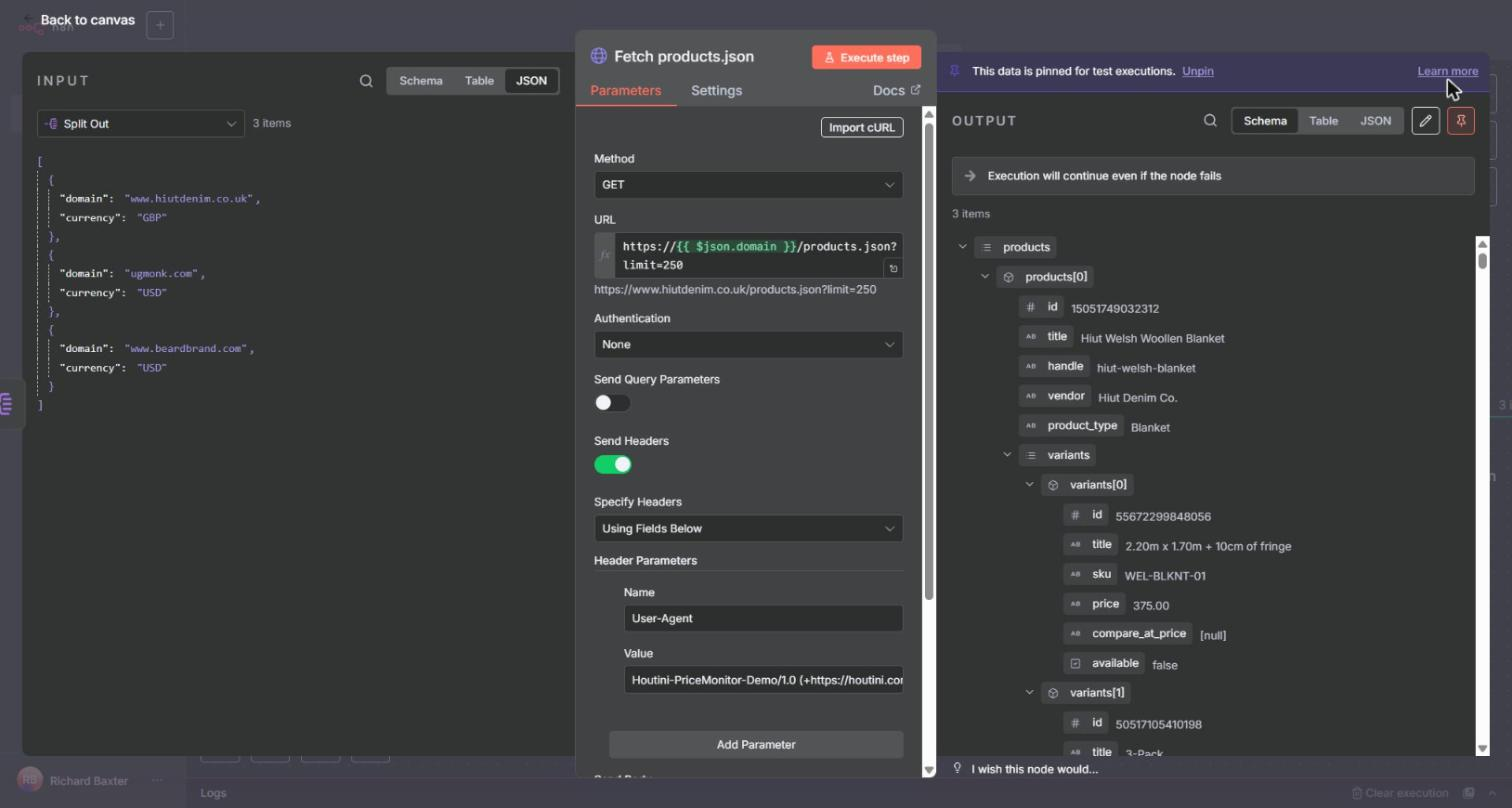
To finish the build I needed real responses, so at 22:20 I fetched the three feeds from my desk and pinned them to the Fetch node. n8n uses pinned data on test runs from the editor and ignores it on production runs; the docs say pinning "isn't available for production workflow executions".
I trimmed the responses down to the fields the flow reads and pasted them in through the output panel: Edit output (the pencil icon) > paste > Save. The banner then reads "This data is pinned for test executions." From here on, on a manual run, the Fetch node doesn't call the stores. Every node after it runs on the captured prices.
For a live run you need a route the stores will answer. That means a proxy, the way production goes through Firecrawl, or n8n running on a connection the stores don't refuse.
Step 3: normalise every product to one shape
Add a Code node after the Fetch node, leave Mode on Run Once for All Items, and paste the code below. Run Once for All Items is the default. The code runs once and sees every input item together, rather than running separately for each one. Rename the node "Normalise".
// One item in per store (its /products.json response), one item out per product.
const stores = $('Split Out').all();   // same order as the Fetch items
const out = [];

$input.all().forEach((item, i) => {
  const store = stores[i].json;
  if (item.json.error) {               // blocked or failed store: log it and carry on
    console.log(`${store.domain}: ${item.json.error.status || item.json.error.message}`);
    return;
  }
  const seen = new Set();
  for (const p of item.json.products || []) {
    const variants = p.variants || [];
    const prices = variants.map(v => parseFloat(v.price)).filter(n => !isNaN(n));
    if (!prices.length) continue;      // nothing sellable
    let sku = (variants.find(v => v.sku) || {}).sku || `auto-${p.id}`;
    if (seen.has(sku)) sku = `auto-${p.id}`;   // two products sharing one store SKU
    seen.add(sku);
    out.push({ json: {
      store: store.domain,
      sku,
      title: p.title,
      price: Math.min(...prices),      // the "from" price: cheapest variant
      currency: store.currency,
      url: `https://${store.domain}/products/${p.handle}`,
    }});
  }
});

return out;
The code pairs each response with its store by position, because the Fetch items come out in the same order as the Split Out items. It skips any error item and logs which store it was. For each product it takes the cheapest variant as the price, which is the "from" price the store shows. It takes the SKU from the first variant that has one. If there's no SKU, or the store has already used that SKU on another product, it falls back to auto- plus the product id; the gotchas explain why. The product URL is built from the product's handle, the URL-friendly name Shopify gives every product.
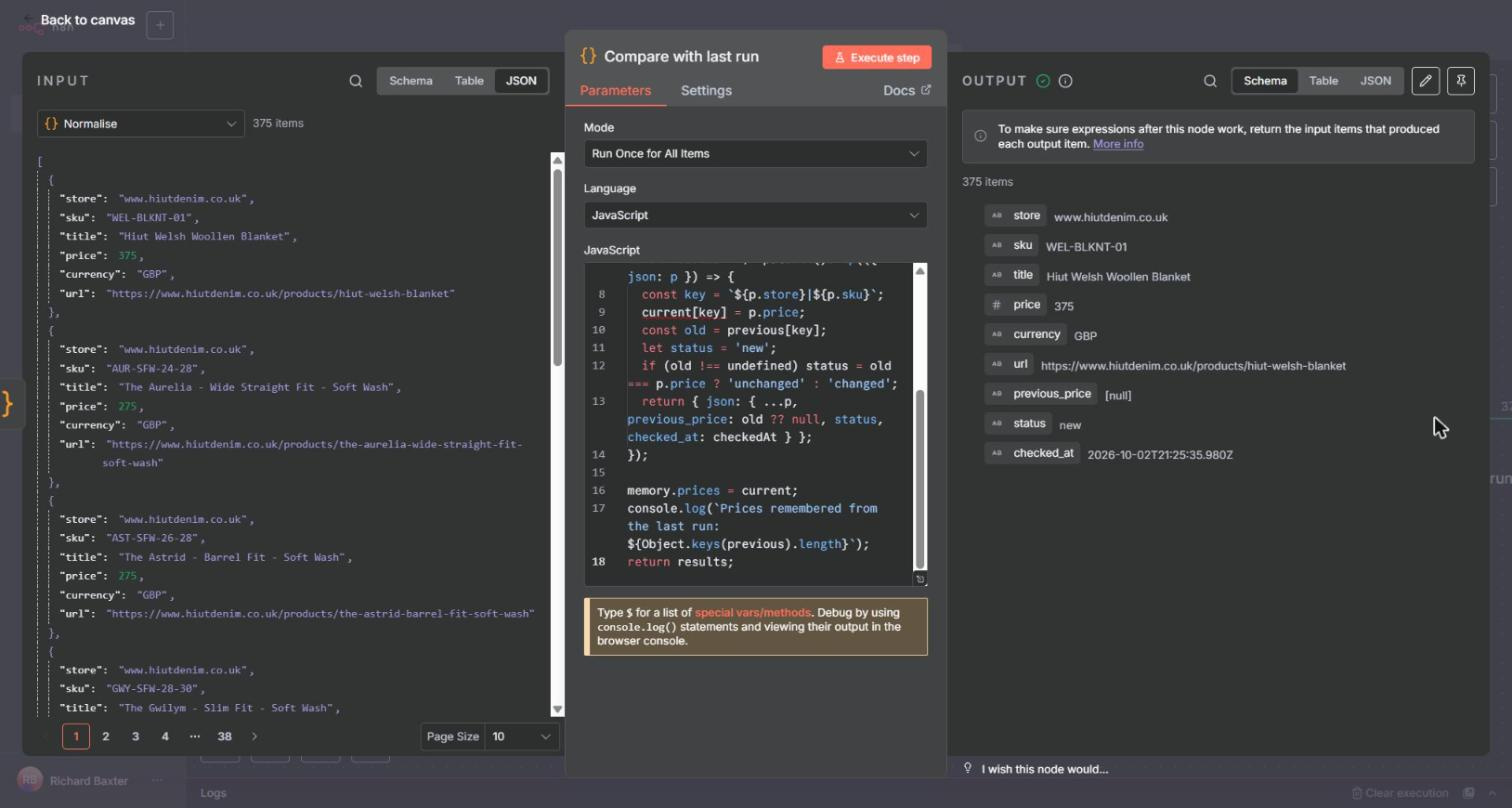
Execute step should return 375 items: 120 + 190 + 65. My first one was the Hiut Welsh Woollen Blanket, SKU WEL-BLKNT-01, price 375, currency GBP.
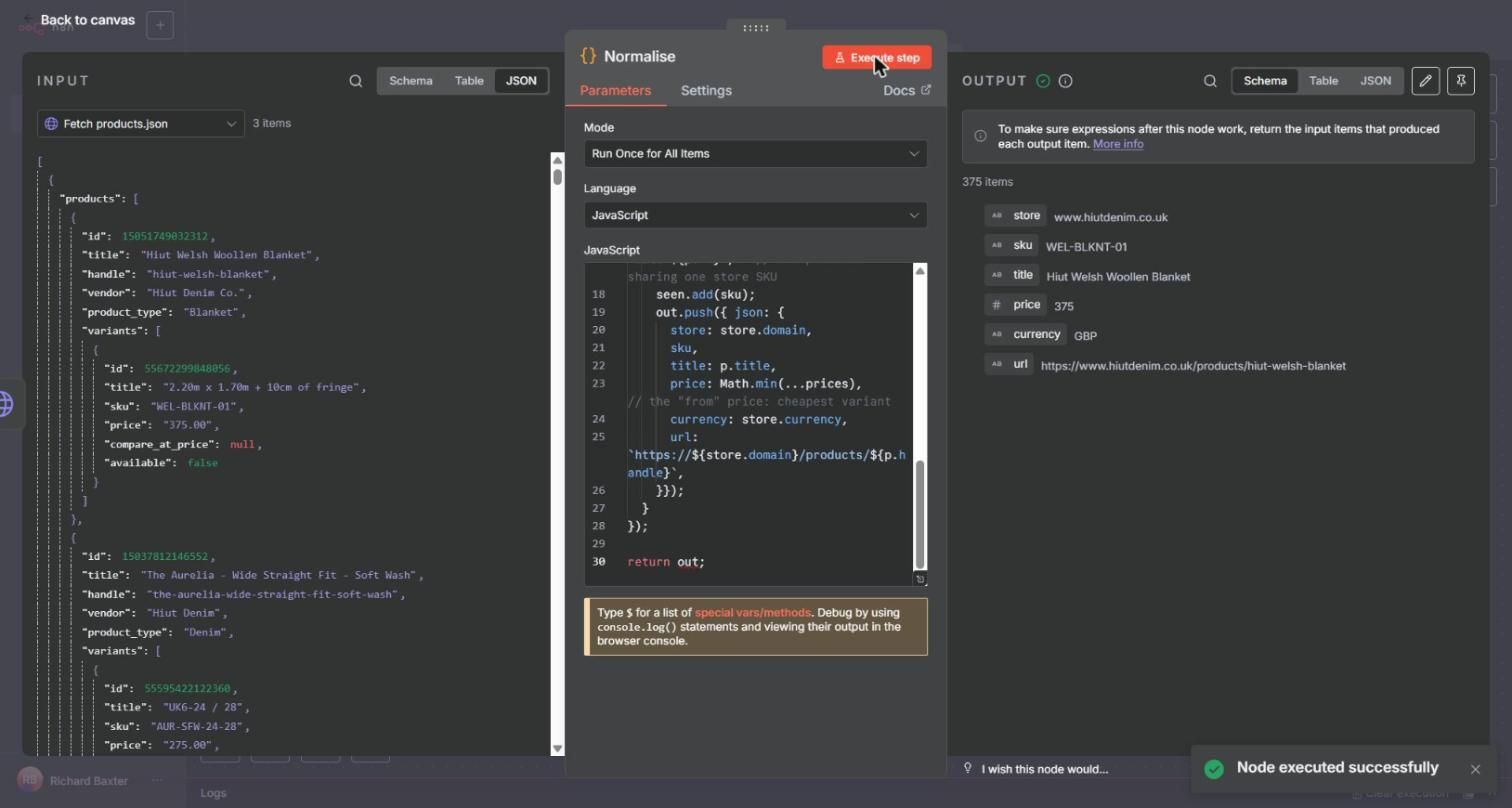
n8n also showed a notice about returning the input items that produced each output item. It's harmless here, because the compare step reads the whole Normalise output with $('Normalise').all() rather than per-item expressions.
Step 4: compare with the last run and flag changes
Why workflow static data didn't work
My first compare used workflow static data. That's a small block of data n8n keeps for each workflow, which a Code node reads and writes with $getWorkflowStaticData('global'). The plan was to save every price at the end of a run and read them back at the start of the next.
I ran the whole workflow twice from the editor, as executions 977529 and 977530. Both runs marked all 375 products "new", and on the second run previous_price was still null. When I asked the API for the workflow, its static data was empty.
The n8n docs say static data "isn't available when testing workflows". It's only saved when the workflow is active (n8n 2.x calls it published), started by its trigger or a webhook, and the run succeeds. So every run you launch from the editor starts from nothing, and you can't test the comparison while you're building it. On the n8n community forum, one user found it "only gets saved during non-test-runs".
Keep the last run in a file
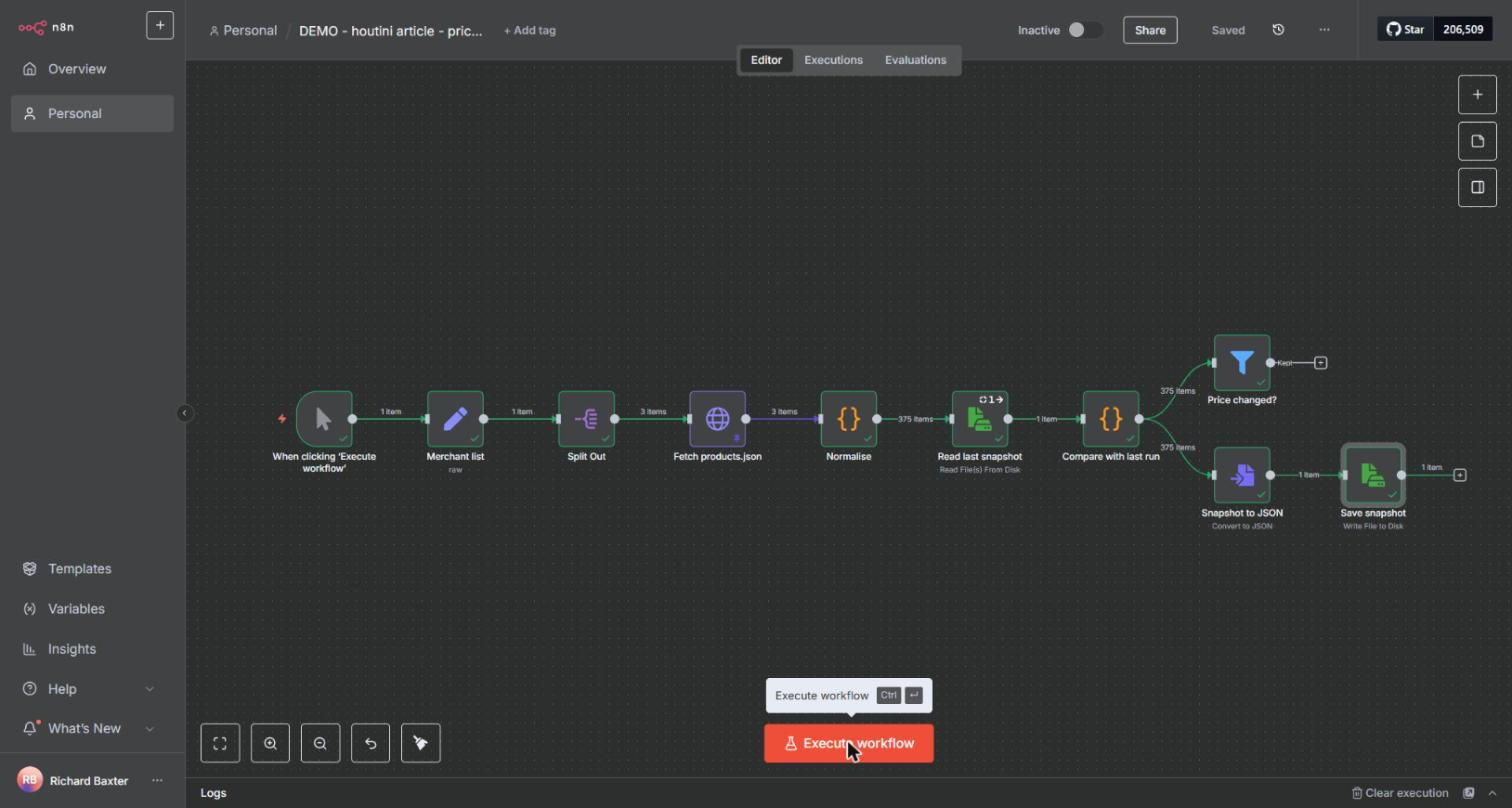
So I moved the last run into a file. Add a Read/Write Files from Disk node between Normalise and the compare step, choose Read File(s) From Disk, and set File(s) Selector to /tmp/houtini-demo-prices.json. Name the node "Read last snapshot". In its Settings, turn on Always Output Data and Execute Once, and set On Error to Continue.
The first run has no file to read. With Always Output Data on and On Error set to Continue, the node passes on one empty item rather than stopping the run. Execute Once makes a node run once however many items arrive; without it, n8n said this node would execute 375 times, once for every product.
Then add a Code node called "Compare with last run" with the code below. It reads the file with this.helpers.getBinaryDataBuffer(0, 'data'), which is the method the n8n docs tell you to use, and builds a map of store|sku to price. Every product comes out marked new, unchanged or changed, with its previous_price and a checked_at time.
// Compare this run's prices with the last snapshot on disk.
// Input: the "Read last snapshot" item (empty on the very first run).
let previous = {};
const snap = $input.first();
if (snap.binary && snap.binary.data) {
  const buf = await this.helpers.getBinaryDataBuffer(0, 'data');
  for (const row of JSON.parse(buf.toString('utf8'))) {
    previous[`${row.store}|${row.sku}`] = row.price;
  }
}

const checkedAt = new Date().toISOString();
const results = $('Normalise').all().map(({ json: p }) => {
  const old = previous[`${p.store}|${p.sku}`];
  let status = 'new';
  if (old !== undefined) status = old === p.price ? 'unchanged' : 'changed';
  return { json: { ...p, previous_price: old ?? null, status, checked_at: checkedAt } };
});

console.log(`Prices in the last snapshot: ${Object.keys(previous).length}`);
return results;
/tmp is fine for a demo on 1.107.3; from n8n 2.0 the node can't reach it unless you add it to N8N_RESTRICT_FILE_ACCESS_TO. In Docker the path is inside the container, and a rebuilt container loses it, so keep anything you want to hold on to on a mounted volume, or in a table. Production keeps its prices in Postgres.
Filter down to the price changes
The compare node's output goes two ways. On the first branch, add a Filter node called "Price changed?" with the condition below. Whatever it keeps is your list of price changes, the feed you'd send an alert from; the demo stops there and sends nothing.
{{ $json.status }} is equal to changedOn the second branch, add Convert to File > Convert to JSON, set to All Items to One File, and then a Read/Write Files from Disk node on Write File to Disk with the same path, /tmp/houtini-demo-prices.json. That file is the snapshot the next run reads. The write operation takes a binary field as its input, which is why the JSON goes through Convert to File first. Name the two nodes "Snapshot to JSON" and "Save snapshot".
Verify it works
Run 1 (execution 977532) found no file, so all 375 products came out "new" and the filter kept none of them. Run 2 (977533) read the 104 kB snapshot and marked all 375 "unchanged", and again the filter kept nothing.
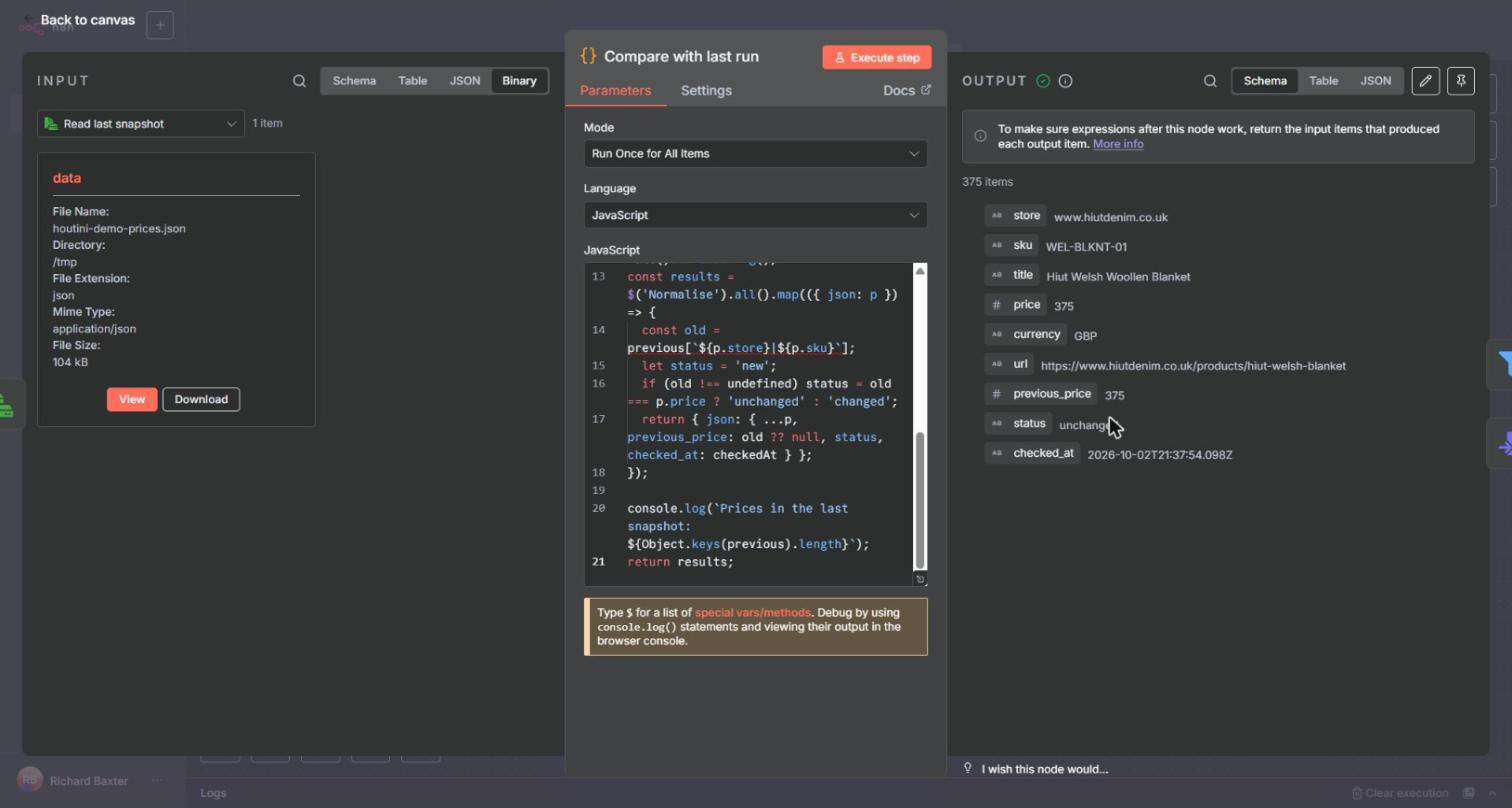
Before run 2 I fetched the feeds again from my desk, about 15 minutes after the first capture. The files were byte-identical, so no price had moved at any of the 375 products, and the pinned data stayed as it was.
To prove the detection fires, I edited one price in the pinned data by hand, taking the Hiut Welsh Woollen Blanket from 375.00 to 350.00, and ran the workflow again as 977534. The filter kept that one item and discarded the other 374.
{
  "store": "www.hiutdenim.co.uk",
  "sku": "WEL-BLKNT-01",
  "title": "Hiut Welsh Woollen Blanket",
  "price": 350,
  "currency": "GBP",
  "url": "https://www.hiutdenim.co.uk/products/hiut-welsh-blanket",
  "previous_price": 375,
  "status": "changed",
  "checked_at": "2026-10-02T21:40:07.284Z"
}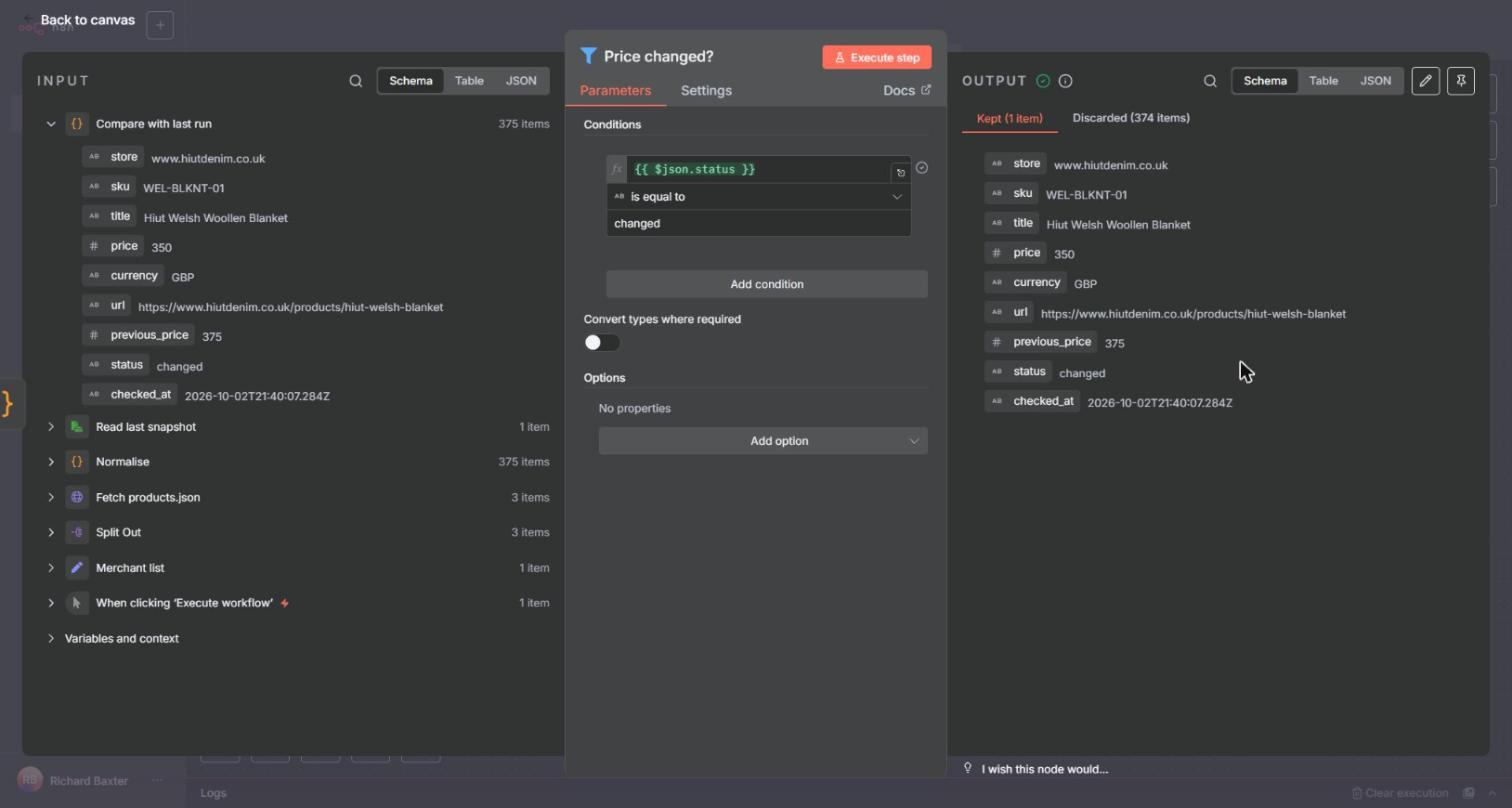
When I restored the desk capture, the next run flagged the blanket again, from £350 back to £375, and the snapshot held the unedited prices.
Gotchas
These come from the build above and from my production flows, and I'm sharing them so you don't lose time to them as well.
Two products can share one SKU
A store can give two products the same SKU. If your save key is store plus SKU, one product with a shared SKU overwrites another and you won't see it happen. Production guards against it in the fetch code: the second product to use a SKU gets auto- plus its product id instead. The Normalise code above carries that line.
Save in batches that fail on their own
My production save is a Postgres upsert. Under Options, Query Batching is set to Independently. In the node's Settings, On Error is set to Continue, and Retry On Fail allows 3 tries. The default batching, Single, is all-or-nothing, which means one bad row fails the whole batch and none of it saves.
Never run a cleanup DELETE after a scrape
In July 2026 I was moving stores off their old Firecrawl flows. The new Shopify scrape saved 1,049 of 1,049 products, with no error. Then a one-time cleanup DELETE, written to clear out the old Firecrawl rows, ran after each scrape and deleted the fresh rows instead: 960 the first time, 1,171 the next.
I first put it down to a duplicate-SKU upsert failure. Wrong. The execution log showed the save had worked, and the rows had gone afterwards.
So a one-off DELETE runs before the first new scrape, never after, and the execution log gets read before anyone starts theorising. My live stale-row cleanup now deletes only rows the latest crawl didn't touch and that are more than 30 days old.
A validation rule can drop a whole store without an error
Production checks every product before it saves. Each store has a substring its product URLs must contain, and a row that fails is dropped with a console line, not an error. The Moza entry said /product/, but Moza's URLs use /products/, so all 98 Moza rows were dropped without a word. That's fixed now.
On 2 October the validation step dropped 31 rows, all priced at 0 or less, which is what its price check is there to catch.
Firecrawl's docs say enhanced, not stealth
Production's fetch code asks Firecrawl for proxy:'stealth', which is how it gets /products.json past the datacentre block from Step 2. It then parses the JSON that comes back, because the feed has exact prices, variants and images with nothing to guess at.
Firecrawl's docs no longer list stealth. They mark the proxy parameter as deprecated and name three modes, basic, enhanced and auto, and the old Stealth Mode page now redirects to Enhanced Mode. Check the setting before you copy production's across. If you haven't used it, there's a walkthrough in how to use Firecrawl in Claude Desktop.
A summary query can run once per item
My production status report runs a stats query over the whole table. It sits after a node that emits one item per product, and with no Execute Once set, it ran once for every item. On 2 October it ran 2,889 times and took 168.9 seconds of a 233-second run. Settings > Execute Once fixes it, and the demo's Read last snapshot node has it on for the same reason.
The schedule runs in the instance's timezone
The Schedule Trigger uses the workflow's timezone if one is set, otherwise the instance's, and the default on self-hosted n8n is America/New_York. My instance is on New York time, which is why production's midnight run started at 04:00 UTC on 2 October. The demo's 6am is 6am in New York, too. To change it, set the timezone in the workflow's Settings.
The public API can't start a run
I tested n8n's public REST API on 2 October against the demo workflow: POST /api/v1/workflows/{id}/run and /execute both returned 404, and POST /api/v1/executions returned 405. The docs list retrying an execution, not starting a new one. To trigger the workflow from outside n8n, put a Webhook node in front of it.
Where to go from here
Move the snapshot into a database table keyed on store and SKU, saved as an upsert in independent batches, the way production does it. Put whichever node sends your alerts after "Price changed?". Add stores by adding lines to the merchant list, and add paging once a catalogue goes past 250 products.
Matching thousands of products without barcodes across Akamai-protected retailers is the competitor price monitoring end of the job, and if that's yours, we should speak. Otherwise, run n8n somewhere the stores will answer, or send the Fetch node's requests through a proxy, then activate the workflow. The Schedule Trigger takes over at 6am New York time, and the next run reads the snapshot this one wrote.
Continue reading.
- How-to GuidesOpenCode vs Claude Code: Setting Up OpenCode Desktop on Windows
- How-to GuidesHow to Connect Google Trends to Claude Code
- How-to GuidesCLAUDE.md: How to Write One That Stays Lean
- How-to GuidesHow to Make a PDF Report with Claude
- How-to GuidesHow to Make a Presentation with Claude
- How-to GuidesHow to Benchmark vLLM: Find the Best Model, Quant and Settings for Your GPU