Getting Started with Claude: a Beginner's Guide
If you've decided to try Claude, the first hour can be confusing - there's the browser, the Desktop app, Cowork on the left sidebar, Claude Code in a tab next to it. Here's how all of that fits together and what to do first, from someone who lives in it every day.

If you've decided to try Claude, the first hour can be confusing. There's claude.ai in your browser. There's a Claude Desktop app you can download. There's something called Cowork on the left sidebar that does work for you. There's a Claude Code tab next to it that looks like it might be for developers. There's a Customize panel that contains three sub-tabs with names like Skills and Connectors and Plugins. None of the official documentation explains how all of these fit together, because the docs are written one feature at a time.
This is the explanation. Claude Desktop is a single app on your computer, and inside it are four different modes for four different kinds of work. You don't pick one or the other - you use whichever one fits the task in front of you. By the end of this article you'll know what each mode is for, what you'll see the first time you open it, and the small handful of beginner traps that catch everyone once.
I use all of it every day. The walkthrough below is the order I'd do it in if I were starting today.
Quick Navigation
What you get |
Signing up |
Your first hour |
Connecting your stuff |
Cowork |
Claude Code in the UI |
Beginner traps |
Install order
What you get when you install Claude Desktop
The thing on Anthropic's download page is one app called Claude Desktop. Inside that single app are four working surfaces that share the same Claude underneath:
- Chat - the conversational mode you're probably already familiar with from claude.ai in a browser. Faster locally because there's less browser overhead. This is where you ask Claude questions, brainstorm, write, paste in a file, get something back.
- Cowork - an agentic workspace where you give Claude a goal and walk away. Claude breaks the goal into steps, runs them in a sandboxed virtual machine on your machine, and shows you the progress. Designed for people who don't want to write code or learn prompting patterns.
- Claude Code (the tab in the app, not the terminal CLI) - the same agent loop Cowork uses, but tuned for working with a codebase. Reads your repo, edits files, runs tests. The terminal version of Claude Code exists and is the same engine; the tab in Claude Desktop is the visual interface to it.
- Customize - the panel down the left sidebar with three sub-tabs (Skills, Connectors, Plugins). This is the extension surface. It's where you connect Claude to your Gmail, your Notion, your GitHub, your database. Without anything wired in here Claude is a capable chat partner. With the right connectors wired in it becomes a control panel for everything you work on.
That's the unified mental model and it's the most important thing to internalise before you start clicking. Most beginner guides treat Chat, Cowork, and Code as three separate products. They're not. They're three different doors into the same underlying Claude, with different UIs optimised for different kinds of task.
Signing up and picking a plan
Go to claude.ai and sign up. You'll be offered five tiers:
- Free - good enough to try Claude for a day or two. Limited model access, lower message rate.
- Pro - $20/month. The everyday paid tier. Full model access, much higher rate, Cowork available, Customize panel unlocked.
- Max - from $100/month, with $200/month and $300/month tiers above. For people running long agentic sessions or heavy Claude Code usage. Substantially higher rate limits and priority.
- Team - $20/seat for shared workspaces.
- Enterprise - sales-led, for organisations with compliance and SSO requirements.
If you're just starting, Pro is the right tier. It's where the useful features unlock and the message limits stop interrupting you. Free is good for confirming Claude is for you; Max is for when you've already worked out you want to run agentic loops all day.
The referral link above includes a free week of Claude Code for new accounts, so if you want to try the coding side before committing to a subscription, that's the cleanest path in.
Once signed up, download Claude Desktop from inside the web app (top-right Settings menu has the link) or directly from claude.ai/download . It runs natively on macOS and Windows. There's no official Linux build; the community maintains an unofficial one if you need it, but most beginners are on Mac or Windows.
Your first hour in Chat mode
When you first open Claude Desktop, you land in Chat. It looks like the browser version: a text box at the bottom, your conversation history above, a model dropdown near the send button.
A few practical things that aren't obvious:
Pick the right model. The dropdown near the send button lets you switch between tiers - usually a faster cheaper option, a default daily-use model, and a heavier reasoning model for hard problems. Match the model to the task. You don't need the reasoning model to summarise an email; you do want it for a tricky analysis or a long refactor.
Paste files directly. Drag a PDF, image, or text file straight into the chat box. Claude reads it. You don't need to extract text first. (One caveat on PDFs covered in the beginner traps section below.)
Use Projects to group related conversations. A Project is a folder of conversations that share a common context: a system prompt you've set, a set of files you've uploaded, a persona you've described. If you're going to come back to the same topic over multiple sessions, set up a Project and instructions once, then start new chats inside it rather than rebuilding the context each time.
The conversation has a finite memory. A single chat can hold a lot, but eventually you run out of context. When the conversation feels like it's drifting or Claude is forgetting things you said earlier, start a new chat. Pull the important context across by hand - or, if you set up a Project, just start fresh inside it.
This is the basic Chat loop and you can get a lot done with just this. Everything below adds more capability to the same Chat, or unlocks the other modes when Chat isn't the right tool.
Connecting Claude to your stuff
Click Customize in the left sidebar. Three tabs across the top:
- Skills - reusable instructions and personas Claude can adopt mid-conversation. Useful if you have repeat workflows ("review this contract using the property-law checklist") and want one click to load the right context.
- Connectors - integrations with external services. Gmail, Drive, Notion, GitHub, Linear, Stripe, hundreds more. This is the one that changes what Claude can do for you.
- Plugins - smaller-scope add-ons distributed by Anthropic and partners. Treat as Connectors' younger cousin.
The path to add a Connector: Customize → Connectors → click the + button → Browse connectors. That opens the Connectors directory at claude.ai/directory with around 440 verified integrations as of mid-2026. Pick the service you want, click Connect, sign in to the service via OAuth, done. Most Connectors take under two minutes to wire in.
There's also a custom-connector option (the + then Add custom connector) if you want to wire in a service that's not in the directory yet. That asks for a remote MCP server URL. Beginners can skip this for now and come back to it once they've used the directory ones.
The Connector you'll feel the impact of first is probably Gmail or Google Drive. Once Claude can read your inbox or your Drive folders, it stops being a generic chat partner and starts being something closer to "the smart assistant who knows my stuff".
Cowork: when you want Claude to do the work
Click the Cowork tab in the sidebar. The screen changes from a chat interface to a goal-and-plan UI. There's a single text box at the top labelled something like "What would you like Claude to do?". Below that is a plan area, an artifacts panel, and a context panel showing what Claude is working with.
The mental model: in Chat, you write back and forth. In Cowork, you describe an outcome and walk away. Claude breaks the outcome into a series of steps, executes them in a sandboxed virtual machine on your computer, and shows you what it produces.
A worked example. You'd type something like:
"Read the attached invoices folder, extract the supplier name, invoice number, date, and total from each PDF, build a spreadsheet that lists them sorted by date, and add a column flagging anything over £500."
You'd attach the folder. You'd hit go. Cowork would draft a plan (read folder → parse each PDF → extract fields → build spreadsheet → flag → save). Then it would execute it, panel by panel, showing you progress. Five to ten minutes later you'd have the spreadsheet on disk.
The catch a lot of beginners hit: Cowork tasks fail more often than Chat conversations, especially complex multi-step ones. The agent loop is good but not perfect. A practical rule: start with smaller tasks (one or two steps) to learn how it phrases its plans, then build up. When a task fails, the plan panel usually shows where it went wrong, and you can iterate on the prompt to give it a better second try.
The other practical thing about Cowork is that it's slower than Chat by design. Chat returns answers in seconds. Cowork runs jobs that take minutes to tens of minutes. That's the right shape when the alternative is doing the work yourself for an hour, but the wrong shape when you just want a quick answer.
Claude Code: the same agent loop for code
Click the Code tab in the sidebar. This is Claude Code with a UI on top - the exact same engine that runs in the terminal CLI version, but with a visual interface that makes it accessible without typing commands.
What you get visually that you don't in the terminal:
- A model dropdown right next to the send button (same as Chat) for switching between fast and heavy models mid-session
- A bypass-permissions toggle in Settings, so you can tell Claude to stop asking before every file edit when you're working on a throwaway project
- Visual plugin management instead of CLI commands
- The MCP servers from your
claude_desktop_config.jsonare loaded automatically
What's the same as the terminal: the agent loop itself, the slash commands like /agents for spawning parallel subagents, the file format for subagent definitions (.claude/agents/*.md with YAML frontmatter). If you use Claude Code in the terminal for power use, the UI version reads the same configuration and can pick up where you left off.
For a beginner, the UI version is the easier place to start. Open your project folder, ask Claude to "add tests for the authentication module", watch it read the code and propose changes. Approve or reject each diff. This is the rhythm.
For people who'd rather skip the visual UI and go straight to the terminal version (and the Code-specific MCP stack), the dedicated Claude Code article covers that side.
Common beginner traps
A few things that catch everyone once.
Cowork can't tell you when the task is too big until it tries. A first-week beginner habit is asking Cowork to do something ambitious in one prompt ("rebuild my entire marketing site"). The plan panel will show a 30-step plan, the run will fail halfway, and the lesson is that Cowork needs the task scoped down. Try splitting big goals into smaller Cowork runs that hand work off to each other.
Chat forgets things halfway through long sessions. When the conversation starts ignoring something you said earlier, it's not Claude being lazy - it's the context window filling up. Start a fresh chat and bring the important bits across by hand. Or set up a Project so the foundational context survives across sessions automatically.
The Free tier is for confirming Claude is for you, not for daily use. You'll hit the message rate cap fast. Most people who try it on Free decide "this isn't quite there yet"; the same people on Pro decide the opposite. If the trial week feels under-powered, that's the tier, not the tool.
Computer Use is slower than Connectors when both work. Cowork can drive your screen via a Computer-Use mode if a task needs UI interaction with an app that has no Connector. It works but it's noticeably slower than asking via an API connector. When a Connector exists for the service, use the Connector. Save Computer Use for the cases where there isn't one.
Don't put production tokens or passwords into a Chat. Use the relevant Connector (Stripe, GitHub, etc.) which handles authentication properly. There's a separate Houtini article on token hygiene covering the canonical pattern.
The install order I'd do today
If you're starting from scratch today, this is the sequence I'd follow:
- Sign up at claude.ai (free week of Claude Code included for new accounts), pick the Free tier to confirm Claude feels right, switch to Pro within a couple of days when you've got a real task to throw at it.
- Download Claude Desktop. Open it. Stay in Chat for the first hour. Try a few prompts you'd normally do in ChatGPT or Gemini and see how Claude feels different.
- Customize → Connectors → wire in one Connector that matches your daily work. Gmail or Drive are the usual first picks for non-developers; GitHub or Linear for developers.
- Start a Project in Chat with a short system prompt describing your context. Use it for one real task that took you over an hour last week. Notice the speed difference.
- Open Cowork. Try a small two-or-three-step task. Get a feel for the goal-and-plan UI. Build up from there.
- If you write code: open the Code tab on a small personal project. Ask Claude to add a small feature. Approve the diffs one at a time. This is the right rhythm for learning the agent loop without losing control.
- If you want the deeper MCP stack: the Houtini guides to the best MCPs for Claude Desktop and for Claude Code cover what to install next.
That's the order. None of it takes long; the bigger investment is changing your habits to use it.
If you need the hardware-and-OS-requirements side - what version of macOS, what Windows build, how much RAM, GPU requirements (none) - Claude Desktop System Requirements is the dedicated article.
Looking for more depth on one of these
- **Best MCPs for Claude Desktop** - the Connectors and MCP servers that change Claude Desktop from a chat window into a control panel.
- **Best MCPs for Claude Code** - the agent stack: Houtini LM for local-model offload, Sentry for debugging, Cloudflare and AWS MCPs for shipping.
- **How to set up LM Studio** - running local models alongside Claude for the tasks where local makes more sense than cloud.
- **Claude Desktop System Requirements** - the hardware and OS detail this article deliberately doesn't cover.
- **Claude Code: The Complete Beginner's Guide** - if you've decided the terminal CLI version of Claude Code is where you want to live, the dedicated companion guide.
Continue reading.
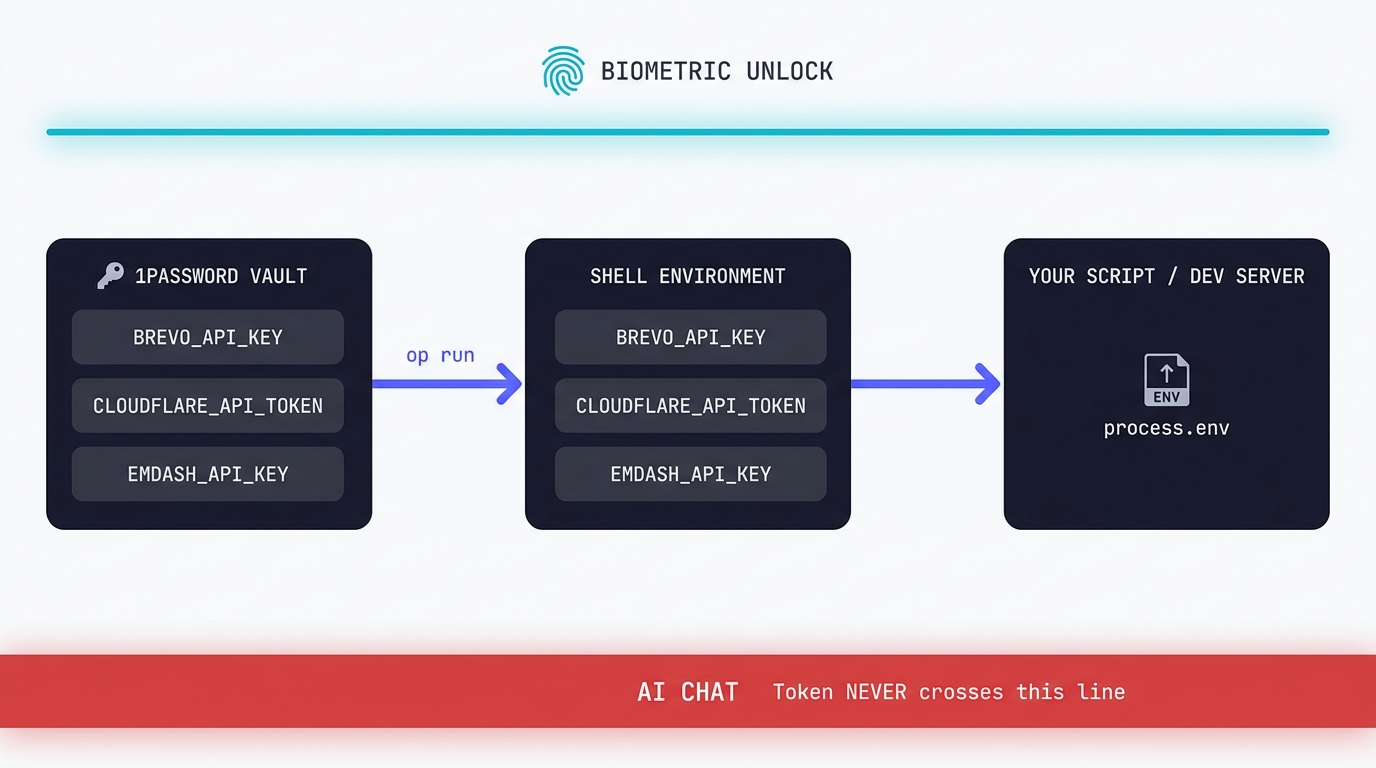
Claude Code API Key Security: A Guide to Token Hygiene
The simplest possible setup that keeps your production tokens out of AI chat windows. 1Password CLI, op run, and the conversational discipline that makes the rest of it work.
Swapping the Engine: How to Run Claude Code on Local Silicon for Zero Pennies
Claude Code's real power isn't the Anthropic model sitting behind it, it's the agentic : the file-system access, the tool use, the way it chains tasks together without you babysitting every step. I figured this out the expensive way. I ran…

A Beginner's Guide to Claude Computer Use
I've been letting Claude control my mouse and keyboard on and off to test this feature for a little while, and the honest answer is that it's simultaneously the most impressive and most frustrating AI feature I've used. It can navigate…