
My latest version of @houtini/gemini-mcp (Gemini MCP) now generates images, video, SVG and html mockups in the Claude Desktop UI with the latest version of MCP apps. But – in case you missed, you can generate images, svgs and video from claude. Just with a Google AI studio API key. Here’s how:
Quick Navigation
Jump directly to what you’re looking for:
What You Need |
What It Looks Like |
Your First Image |
Editing Images |
Grounded Generation |
Tips |
Real Workflows |
Mistakes
What You Need
You’ll need Claude Code or Claude Desktop, plus the @houtini/gemini-mcp server installed with a Gemini API key. Get your key from Google AI Studio – the free tier covers a single user easily (basically free).
Add Gemini MCP to Claude Code – with one command:
claude mcp add gemini-mcp -s user -- npx -y @houtini/gemini-mcpThen set your key: export GEMINI_API_KEY=your-key-here (or add it to your shell profile).
Add Gemini MCP to Claude Desktop – add this to your claude_desktop_config.json:
{
  "mcpServers": {
    "gemini": {
      "command": "npx",
      "args": ["@houtini/gemini-mcp"],
      "env": {
        "GEMINI_API_KEY": "your-api-key-here"
      }
    }
  }
}
FYI: your desktop config file lives at C:\Users\{username}\AppData\Roaming\Claude\claude_desktop_config.json on Windows, or ~/Library/Application Support/Claude/claude_desktop_config.json on Mac.
Restart Claude Desktop after saving and the tools show up automatically. npx pulls the package on first run, there’s no separate install step.
Never set up an MCP before? I wrote a step-by-step for Claude Desktop here, and there’s also a beginner’s guide to Claude Code if that’s your setup.
When you’re done and you’ve restarted, some tools show up in your Claude toolbox When you’re done and you’ve restarted, thirteen tools show up in your Claude toolbox: gemini_chat for grounded conversations, gemini_deep_research for multi-step research reports, generate_image and edit_image for the image work we’re covering here, generate_video for Veo 3.1 video clips, generate_svg for vector diagrams, generate_landing_page for self-contained HTML pages, describe_image and analyze_image for vision tasks, load_image_from_path for feeding local files into any image tool, gemini_prompt_assistant for prompt guidance, gemini_list_models, and gemini_help.
This article focuses on the two image tools – generate_image and edit_image – but the others are worth exploring once you’re set up.
What It Looks Like
Before we get into the tools, here’s what you see in Claude Desktop, generated images render inline with zoom controls, the file path, and the prompt that created them:

Diagrams and technical visuals work the same way:
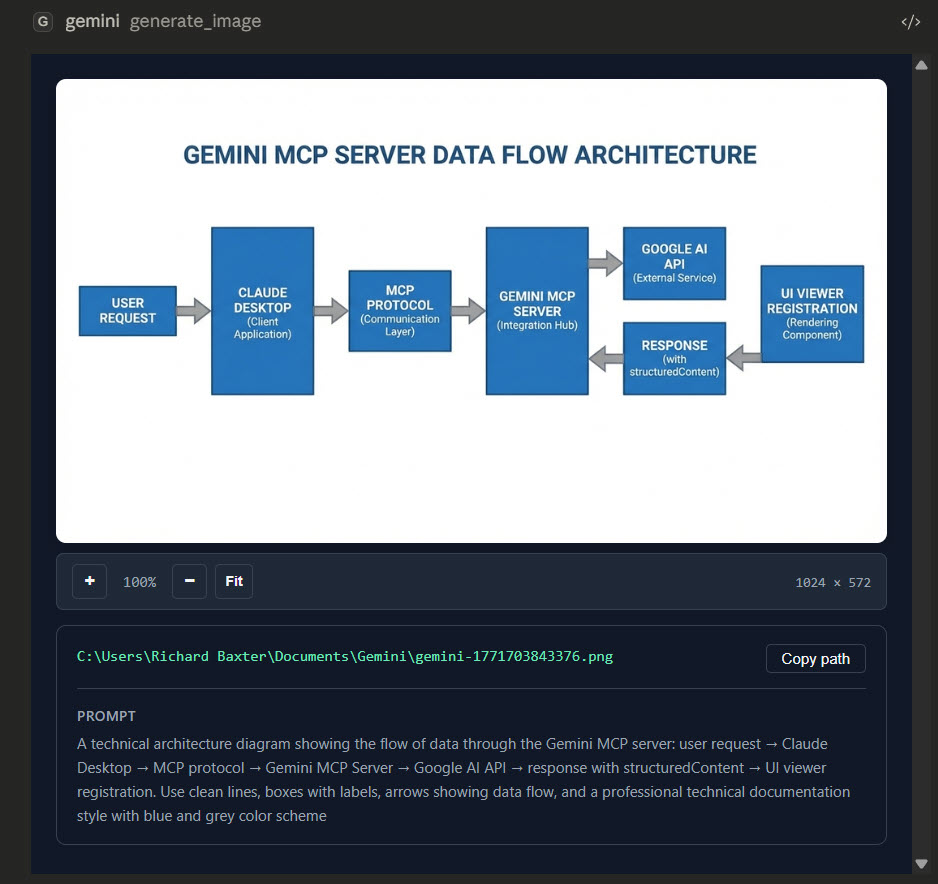
The preview is full-width inside the chat window – not a thumbnail. You can evaluate composition and content in about five seconds without opening the file. The full-res version sits on disk at whatever path you specified.
In Claude Code (the terminal version), you get the same inline preview if your terminal supports images, or a file path link if it doesn’t. Either way the PNG lands on disk.
Creating Your First Image
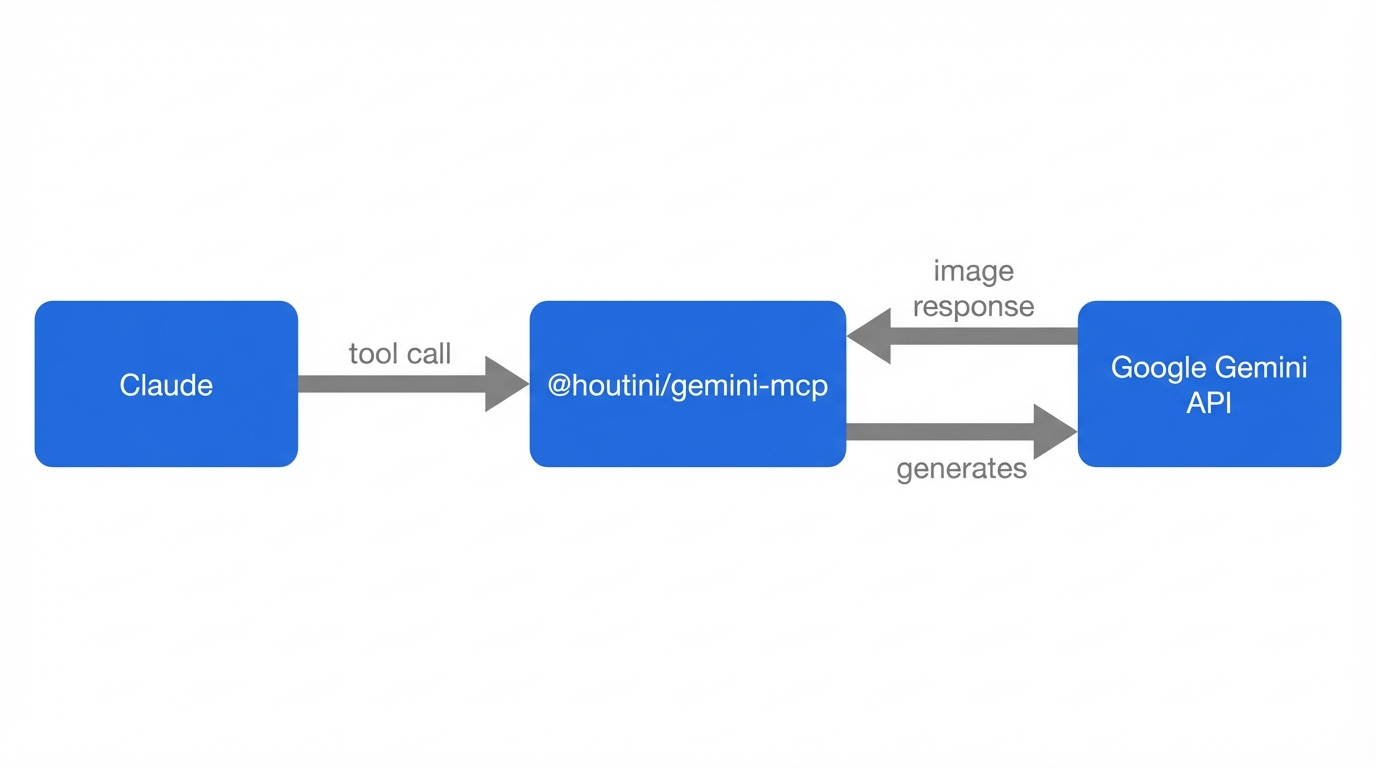
You literally just ask Claude for what you want. Claude writes the generation prompt behind the scenes, calls Gemini, and the image appears inline in your chat window. I needed an architecture diagram for an article last week – here’s roughly what I typed:
Generate a clean technical diagram showing how an MCP server connects Claude to external APIs. Claude on the left, MCP server in the middle, APIs on the right. Flat style, white background, blue and grey colours.
Claude takes that, writes a detailed prompt for Gemini’s image model (gemini-3-pro-image-preview, internally called Nano Banana Pro), and the result comes back as a full-width preview right in the conversation.
Meanwhile, the full-res file – roughly 2-5MB, proper production quality – has already landed on disk wherever you told it to save. (And if you forgot to specify a path, which I’ve done more times than I’d like to admit, it ends up in the MCP’s default output directory.)
The bit that makes this different from pasting a prompt into a standalone image generator is that Claude understands the context. Mid-article, you ask for a diagram – and Claude already knows the architecture you’ve been discussing for the last twenty minutes. Claude’s already got the context – you skip the re-explanation entirely.
Aspect ratios go from 1:1 to 16:9 – I mostly use 16:9 for article headers and 1:1 for social. Resolution goes up to 4K for print-quality stuff, though honestly, the default is plenty for anything web-bound.

Editing Images with Natural Language
The other tool – edit_image – is probably the one I lean on more, frankly. Hand it an image file path, describe what needs changing in plain English, and Gemini does the rest.
I use this all the time for article screenshots. I’ll capture a window, then tell Claude:
Add an orange callout box around the settings panel in this screenshot, with a label that says “Change this setting first”
Gemini edits the image in place – adds the annotation, keeps everything else untouched – and saves the result. For the kind of “here’s what to click” annotations that make how-to guides actually useful, it’s faster than opening Figma or Preview.

You can chain edits too. Each generation returns a thoughtSignature – a blob of model state that lets Gemini remember what it was working on. Pass it forward on the next edit and the model picks up where it left off, so you can refine iteratively: “make that label smaller”, “shift the border left a bit”, “change the callout colour to red”. Without the signature each edit starts fresh, which is annoying when you’re five tweaks deep into a diagram.
I’ve found three or four sequential edits is the sweet spot. Beyond that, small artefacts start to creep in and you’re better off regenerating from scratch with a more precise prompt.
Grounded Generation with Real Search Data
Set use_search: true on a generate call and Gemini hits Google before it creates the image – grounding the visual in actual, current data.
You get source URLs back too, so you can verify where the data came from.
That’s really handy for:
- Current weather visualised as an infographic (real temperatures, real forecast)
- Product pricing comparison cards with actual prices pulled from the web
- News event summary graphics with correct dates and facts
For anything where “roughly right” is fine, standard generation works. If the image has any numbers that could be fact-checked, use_search goes on. Learned that one the hard way.

One trade-off worth knowing: grounded generation is slower – maybe 15-20 seconds versus 5-8 for a standard call – and the visual polish dips a bit because the model’s spending brainpower on data accuracy instead of aesthetics. The 15-second wait is a small price. And frankly, a slightly rougher-looking chart that’s actually correct is infinitely more useful than a gorgeous one where the numbers are pure fantasy.
Tips for Better Results
A few things I’ve picked up after hundreds of generations:
Let Claude write the prompt.
You don’t need to write a Gemini-optimised image prompt. Just describe what you want in plain English – “a diagram showing X connecting to Y” – and Claude translates that into a detailed generation prompt with the right style keywords, colour specs, and composition instructions. Claude’s consistently better at this than I am.
Specify the style upfront.
If you want flat/minimalist, say so. If you want photorealistic, say so. If you don’t specify, the model defaults to something in between that’s rarely what you wanted. My go-to for article diagrams: “clean flat technical style, white background, blue and grey colour scheme, no gradients, no 3D.” For social graphics I’ll ask for something bolder – “modern, vibrant, dark background.”

Use reference images for edits.
The edit_image tool can take an existing image as a starting point. I’ll screenshot a rough layout from a whiteboard, pass it in, and ask Gemini to “redraw this as a clean technical diagram.” The reference gives the model spatial context that words alone can’t convey.
Be specific about what you don’t want.
“No text overlays”, “no people”, “no decorative borders” – negative constraints are just as useful as positive descriptions. I’ve found this saves a regeneration cycle about half the time.
Set aspect ratio to match the destination.
16:9 for article headers and blog images. 1:1 for social avatars and thumbnails. 4:3 for embedded content. Getting this right from the start avoids awkward cropping later.
Name your output path.
“Save it to ./images/architecture-diagram.png” in your prompt. Otherwise you’re hunting through temp directories for a file called gemini-1774353179041.png. Ask me how I know.
What You Can Use This For
After a few months of daily use – I built this MCP for my workflow – but here’s what I / (you can) do.
Diagrams for articles – Architecture diagrams, data flow visuals, comparison charts. Faster than Figma for anything schematic because I don’t have to think about layout – I describe the relationships and Claude handles the visual structure. I wrote about combining this with the design improvement workflow – using Gemini to critique and polish rough visuals too.
Annotated screenshots – I capture a window, then use edit_image to add callout boxes, numbered markers, or highlighted regions. I’ve never needed and that’s why.
Social media visuals – quick LinkedIn post graphics, carousel cover images. I covered a full carousel creation workflow using Gemini SVG generation in a previous article – but for single-image social posts, generate_image is the quicker path.
Quick mockups – “what would this look like as a marketing image” explorations before committing to a proper design. Sometimes the answer is “good enough to ship”, sometimes it’s “bin that, start over.”
What I don’t use it for: anything needing precise photographic realism, anything with human faces where accuracy matters, or anything with dense text that needs to be pixel-perfect legible. The model’s good – genuinely good – but it’s a generative model and text rendering is still its weakest point.
Already running Claude Code or Desktop? I wrote a full overview of the Gemini MCP covering everything else it can do. The MCP does a lot more than images – chat, search grounding, video generation with Veo – but the image tools are the ones I find myself reaching for most. Enjoy!
Related Posts
How to Make Images with Claude and (our) Gemini MCP
My latest version of @houtini/gemini-mcp (Gemini MCP) now generates images, video, SVG and html mockups in the Claude Desktop UI with the latest version of MCP apps. But – in case you missed, you can generate images, svgs and video from claude. Just with a Google AI studio API key. Here’s how: Quick Navigation Jump … <a title="How to Make Images with Claude and (our) Gemini MCP" class="read-more" href="https://houtini.com/how-to-make-images-with-claude-and-gemini-mcp/" aria-label="Read more about How to Make Images with Claude and (our) Gemini MCP">Read more</a>

Yet Another Memory MCP? That’s Not the Memory You’re Looking For
I was considering building my own memory system for Claude Code after some early, failed affairs with memory MCPs. In therapy we’re encouraged to think about how we think. A discussion about metacognition in a completely unrelated world sparked an idea in my working one. The Claude Code ecosystem is flooded with memory solutions. Claude-Mem, … <a title="How to Make Images with Claude and (our) Gemini MCP" class="read-more" href="https://houtini.com/how-to-make-images-with-claude-and-gemini-mcp/" aria-label="Read more about How to Make Images with Claude and (our) Gemini MCP">Read more</a>

The Best MCPs for Content Marketing (Research, Publish, Measure)
Most front line content marketing workflow follows the same loop. Find something worth writing about, dig into what’s already ranking on your site, update or write it, run it through SEO checks, shove it into WordPress, then wait to see if anyone reads it. Just six months ago that loop was tedious tab-switching and copy-pasting. … <a title="How to Make Images with Claude and (our) Gemini MCP" class="read-more" href="https://houtini.com/how-to-make-images-with-claude-and-gemini-mcp/" aria-label="Read more about How to Make Images with Claude and (our) Gemini MCP">Read more</a>
How to Set Up LM Studio: Running AI Models on Your Own Hardware
How does anyone end up running their own AI models locally? For me, it started because of a deep interest in GPUs and powerful computers. I’ve got a machine on my network called “hopper” with six NVIDIA GPUs and 256GB of RAM, and I’d been using it for various tasks already, so the idea of … <a title="How to Make Images with Claude and (our) Gemini MCP" class="read-more" href="https://houtini.com/how-to-make-images-with-claude-and-gemini-mcp/" aria-label="Read more about How to Make Images with Claude and (our) Gemini MCP">Read more</a>
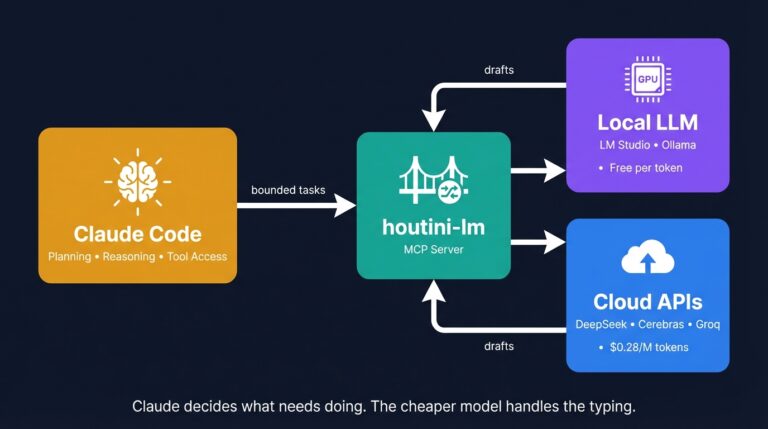
Cut Your Claude Code Token Use by Offloading Work to Cheaper Models with Houtini-LM
I built houtini-lm for people worried that their Anthropic bill might be getting out of hand. I’d leave Claude Code running overnight on big refactors, wake up, and wince at the token count. A huge chunk of that spend was going on tasks any decent coding model handles fine – boilerplate generation, code review, commit … <a title="How to Make Images with Claude and (our) Gemini MCP" class="read-more" href="https://houtini.com/how-to-make-images-with-claude-and-gemini-mcp/" aria-label="Read more about How to Make Images with Claude and (our) Gemini MCP">Read more</a>
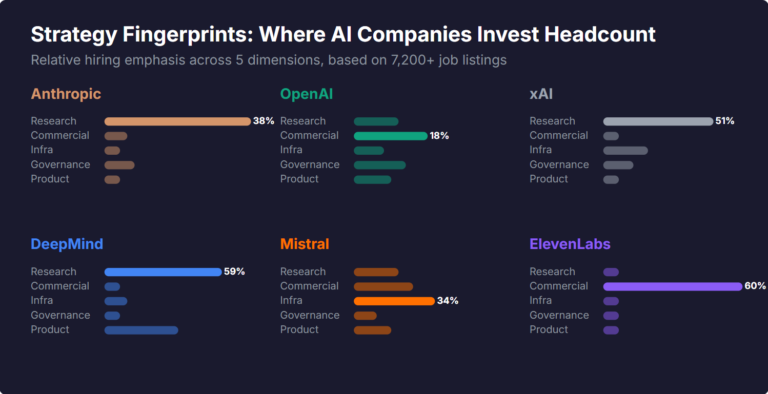
What Skills Are AI Companies Hiring For, and What Do the Jobs Tell Us About Their Strategy?
I pointed YubHub at 7,200+ job listings across the major AI labs and the hiring patterns reveal six completely different strategic bets. Anthropic is all-in on research. OpenAI reads like an enterprise SaaS company. xAI is hiring domain experts to teach Grok finance. Here's what the data shows.