
It’s easy just to freestyle-prompt Claude Code because it’s so great at understanding context, you can bluff your way to a “working” projects and then just walk away. But you’ve got to build a proper Claude repo if you want to easily pick up from where you left off. Today, we’re looking at a proper Claude Code project backbone, inclduing the well known CLAUDE.md file.
The Problem | What’s in .claude/ | CLAUDE.md | Rules | Skills | Agents | Settings | Project vs Global | 5-Step Setup | Mistakes
The Problem with Freestyle Prompting
Most people use Claude Code the way I used to – open the terminal, start typing, hope for the best. That’s fine for throwaway scripts and one-off questions. But the moment you’re building something genuine you’ll come back to tomorrow, in some format, you find yourself re-explaining your entire project every single session. Your architecture, your test runner, why that one folder is generated and shouldn’t be edited, all of it, from scratch, every time. This is less of a problem today than it was a few months ago, never teh less hygiene is a really key component of learning how to make.
Claude Code doesn’t carry anything over from your last conversation by default. It has no idea your project uses TypeScript strict mode, that your tests live in __tests__/ folders, that you’ve got a monorepo where each package needs a different build command. It’ll figure some of this out by reading your code, but that burns context tokens (which aren’t free, and I’ve got the bills to prove it) and sometimes it guesses wrong.
The .claude/ folder and CLAUDE.md file solve this. They’re Claude’s project memory – a set of files that load automatically at the start of every session, giving Claude the rules, permissions, and architectural context it needs without you repeating yourself.
If you’ve used Cursor, you’ll recognise the concept – they’ve got .cursor/rules/, Windsurf has .windsurf/rules/, same general idea. Claude Code’s version goes further than either of those (skills that trigger automatically, subagents with restricted tool access, a proper permissions model) but the underlying principle is identical: you describe your project once and the AI remembers it every session.
What’s in the .claude/ Folder?
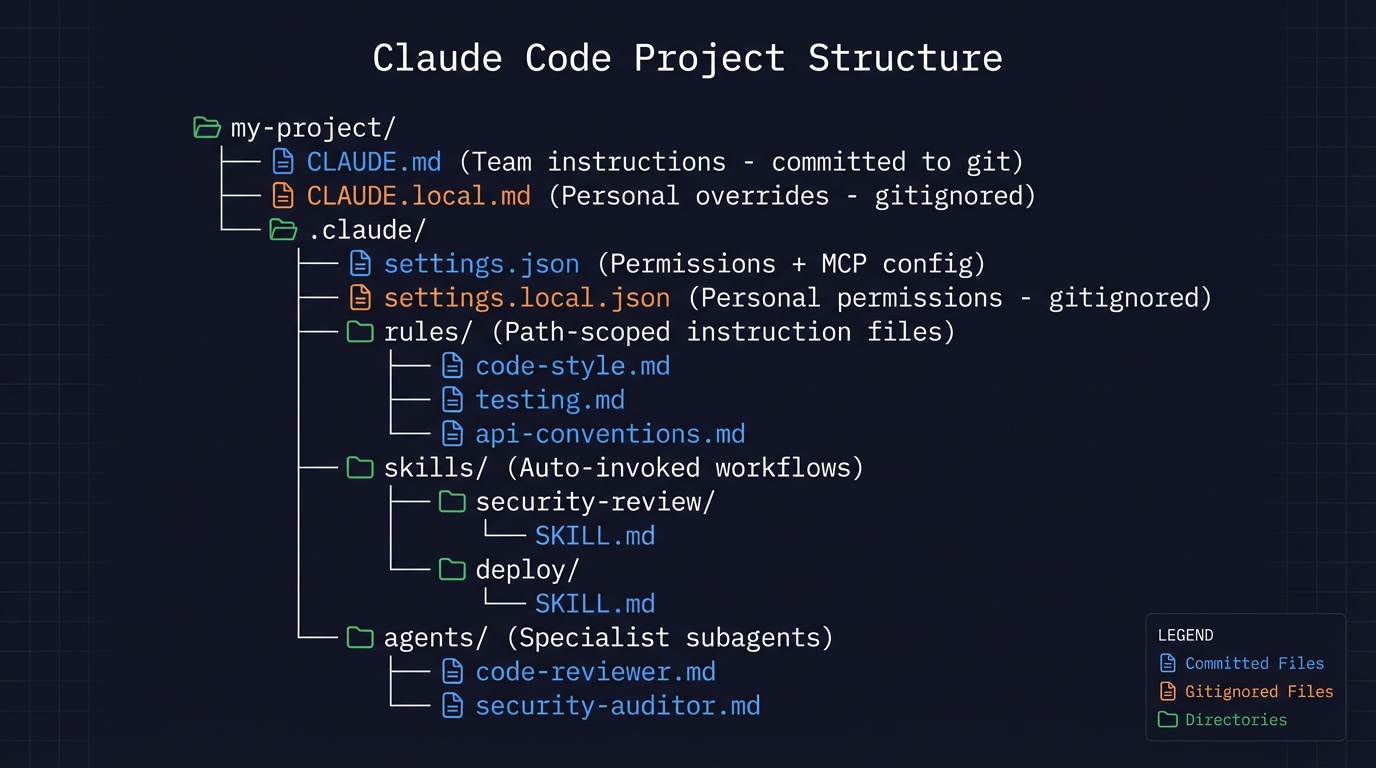
Here’s what a mature Claude Code project looks like (this is roughly what my own repos have evolved into over about six months):
my-project/
├── CLAUDE.md                  # Team instructions (committed to git)
├── CLAUDE.local.md            # Personal overrides (gitignored)
│
└── .claude/
    ├── settings.json          # Permissions + MCP server config
    ├── settings.local.json    # Personal permission overrides (gitignored)
    │
    ├── rules/                 # Modular, path-scoped instruction files
    │   ├── code-style.md
    │   ├── testing.md
    │   └── api-conventions.md
    │
    ├── skills/                # Auto-invoked workflows + slash commands
    │   ├── security-review/
    │   │   └── SKILL.md
    │   └── deploy/
    │       └── SKILL.md
    │
    └── agents/                # Specialised subagent personas
        ├── code-reviewer.md
        └── security-auditor.md
Not every project needs all of this, and mine certainly didn’t start this way. My smaller repos still have just a CLAUDE.md and a settings.json. The bigger ones – like my content production system – grew into the full setup with rules, skills, and custom agents over time.
CLAUDE.md – The Brain File
Everything in the .claude/ folder builds on this one file. Claude reads it when you start a session and keeps it loaded for the entire conversation, so whatever you write in here shapes every response you get back. You tell it to always write tests before implementation, it will. You tell it never to use console.log for error handling, it won’t.
The fastest way to get started is running /init – Claude scans your codebase, reads your package.json, inspects the folder structure, checks for test frameworks, and generates a starter CLAUDE.md. It’s very good at spotting your stack (it correctly identified Vitest in one of my repos where even I’d forgotten I’d switched from Jest).
But treat /init output as a first draft. It can’t guess your business logic or the architectural decisions you made six months ago that aren’t obvious from the code. I always prune the generated file down to maybe half its original length and then add the stuff that actually matters – the conventions, the gotchas, the “don’t touch this folder” warnings.
Here’s roughly what belongs in there:
## Commands
npm run dev          # Start dev server
npm run test         # Run tests (Vitest)
npm run lint         # ESLint check
npm run build        # Production build

## Architecture
- Express REST API, Node 20, TypeScript strict
- PostgreSQL via Prisma ORM
- Handlers in src/handlers/, shared types in src/types/

## Conventions
- Use zod for request validation in every handler
- Return shape is always { data, error }
- Never expose stack traces to the client
- Use the logger module, not console.log

## Watch out for
- Tests use a real local DB, not mocks. Run npm run db:test:reset first
- Strict TypeScript: no unused imports, ever
That’s maybe 20 lines, and it gives Claude everything it needs to work productively in this particular codebase. Notice what’s not in there – no full API docs, no style guide, no database schema. Only the things Claude would potentially get wrong if you didn’t tell it.
The official docs have a good heuristic for this: “For each line, ask: would removing this cause Claude to make mistakes? If not, cut it.” I’d go further than that, actually – keep the whole file under 200 lines. Files longer than that start eating too much context, and Claude’s instruction adherence actually drops (the needle-in-a-haystack problem, which I’ve written about in the context of managing costs).
What NOT to put in CLAUDE.md
Don’t dump your entire documentation in here. I see it constantly – someone creates a 500-line CLAUDE.md with their full API reference, their entire style guide, three paragraphs explaining their database schema. Claude ignores half of it. The important rules get buried under 400 lines of context it didn’t need.
- Linter and formatter config – let your tools handle that via hooks instead
- Full documentation – link to it, don’t inline it
- Information that changes frequently – it’ll go stale
- Things Claude already knows from reading code – standard language conventions, obvious patterns
You can use @ imports to reference other files without inlining them: @docs/git-workflow.md or @README.md. Claude pulls these in on demand without permanently bloating the context.
CLAUDE.local.md – Your Personal Overrides
Sometimes you’ve got preferences that are just yours – not the whole team’s. Maybe your local Postgres runs on port 5433, or you use podman instead of Docker, or you’re halfway through a refactor and want Claude to ignore certain failing tests for now.
That’s what CLAUDE.local.md is for – drop it in your project root and Claude reads it alongside the main CLAUDE.md, but it’s automatically gitignored so your personal tweaks never land in the shared repo.
Rules – For When CLAUDE.md Gets Crowded
Once your project grows and your CLAUDE.md starts pushing past 200 lines, split it. Every markdown file inside .claude/rules/ loads alongside CLAUDE.md automatically.
.claude/rules/
├── code-style.md
├── testing.md
├── api-conventions.md
└── security.md
Each file stays focused on one concern, which also means the person who owns API conventions edits api-conventions.md, the testing lead edits testing.md, and nobody tramples on each other’s rules.
But the real payoff here is path-scoped rules – you add YAML frontmatter and the rule only activates when Claude touches matching files:
---
description: Standards for API route handlers
paths:
  - "src/api/**/*.ts"
  - "src/handlers/**/*.ts"
---
# API Design Rules

- All handlers return { data, error } shape
- Use zod for request body validation
- Never expose internal error details to clients
Claude won’t load this rule when it’s editing a React component – it only fires when working inside src/api/ or src/handlers/, which keeps your context clean and focused. Rules without a paths field load unconditionally every session, so use path scoping wherever it makes sense.
Skills – Reusable Workflows
Skills are workflows that Claude can invoke automatically when the task matches, without you typing a slash command. Each skill lives in its own subdirectory with a SKILL.md:
.claude/skills/
├── security-review/
│   ├── SKILL.md
│   └── DETAILED_GUIDE.md
└── deploy/
    ├── SKILL.md
    └── templates/
        └── release-notes.md
The SKILL.md uses YAML frontmatter to describe when to activate:
---
name: security-review
description: Security audit. Use when reviewing code for vulnerabilities
  or before deployments.
---
Analyse the codebase for security vulnerabilities:

1. SQL injection and XSS risks
2. Exposed credentials or secrets
3. Insecure configurations

Report findings with severity ratings and remediation steps.
Reference @DETAILED_GUIDE.md for our security standards.
When you say “review this PR for security issues,” Claude recognises the match and invokes the skill. Or you can call it explicitly with /security-review if you want to be deliberate about it.
One thing I wish the blog posts mentioned more clearly: commands have been merged into skills. The .claude/commands/ folder still works for backwards compatibility, but skills are where Anthropic is putting the development effort going forward. Skills can bundle supporting files alongside them (like that DETAILED_GUIDE.md reference above), accept $ARGUMENTS, and trigger automatically based on task context – commands were always single files with none of that flexibility. Bottom line: if you’re setting up a new project today, don’t bother with the commands folder at all – go straight to skills.
I use skills heavily in my MCP server development workflow – I’ve got a TDD skill that enforces test-first development, a code review skill, and a deployment checklist. The TDD one alone probably saved me from shipping broken code a dozen times. (I’m the kind of person who writes the implementation first and “plans to add tests later.” The skill doesn’t let me get away with that.)
Agents – Specialist Subagents
For tasks that need focused attention without cluttering your main conversation, define subagent personas in .claude/agents/:
---
name: code-reviewer
description: Reviews code for bugs and maintainability issues
model: sonnet
tools: Read, Grep, Glob
---
You are a senior code reviewer. Focus on:
- Bugs, not style issues
- Specific fixes, not vague improvements
- Edge cases and error handling gaps
The tools field restricts what the agent can do, and you should think carefully about this. A security auditor needs Read, Grep, and Glob – it shouldn’t be able to write files, so don’t give it Write access. The model field lets you pick a cheaper, faster model for focused tasks (Sonnet handles read-only exploration well enough; save Opus for the reasoning-heavy work where you actually need it).
What makes agents worth the setup, though, is that they get their own context window entirely separate from yours. They’ll explore your codebase, read dozens of files, compress everything they find, and hand back a summary – and your main session stays clean because you haven’t burned context on all that intermediate exploration.
settings.json – Permissions
The .claude/settings.json file controls what Claude is and isn’t allowed to do:
{
  "permissions": {
    "allow": [
      "Bash(npm run *)",
      "Bash(git status)",
      "Bash(git diff *)",
      "Read",
      "Write",
      "Edit"
    ],
    "deny": [
      "Bash(rm -rf *)",
      "Bash(curl *)",
      "Read(./.env)",
      "Read(./.env.*)"
    ]
  }
}
Commands in the allow list run without asking. Denied commands are blocked entirely. Everything else triggers a permission prompt.
Without this file, you’ll get what I call “approval fatigue” – Claude asks permission for npm run test forty times a day, and eventually you stop reading the prompts and just click yes on everything. At which point the entire safety model is theatre. I learned this the hard way when I almost let Claude run a destructive database command because I was on autopilot. Set up your allow list on day one, before that habit sets in.
You can also have a settings.local.json for personal permission overrides, same idea as CLAUDE.local.md. Automatically gitignored.
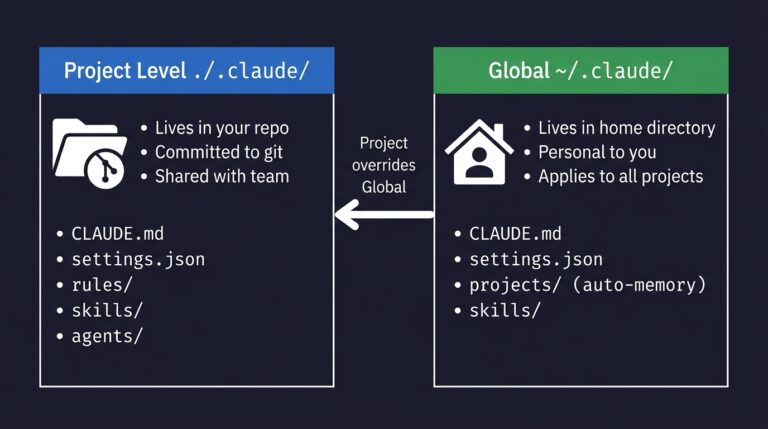
Project vs Global
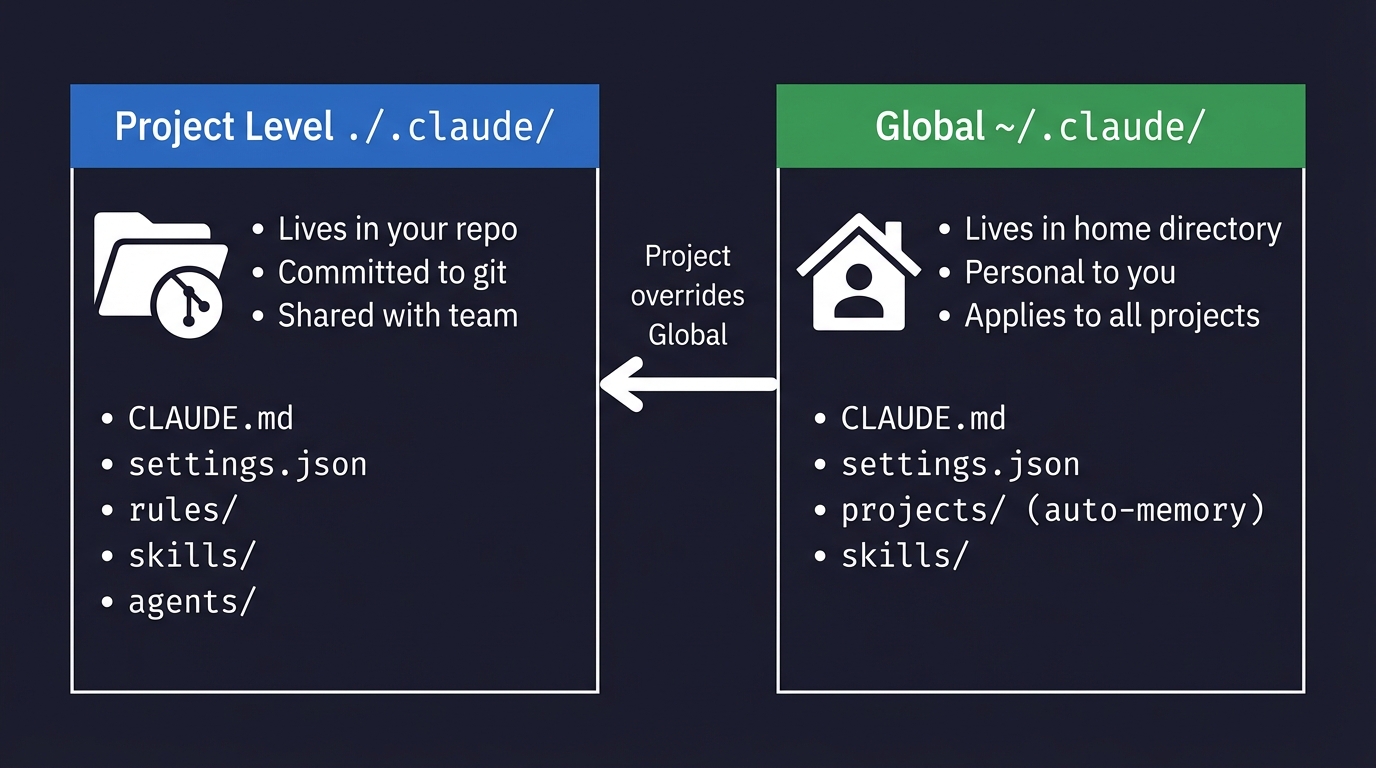
There are actually two .claude directories, which confused me for longer than I’d like to admit:
Project-level (./.claude/) lives in your repo, committed to git, so everyone on the team gets the same rules, skills, and permissions. All your project-specific config goes here.
Global (~/.claude/) lives in your home directory and applies across every project you work on. It stores your personal preferences, session history, auto-memory per project, and any personal skills you’ve built.
Your global ~/.claude/CLAUDE.md loads into every session regardless of which project you’re in – I put things like “I prefer concise answers” and “always use functional patterns” in mine. When there’s a conflict between project and global settings, the project-level file wins, which is what you’d expect.
There’s also an auto-memory system tucked away in ~/.claude/projects/ – Claude saves notes to itself as it works, things like commands it discovers, patterns it notices, architecture insights it picks up. These notes persist across sessions and you can browse them with /memory. I didn’t expect to use these much, but they’ve turned out to be quite useful. Claude remembered that one of my repos had a quirky build step that I’d forgotten about myself.
The Five-Step Setup
If you’re starting from scratch, here’s the progression I use:
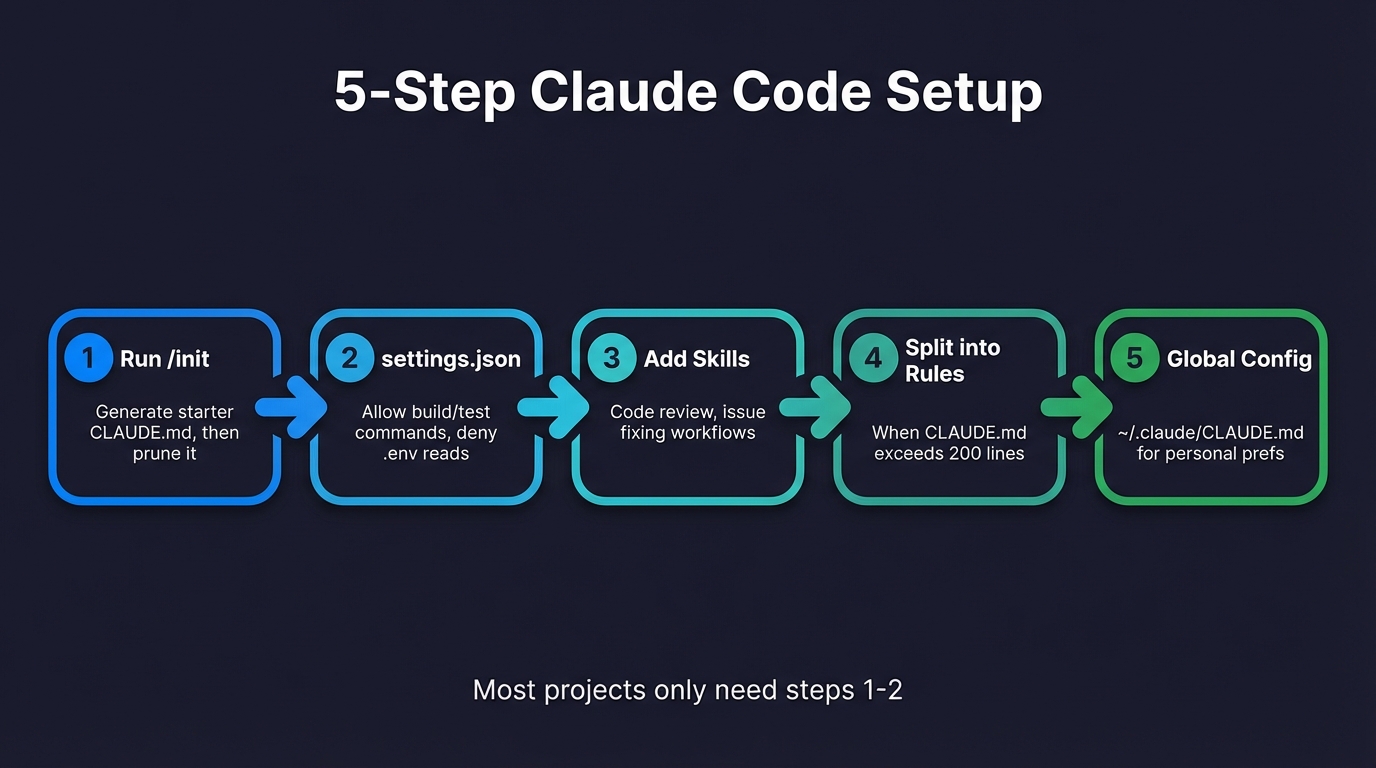
Step 1: Run /init and then immediately edit what it produces. The generated CLAUDE.md is a solid starting point but it’ll be too long and too generic. Prune it down, add your team’s conventions and the gotchas that aren’t obvious from the code.
Step 2: Create .claude/settings.json with your allow and deny lists. At minimum, allow your build and test commands and deny .env reads. This eliminates the approval fatigue problem from day one (I cannot overstate how much better the workflow gets once you’re not clicking “allow” every thirty seconds).
Step 3: Build one or two skills for the workflows you repeat most often. Code review and issue fixing are good first choices – put them in .claude/skills/ with a SKILL.md that describes when they should activate.
Step 4: Split CLAUDE.md into rules/ once it gets crowded. When you’re past 200 lines (and you will be, eventually), break instructions into .claude/rules/ files and scope them by path where it makes sense.
Step 5: Set up ~/.claude/CLAUDE.md for your personal cross-project preferences. Things like “I prefer TypeScript strict mode” or “always use British English in comments” – the stuff you want in every project regardless of the team.
That’s all you need for 95% of projects. Agents and hooks come later, when you’ve got recurring complex workflows that justify the setup cost. I didn’t add my first custom agent until about four months into using Claude Code daily, and I wished I’d done it sooner.
If you take one thing from this article, let it be this: get your CLAUDE.md right before you touch anything else. I spent months without one and the difference once I added it was immediate – fewer mistakes, less repetition, less of me typing the same instructions into every session. Rules, skills, agents, hooks – all of that builds on the foundation of a good CLAUDE.md. Keep it under 200 lines, keep it honest, and update it when your project changes.
Related Posts
How to Set Up a Claude Code Project (And What Goes Where)
The .claude folder is the control centre for how Claude Code behaves in your project. Here's what goes in it, what each file does, and the step-by-step setup I use for every new project.
Swapping the Engine: How to Run Claude Code on Local Silicon for Zero Pennies
Claude Code’s real power isn’t the Anthropic model sitting behind it, it’s the agentic : the file-system access, the tool use, the way it chains tasks together without you babysitting every step. I figured this out the expensive way. I ran a batch of log-parsing scripts through the API for a client project last month … <a title="How to Make SVGs with Claude and Gemini MCP" class="read-more" href="https://houtini.com/how-to-make-svgs-with-claude-and-gemini-mcp/" aria-label="Read more about How to Make SVGs with Claude and Gemini MCP">Read more</a>
Claude Desktop System Requirements: Windows & macOS
Have you found yourself becoming a heavy AI user? For Claude Desktop, what hardware matters, what doesn’t, and where do Anthropic’s official specs look a bit optimistic? In this article: Official Requirements | Windows vs macOS | What Actually Matters | RAM | MCP Servers | Minimum vs Comfortable | Mistakes Official Requirements Anthropic doesn’t … <a title="How to Make SVGs with Claude and Gemini MCP" class="read-more" href="https://houtini.com/how-to-make-svgs-with-claude-and-gemini-mcp/" aria-label="Read more about How to Make SVGs with Claude and Gemini MCP">Read more</a>
Best GPUs for Running Local LLMs: Buyer’s Guide 2026
I’ve been running various LLMs on my own hardware for a while now and, without fail, the question I see asked the most (especially on Reddit) is “what GPU should I buy?” The rules for buying a GPU for AI are nothing like the rules for buying one for gaming – CUDA cores barely matter, … <a title="How to Make SVGs with Claude and Gemini MCP" class="read-more" href="https://houtini.com/how-to-make-svgs-with-claude-and-gemini-mcp/" aria-label="Read more about How to Make SVGs with Claude and Gemini MCP">Read more</a>

A Beginner’s Guide to Claude Computer Use
I’ve been letting Claude control my mouse and keyboard on and off to test this feature for a little while, and the honest answer is that it’s simultaneously the most impressive and most frustrating AI feature I’ve used. It can navigate software it’s never seen before just by looking at the screen – but it … <a title="How to Make SVGs with Claude and Gemini MCP" class="read-more" href="https://houtini.com/how-to-make-svgs-with-claude-and-gemini-mcp/" aria-label="Read more about How to Make SVGs with Claude and Gemini MCP">Read more</a>

A Beginner’s Guide to AI Mini PCs – Do You Need a DGX Spark?
I’ve been running a local LLM on a variety of bootstrapped bit of hardward, water-cooled 3090’s and an LLM server I call hopper full of older Ada spec GPUs. When NVIDIA, Corsair, et al. all started shipping these tiny purpose-built AI boxes – the DGX Spark, the AI Workstation 300, the Framework Desktop – I … <a title="How to Make SVGs with Claude and Gemini MCP" class="read-more" href="https://houtini.com/how-to-make-svgs-with-claude-and-gemini-mcp/" aria-label="Read more about How to Make SVGs with Claude and Gemini MCP">Read more</a>