I’ve got a client over in Australia who are *just* warming up after a lengthy Christmas break. It’s an SAP B1 integration with Shopify and Onetimpim – many moving parts!
My client emailed this morning asking for a catch-up meeting and mentioned he was working through his emails to get a sense of where each project item was. I offered to make him a summary of all email transactions over December, with any project blocking issues recorded as a priority and an issues list.
This is a really good example of using AI at work; it’s easy to learn, powerful to use and (as anyone with an email inbox will attest) saves a lot of time.
In today’s article
I realise that some of my articles might be a bit of a steep learning curve for those new to using AI tools at work. Sorry if that’s put you off! My New Year’s mission: create beginner-friendly guides to getting started with AI tools with practical, real-world use cases. This is the first of a series of articles on using AI at work (or for work). Today, you’ll learn:
- How to set up the Gmail MCP server so that your Claude Desktop installation can read email
- We’ll work through the OAuth authentication bit with Google Cloud Console (the tricky bit, but once it done, it’s done)
- I’ll share an email analysis workflow
- Query patterns in prompts that work
- Why this is better than expecting people to jump straight into “building AI agents” and the more advanced stuff.
What you’ll need: Claude Desktop installed (free tier works), Node.js/npm on your system, a Gmail account, basic command line comfort. No coding required.
Get practical AI tools and workflows delivered weekly.
No spam. Unsubscribe anytime.
The Learning Curve
Most people approach AI tools backwards. They read about autonomous agents, multi-step workflows, amazing new saas launches that can pick an outfit for you – whatever. You soon get overwhelmed and quit because you’re busy doing your job. Fair enough. The gap between “ChatGPT can write emails” and “I built a custom agent that monitors my inbox and auto-responds” is enormous. As an aside: I don’t recommend ChatGPT for anything. It’s rubbish.
The smart path for the time poor: Start with something simple that solves a real problem immediately. Email analysis hits that spot. You already have the data (your Gmail), the task is fairly concrete (“summarise this thread”), and success is obvious (a useful summary in minutes, not hours).
My client’s request was perfect for this. I needed to summarise client emails covering four distinct workflows before our strategy meeting. Manually reading through threads and taking notes seemed like a missed opportunity to share.
What’s Gmail MCP?
OK – MCP servers. As soon as you wrap your head around what an MCP server is, you’ll never look back. Think of MCP (Model Context Protocol) as a universal adapter for AI tools. That’s what it is! Claude (or any AI assistant) can’t directly access your Gmail. It needs a translator – something that understands “search my emails from last week” and converts that into Gmail API calls, then formats the results back to Claude.
That’s the MCP server. It’s running on your machine, has permission to access your Gmail (via an authentication method called OAuth), and acts as the bridge between Claude Desktop and Google’s servers. Security-wise, it’s solid: tokens stored locally, you control what permissions are granted, and it’s open source so you can audit the code if you’re paranoid (I am, I did).
GongRzhe’s @gongrzhe/server-gmail-mcp package does the heavy lifting here. It’s on npm (a package repository for open source software), handles OAuth properly, and provides all the Gmail operations you’ll need – search, read threads, send emails, and manage labels.
Let’s Get Set Up!
Step 1: Google Cloud Console OAuth
This is where everyone stumbles. You need to create OAuth credentials, and the credential type matters. Not the scopes, not the permissions – the type.
What you need to do:
1) Go to Google Cloud Console
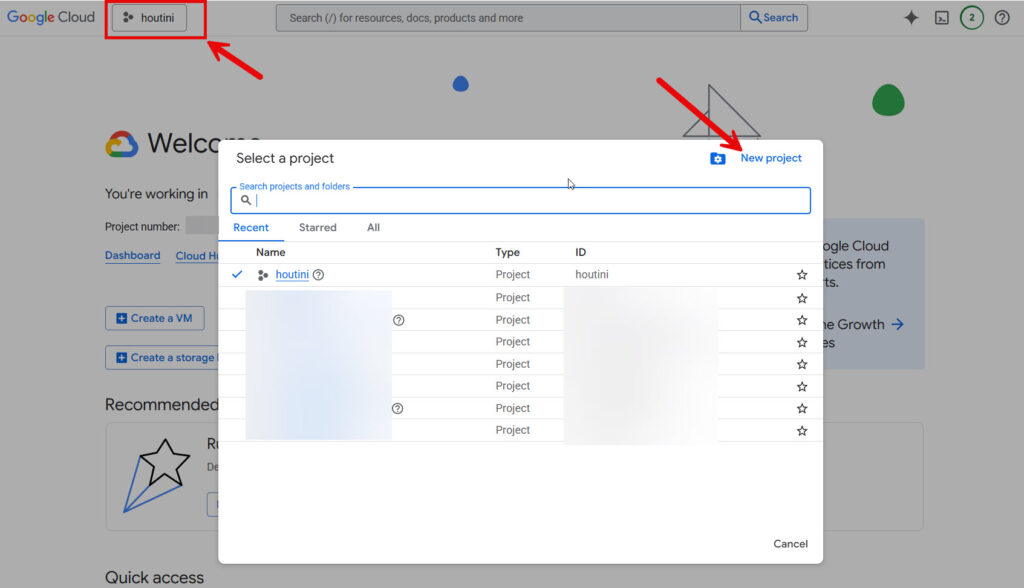
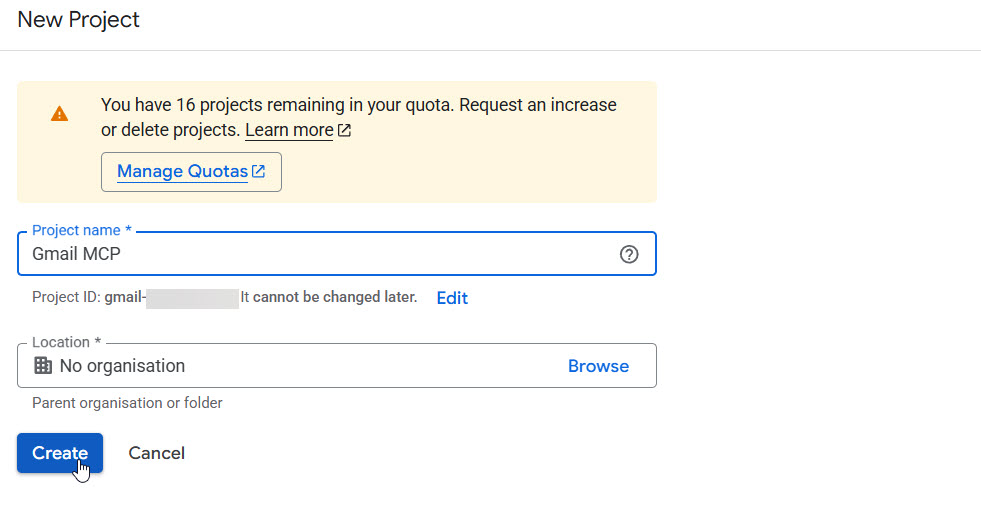
2) Create a new project (name it whatever – “Gmail MCP” works)
When the project has been created, make sure you’re actually in the project:
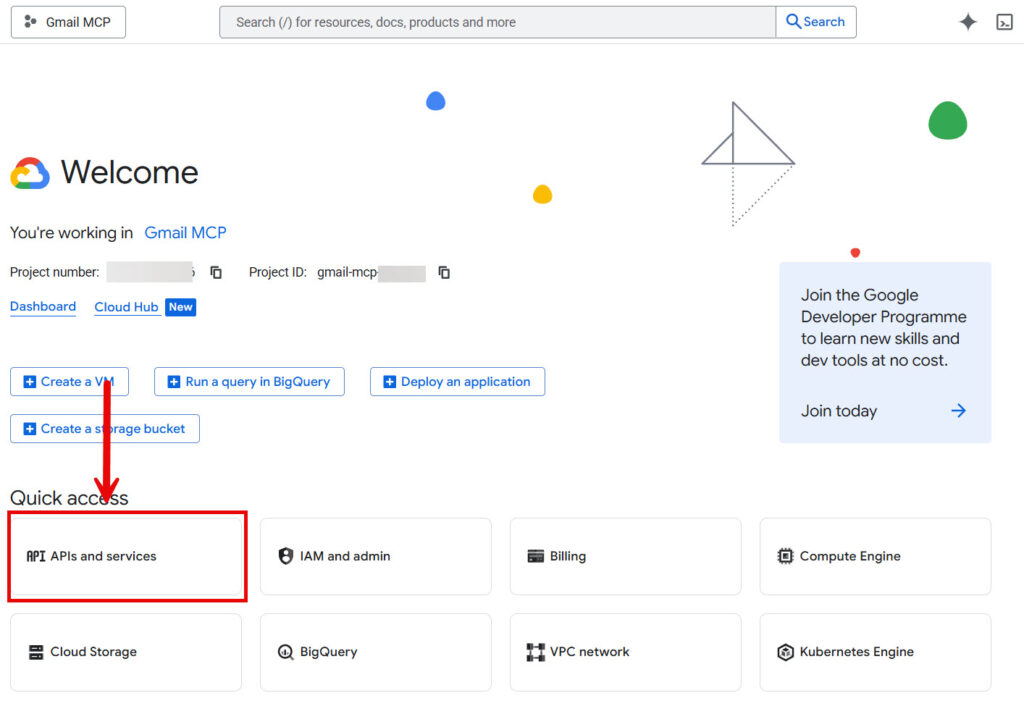
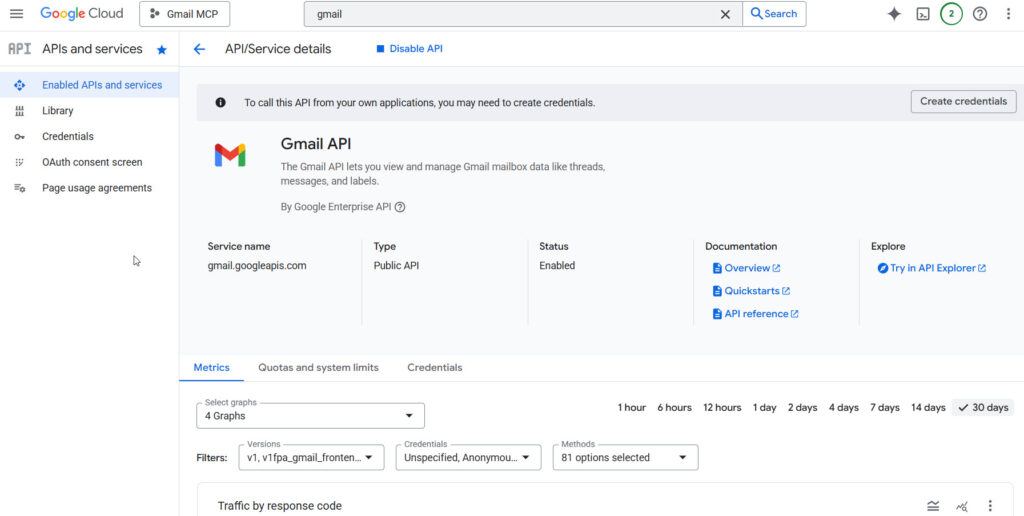
Use the quick access links from the project homepage, click APIs and services, and search for “Gmail API”
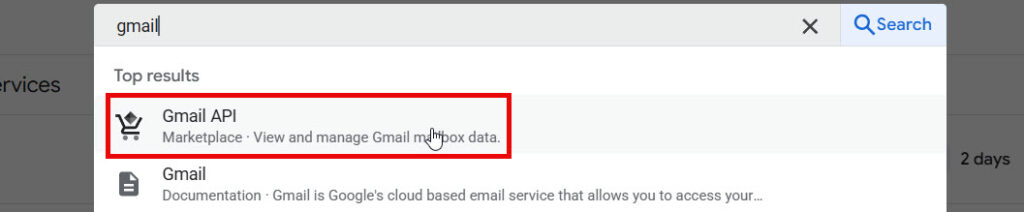
By clicking “Enable”, the Gmail API will be enabled, and it’ll take you to the Gmail API service:
Click “OAuth consent screen” and follow these steps:
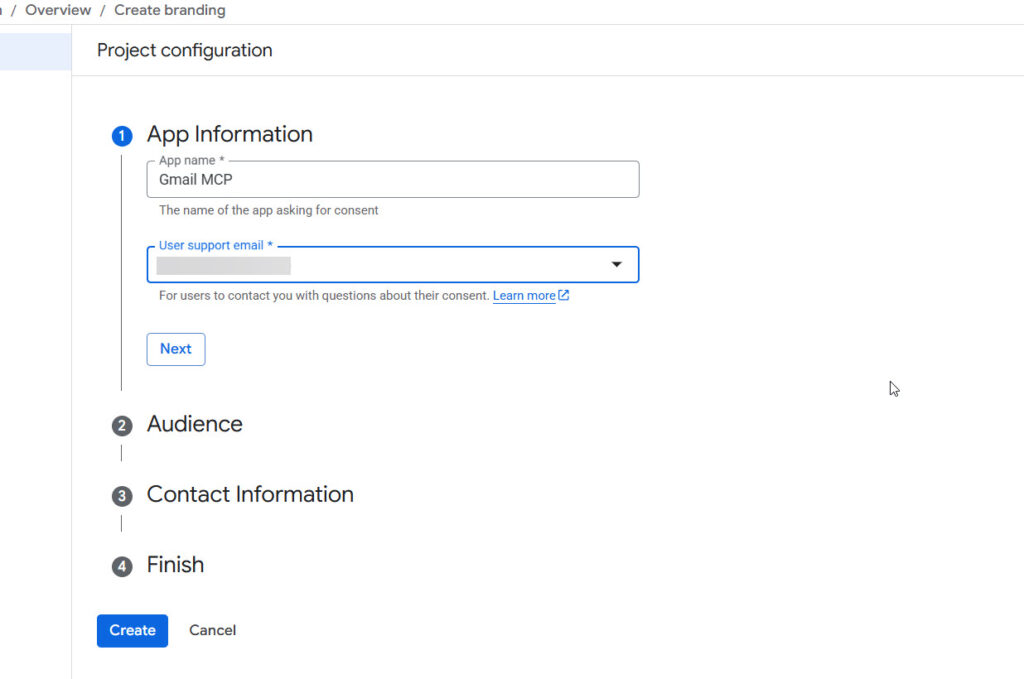
Audience: Choose “External” user type. Fill in your app name, support email, and developer email
Add YOUR email to “Test users” (critical – you can’t authenticate without this)
Save, and continue through the steps.
Create credentials (THE IMPORTANT BIT):
APIs & Services > Credentials > Create Credentials > OAuth client ID
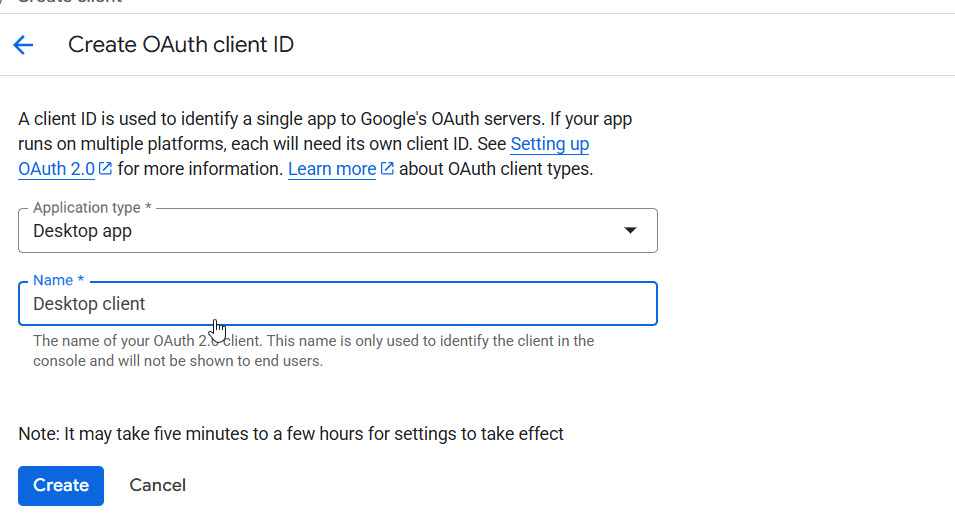
Application type: Desktop app (not Web application – this tripped me up initially)
Name it something obvious: “Gmail MCP Client”
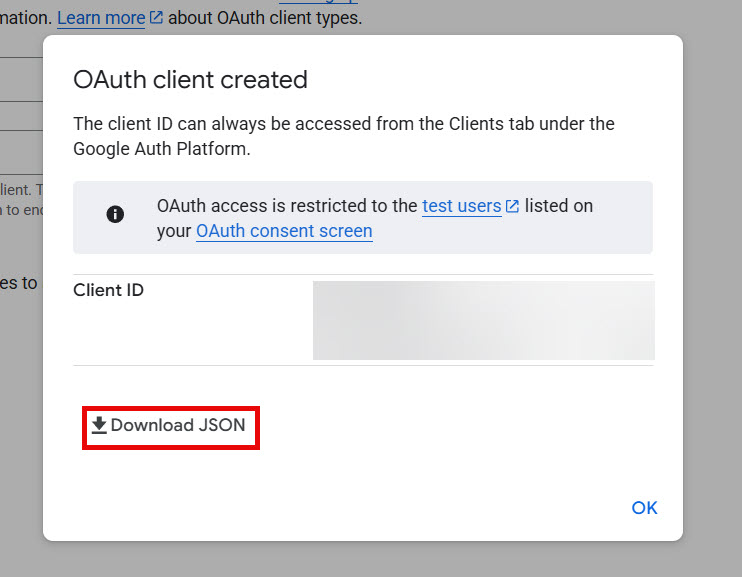
Then, download the JSON file – head to wherever you saved it, and name the downloaded file gcp-oauth.keys.json
Technical bit – why Desktop app matters: The redirect URIs are different. Web apps expect http://localhost:3000/callback, Desktop apps use http://localhost or platform-specific handlers. The MCP server expects Desktop app credentials. If you use Web app credentials, you’ll hit redirect_uri_mismatch errors during authentication.
Step 2: Install Node.js
Node.js is really a clever application that allows your computer to run JavaScript outside of a web browser. It’s called a runtime environment – the engine you need to run JS applications in Windows. Install it from here: https://nodejs.org/en/download
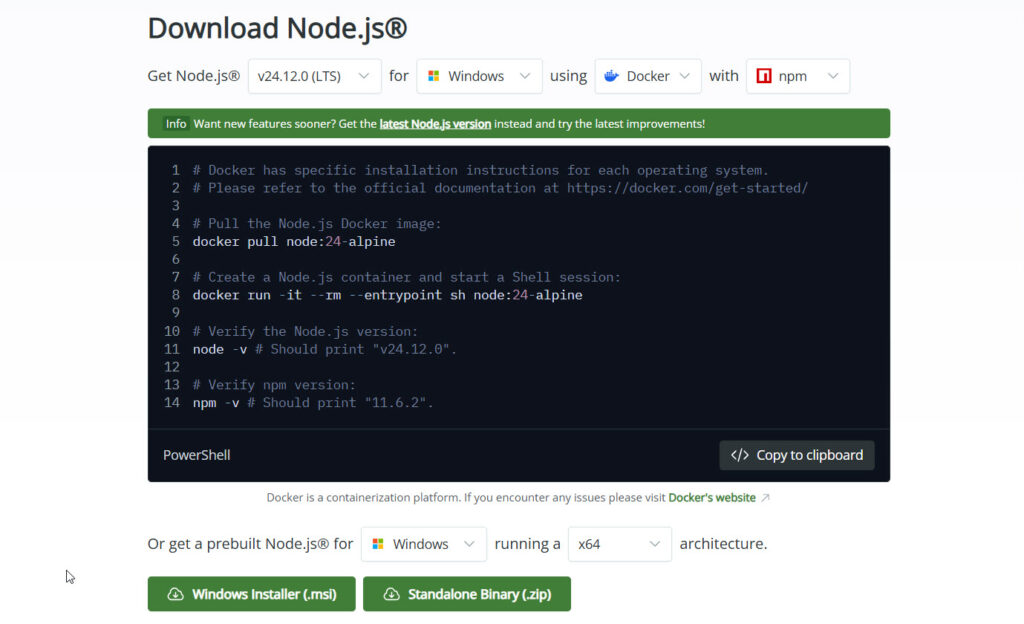
When you have node.js installed, you have added support for npx – Node Package eXecute allows you to run an NPM package on your PC.
When you’ve downloaded and installed Node, you can check it is installed by typing node -v into command:
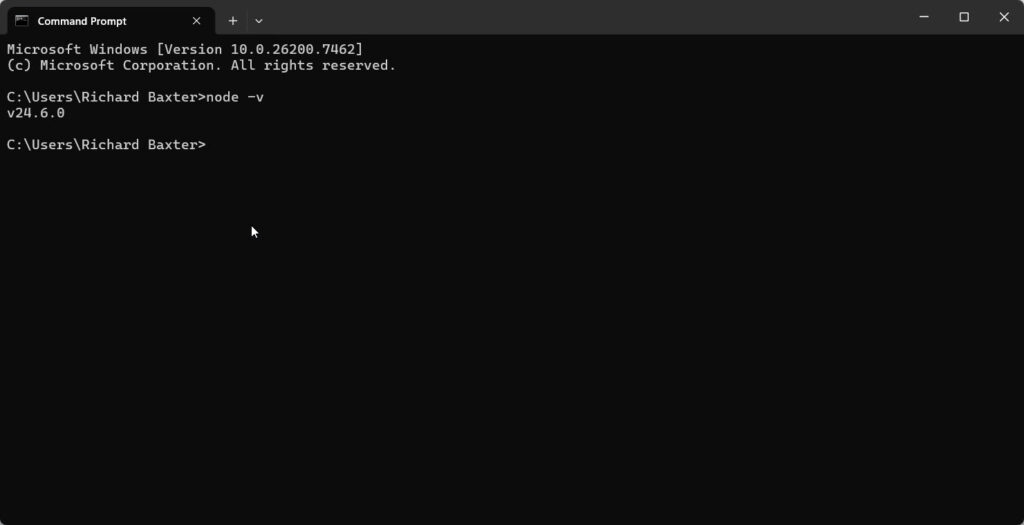
When you have node ready, you can authorise Gmail then setup Claude Desktop with an MCP server!
Step 3: Place Your Credentials
Put gcp-oauth.keys.json somewhere sensible. The server looks for it in:
- Current directory (where you run the command)
~/.gmail-mcp/on macOS/Linux%USERPROFILE%\.gmail-mcp\on Windows
I keep mine in ~/.gmail-mcp/ because that’s where authentication tokens get stored anyway.
Step 4: Add the Gmail MCP Server
Claude offers easy access to it’s claude_config.json file, by navigating File > Settings > Developer
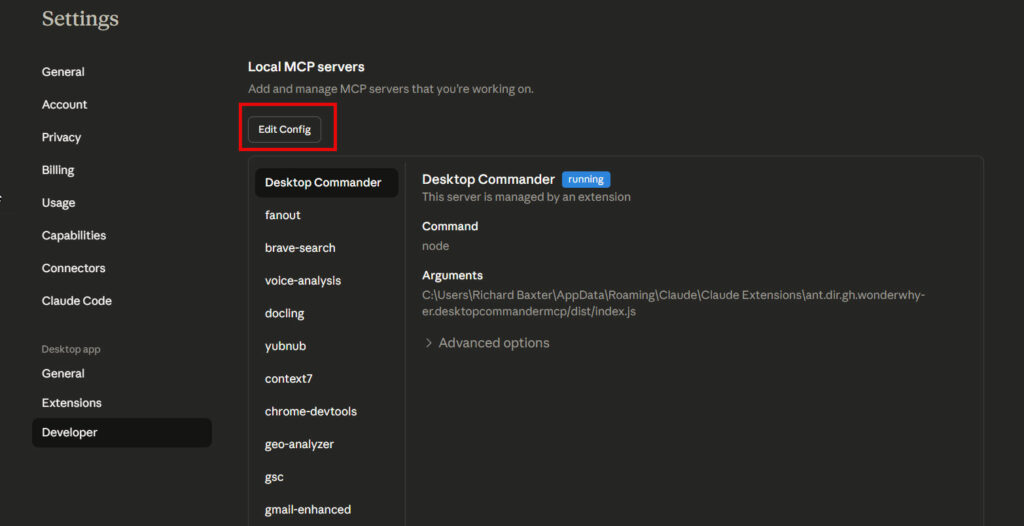
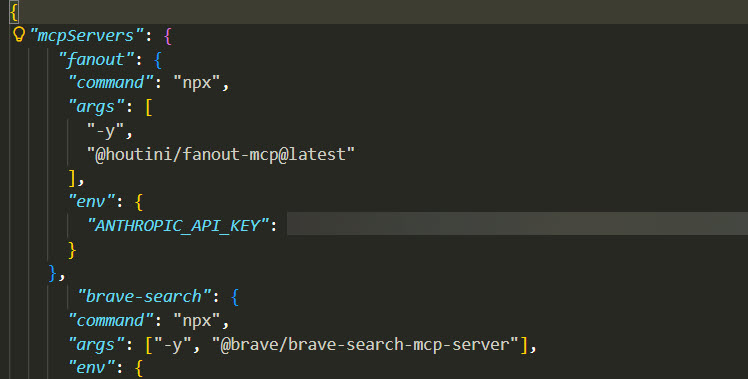
Clicking edit config will open the location of your claude_config.json file. Yours will have the mcpservers wrapper but no mcp servers are likely to be setup. Open: claude_desktop_config.json:

You can open this file with notepad or your text editor of choice, mine looks like this:
For macOS:
~/Library/Application Support/Claude/claude_desktop_config.json
You are going to paste this code straight into claude_desktop_config.json:
Windows:
%APPDATA%\Claude\claude_desktop_config.jsonAdd this to the config (creating the directory path and moving the auth file if it doesn’t exist):
{
  "mcpServers": {
    "gmail": {
      "command": "npx",
      "args": [
        "-y",
        "@gongrzhe/server-gmail-mcp"
      ],
      "env": {
        "CREDENTIALS_PATH": "/path/to/your/gcp-oauth.keys.json"
      }
    }
  }
}
Replace /path/to/your/gcp-oauth.keys.json with the actual path. On Windows, use backslashes: C:\\Users\\YourName\\.gmail-mcp\\gcp-oauth.keys.json.
Step 5: Authenticate
Restart Claude Desktop. The MCP server starts automatically when Claude launches.
The first time the Gmail MCP server runs, it’ll open your browser for OAuth authentication. You’ll see Google’s permission screen asking you to grant access to:
- Read emails
- Send emails
- Manage labels
- Etc.
Click “Allow” and close the browser. Authentication tokens are now stored in ~/.gmail-mcp/ (or Windows equivalent). You won’t need to authenticate again unless you revoke access or the tokens expire.
Hopefully that worked for you – drop me a line if you’re stuck.
First Analysis: The Email Summary
Right, on with the story. Here’s the prompt I used for my meeting prep:
Use the Gmail mcp to write sam, my client, a summary of all emails sent to and from the client.com.au hostname? he's just back from christmas and we need an actions list of recent conversations that require actions.

My email address is xxxxx

The goal: what needs doing so that we can get the new website live? For example, there was a thread about missing brand names in type/tag in our product PIM to XXX

To limit context waste: Check Emails sent only to: sam@client.com.au and dave@client.com.au between the 10th and 24th December 2025

Important: reading through full email chains will kill your context window. Use methods or settings you can use in the gmail mcp to manage this.

Date range: (2025/12/10 to 2025/12/24)

Example search format: label:inbox-client from:(me) to:(sam@client.com.au,dave@client.com.au) after:2025/12/10 before:2025/12/24 I'd prefer to check emails sent to sam OR dave rather than emails to both of them.

Keep your search targeted, a broader search will kill your context. All the emails are in  label:inbox-client
You’ll note I helped Claude with the Gmail advanced search syntax becuase, this was quite a big job, and I wanted to keep focused on this single task.
What Claude did (via Gmail MCP):
- Searched Gmail for
from:sam@client.com.au after:2025/12/01 - Reviewed full thread content
- Identified which emails related to which workstream
- Extracted decisions, questions, and action items
- Formatted it as a structured summary
I can;t show you the output without rewriting what it actually said. But it was good, and, becuase I have Desktop Commander Claude saved teh summary for me in my documents folder.
Time saved? Definitely (largely because I already had the MCP installed. Summarising all of those notes would have taken me ages. This process took a few attempts at the right prompt, followed by the results, which just needed a copy paste into the email and a bit of formatting. And, I might add – it was good. I’m prepped for tomorrow’s meeting. Writing an article about this whole thing has taken me way longer than the actual task, but there you go.
Be Query Efficient
Specific time frames really matter:
“Emails from last month” is vague. “Emails from sam@client.com.au after:2025/12/01” is precise. The Gmail search syntax is powerful so use it. from:, to:, subject:, has:attachment, date filters (after:, before:) all work, and you can grab that syntax just by doing an advanced search in Gmail.
Clear organisation structure in the query:
My query explicitly asked for organisation by content pillar. If I’d just said “summarise these emails,” Claude would’ve given me chronological summaries. Not useful for meeting prep.
“Create actionable summary” is magic phrasing:
It triggers task-oriented formatting. Claude separates decisions from questions, highlights unresolved items, formats as checkboxes. Compare that to “summarise” which just gives you paragraphs of text. Quite the insight that.
Common Mistakes to Avoid
1. Wrong OAuth credential type
Use Desktop app, not Web application. The redirect URIs are different and you’ll waste time debugging authentication failures.
2. Gmail API not enabled
You can create credentials all day, but if the Gmail API isn’t enabled in your Google Cloud project, nothing works. Check the “APIs & Services > Library” section.
3. Credentials file path issues
Windows path separators matter. Use C:\\Users\\... not C:/Users/... in your Claude Desktop config. On macOS/Linux, ~/.gmail-mcp/gcp-oauth.keys.json works fine.
4. Expecting Claude to “just know” your email structure
Claude needs explicit instructions. “Summarise my emails” produces generic output. “Summarise emails from [sender] covering [topics], organised by [structure]” produces usable output.
5. Starting too complex
Don’t build a multi-step automation on day one. Master simple email summaries first. The progression is: summaries → invoice tracking > regular reports > eventually automation. Walking before running (fair enough).
The cool thing about learning to prompt and using MCPs is that you can stop Claude, edit the prompt and try again. None of this is a one-size-fits-all type of task – as workers, we all have our individual preferences and you can absolutely learn on the fly by trying different prompt variations to interpret the outcome.
Links & References
- Gmail MCP Server GitHub: GongRzhe/Gmail-MCP-Server
- npm package:
@gongrzhe/server-gmail-mcp - Claude Desktop: Download from Anthropic
- Google Cloud Console: console.cloud.google.com
- Gmail API Documentation: developers.google.com/gmail/api
- MCP Protocol Docs: modelcontextprotocol.io
So, back to learning AI for work. Start with your email. Master that. Then expand. If you’re not sure here’s a beginner’s guide to Claude Desktop: How to Add an MCP Server to Claude Desktop. If you want a simpler MCP (from an installation standpoint) I can’t recommend Desktop Commander enough – it gives Claude the ability to create and save files – it’s properly battle tested, and I’ve never had a problem with it. Especially combined with GitHub – but that’s for another article. Enjoy!

I’m a Marketing Technologist working with clients on automation, API design, content marketing workflow and data augmentation / retrieval. Here for people with interesting problems to solve.